
There’s just something magical about pulling a loaf of bakery-style bread, steaming hot and utterly glossy, out of your own oven, right? But when that bread delivers incredible, deep chocolate flavor and that signature soft, swirled texture? That’s true kitchen alchemy. I’m Juliana, and after years studying food science and developing recipes professionally, I can tell you that achieving the perfect Homemade Chocolate Babka Recipe isn’t luck—it’s precision. Forget dry, stiff store-bought versions; this Ultimate Homemade Soft Chocolate Babka Recipe makes the process feel incredibly manageable, giving you a truly decadent chocolate brioche that smells like paradise.
- Why This Homemade Chocolate Babka Recipe Works (The Science of Softness)
- Gathering Ingredients for Your Decadent Chocolate Babka
- Step By Step Chocolate Babka: Mastering the Enriched Dough
- Creating the Perfect Chocolate Swirl Loaf Recipe Layers
- Baking the Best Chocolate Babka Bread
- The Essential Babka with Syrup Glaze Finish
- Tips for Success with Your Weekend Baking Project
- Storage & Reheating Instructions for Moist Chocolate Sweet Bread
- Frequently Asked Questions About Chocolate Babka
- Share Your Alchemy Chef Chocolate Babka Creation
Why This Homemade Chocolate Babka Recipe Works (The Science of Softness)
So many people are intimidated by babka, thinking it requires intense skill, but trust me, the magic here is actually very straightforward! My background in food science really helps simplify the technique so you get that famous bakery result without the headache. You absolutely can make this rich, soft swirled chocolate bread right here in your home kitchen.
Here’s why this recipe beats anything you grab off the shelf:
- The enriched dough is essentially a basic brioche—butter and eggs make it incredibly soft.
- We use a simple rolling and twisting method—much easier than complex braiding!
- The final step? A glorious syrup glaze that locks in moisture so your bread stays fresh forever.
- You’ll get those beautiful, distinct layers and a glossy finish that just screams ‘bakery!’
Gathering Ingredients for Your Decadent Chocolate Babka
Before we dive into making dough magic, let’s talk ingredients. Getting these few components right is where the ‘alchemy’ really starts! Because this is an enriched brioche-style dough, we need things nice and temperate so everything emulsifies beautifully. Precision here just guarantees that gorgeous, soft texture we are aiming for. I pulled all these specific measurements from the massive testing I did to create this reliable Homemade Chocolate Babka Recipe!
For the Fluffy Babka Dough Recipe
This is the base for our super soft bread. Remember, it’s enriched, so it needs a little patience while mixing!
- 1 cup whole milk, warmed just right—think warm bath water, around 105°F to 115°F, not hot!
- 2 1/4 teaspoons active dry yeast
- 1/2 cup granulated sugar
- 3 large eggs, brought up to room temperature—this makes them mix in smoother!
- 1 teaspoon vanilla extract
- 4 cups all-purpose flour, plus a little extra if things get sticky
- 1 teaspoon salt
- 1/2 cup (one whole stick!) unsalted butter, softened nicely and cut into smaller chunks
For the Rich Chocolate Filling Bread Spread
This filling is what creates those incredible dark ribbons. The butter must be softened but not melted; that’s key for a perfect spread later.
- 1 cup (two full sticks!) unsalted butter, softened completely
- 1 cup packed light brown sugar—the molasses gives such depth!
- 3/4 cup unsweetened cocoa powder
- 1 teaspoon instant espresso powder (Optional, but wow, it wakes up the chocolate!)
- 1 cup bittersweet chocolate, cut into tiny pieces—the smaller the chop, the easier it spreads!
For the Babka with Syrup Glaze
Don’t skip this step! The syrup is the absolute secret weapon to keeping this bread moist for days. It pours right over the hot loaf.
- 1/2 cup granulated sugar
- 1/2 cup water
- 1 teaspoon vanilla extract
Step By Step Chocolate Babka: Mastering the Enriched Dough
Alright, ready to get your hands gloriously messy? Since this is a brioche-style dough—meaning, it’s rich with fat and eggs—the order we add things matters a ton! If you dump the butter in too soon, it just coats the flour and stops gluten development. That’s why we follow this precise sequence to get that beautiful structure. This is the foundational part of getting that perfect chocolate babka.
Activating Yeast and Mixing the Fluffy Babka Dough Recipe
First things first: proof your yeast! Combine that warm milk—remember, about 110°F—with the yeast and just a little pinch of sugar. Give it five minutes to wake up and get foamy. If it doesn’t foam, your milk was too hot or too cold, and we need to start that part over, sadly! Once it’s bubbly, toss it into your mixer bowl with the flour, the rest of the sugar, and the salt. Mix it on low just until you see a messy, shaggy dough forming. It won’t look pretty yet!
Kneading and First Rise for the Chocolate Babka Dough
Now comes the butter incorporation, which takes patience. Add that softened butter piece by piece while the mixer is running on low. You have to wait until the first chunk is fully absorbed before adding the next one! Once all the butter is in, crank the speed up to medium-low and let it knead for a solid 8 to 10 minutes. You’re looking for dough that’s pulled away from the sides and feels super elastic—that means strong gluten structure! Pop it in an oiled bowl, cover it, and let it rise for about 1.5 to 2 hours until it’s seriously doubled. Pro baker secret? If you have time, stick that beautiful dough in the fridge overnight before rolling it out; chilled dough is much, much easier to manage.
Creating the Perfect Chocolate Swirl Loaf Recipe Layers
Okay, this is where everything comes together visually! We need to prepare that luscious filling and then get super focused on the rolling and twisting to guarantee those gorgeous, distinct chocolate layers that make a chocolate babka famous. This shaping technique is what separates a regular chocolate loaf from a show-stopping bakery wonder; don’t get nervous though, it’s easier than it looks!
Preparing the Rich Chocolate Filling Bread
Grab that mixture for the Rich Chocolate Filling Bread. You want your softened butter beaten up until it’s perfectly smooth, and then mix in the brown sugar, cocoa powder, and that optional espresso powder—it truly deepens that chocolate flavor! Once it’s creamy, stir in your finely chopped chocolate pieces. Here’s my big tip for getting those clean swirls: make sure your chopped chocolate pieces are *cold*. Seriously! If the chocolate stays in distinct chunks rather than melting into the butter, you get phenomenal, separated dark layers when you bake it.
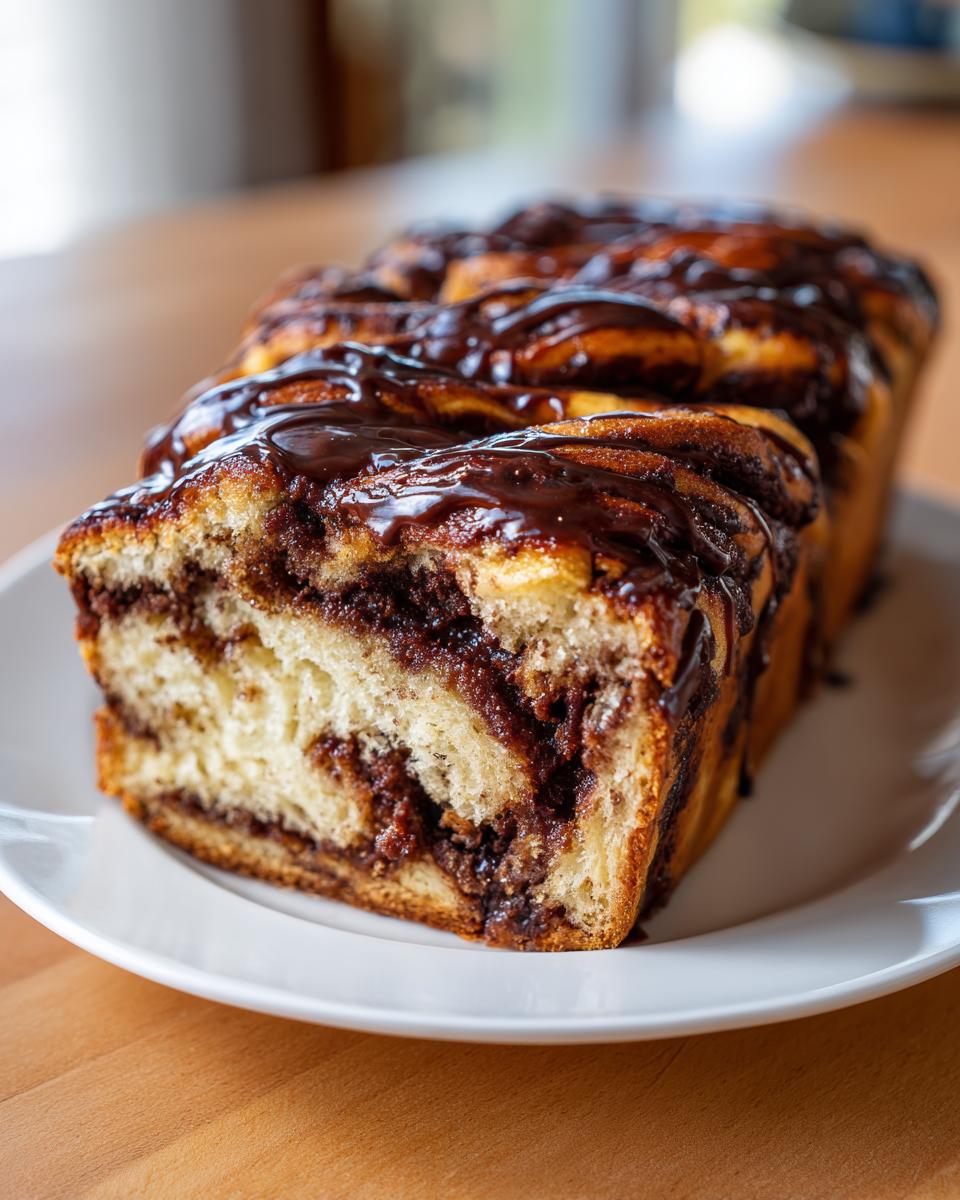
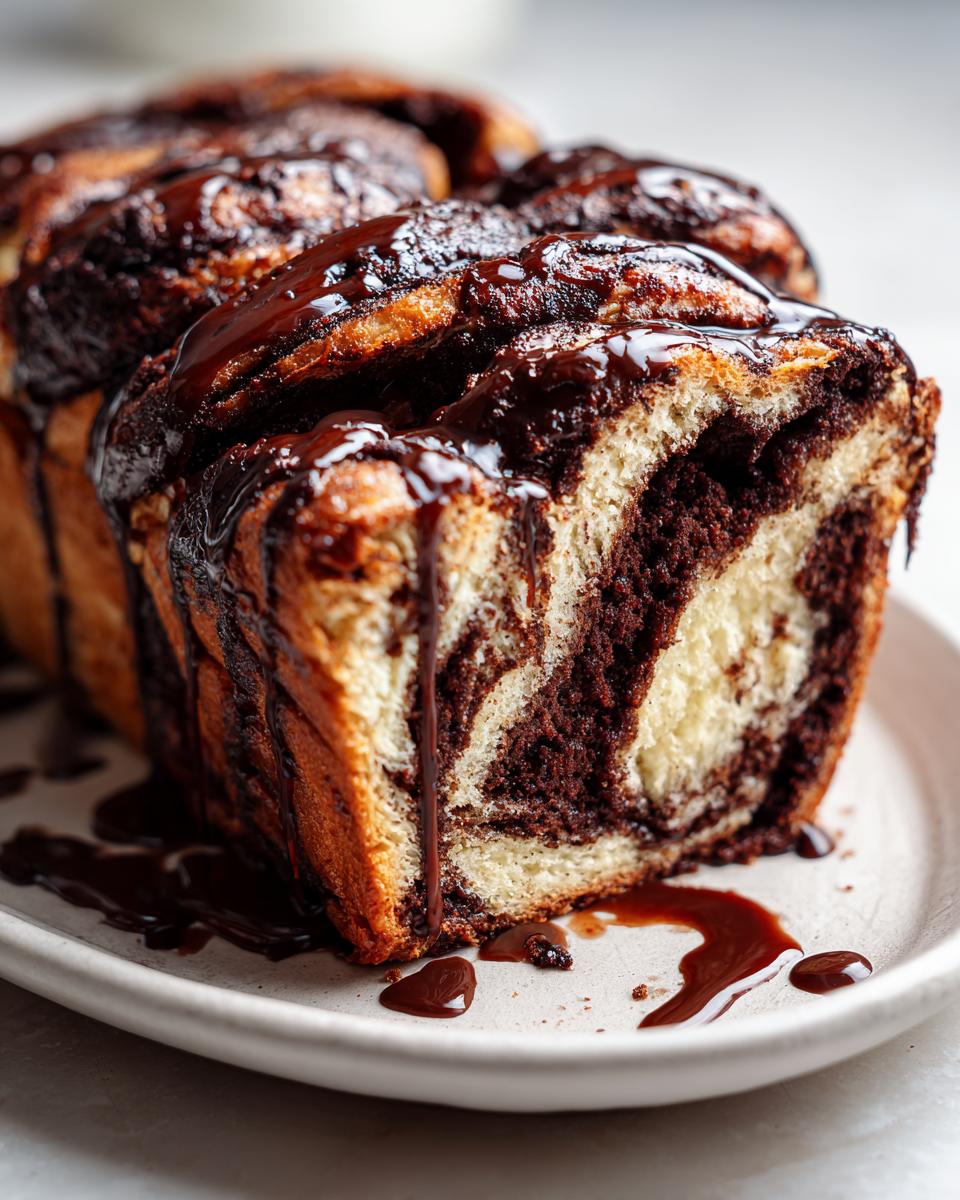
How to Braid Babka for Distinct Swirls
First, punch down your beautifully risen dough and roll it out onto a lightly floured surface into a big 12×18 inch rectangle. Spread that decadent filling evenly across the dough, but leave about an inch clean on one long side—that’s your seal! Now, roll it up tightly, starting from the long edge that *has* filling right up to that empty edge. You should have a perfect chocolate-filled log. When I first tried this, I kept squishing the ends! Don’t worry if yours looks messy at first. Now, take a sharp knife and slice that log right down the middle, lengthwise, so you expose all those wonderful layers! Turn the two halves so the cut sides face up. Gently twist them around each other, keeping those pretty swirls facing skyward, and pinch the ends closed. Carefully tuck that twisted beauty into your loaf pan. That’s how you guarantee visual perfection!
Baking the Best Chocolate Babka Bread
We’ve done all the hard, beautiful work—now it’s time for the oven! After you get your twisted loaf tucked into the greased pan, you need to let it puff up again during that second rise. Don’t rush this; give it 45 to 60 minutes until it looks visibly puffy and light. Make sure to preheat your oven to 350°F (175°C) while the dough is finishing its final rise. Bake it for about 35 to 45 minutes. If you notice the top is getting too dark, which can happen because of all that sugar, just loosely tent a piece of foil over it. That’s the trick to getting that perfect, deep golden hue without burning the top while the center finishes cooking. This is how we ensure you get that true Bakery Style Babka at Home!
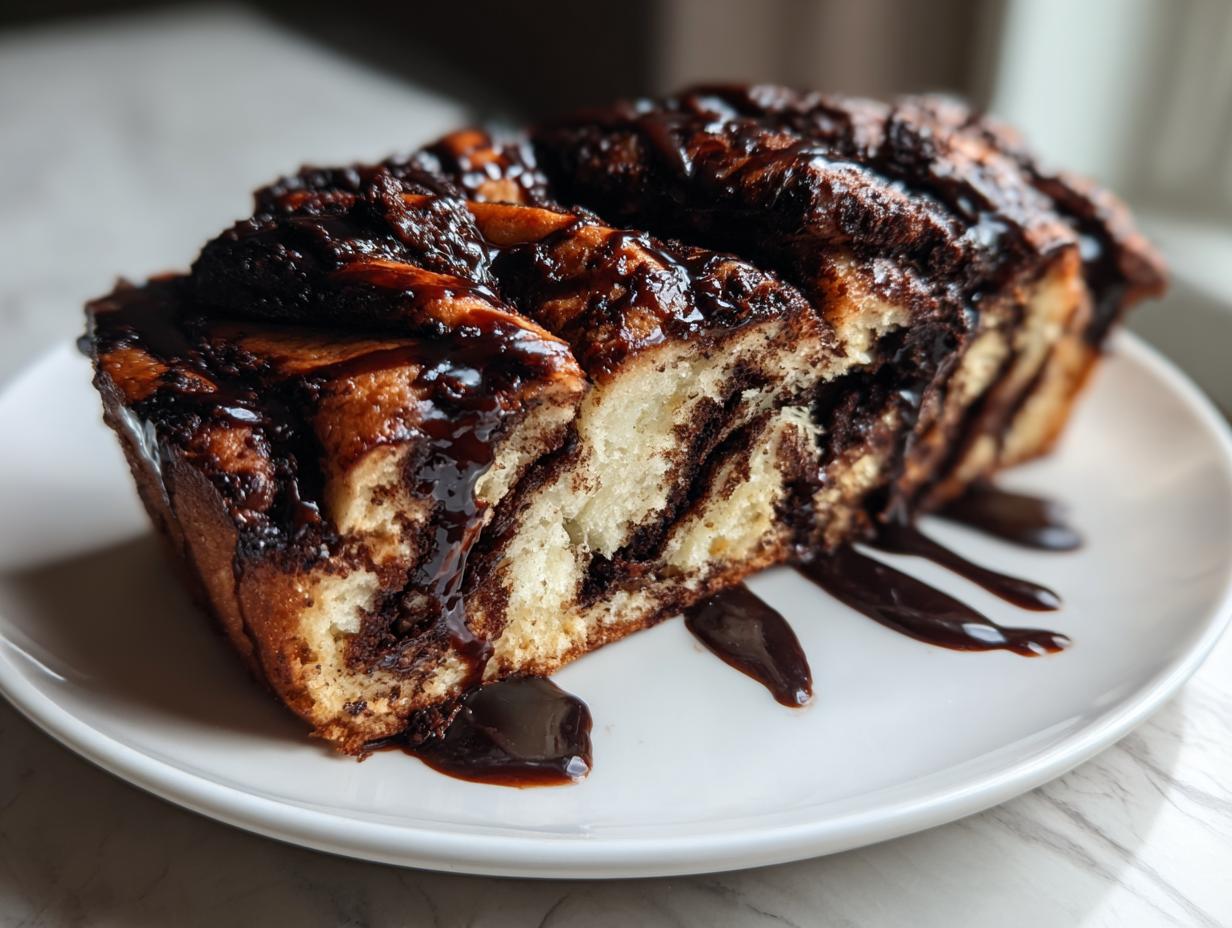
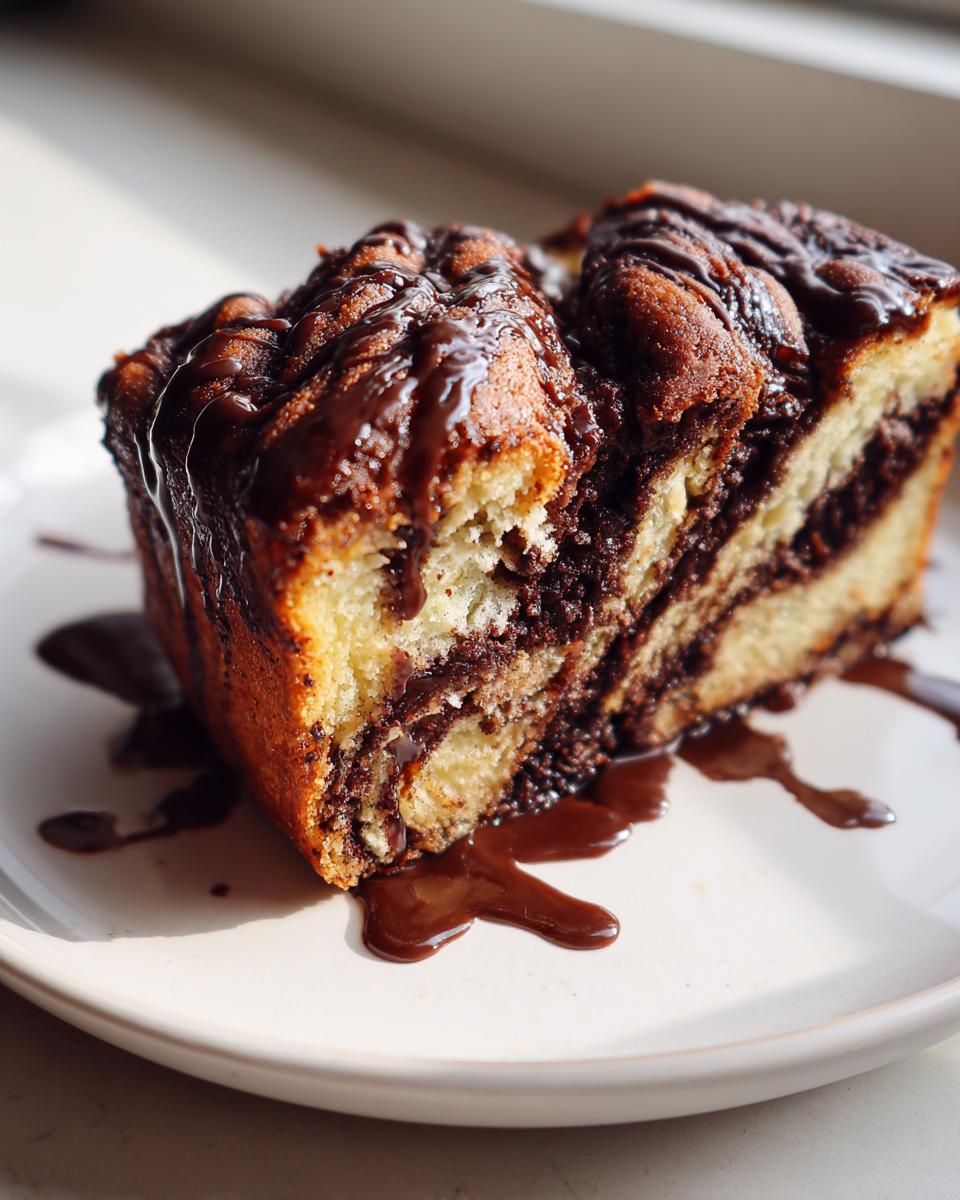
The Essential Babka with Syrup Glaze Finish
Okay, this step is non-negotiable if you want that glossy, professional shine and an unbelievably moist interior. Seriously, the syrup glaze is what transforms this from a good bread to an amazing, almost sinful one, guaranteeing your final product is that perfect moist chocolate sweet bread.
While the babka is baking, whisk together the sugar and water for the glaze until it boils and dissolves. The moment you pull that hot loaf out of the oven, you need to brush this liquid magic all over the top surface. Don’t be shy!
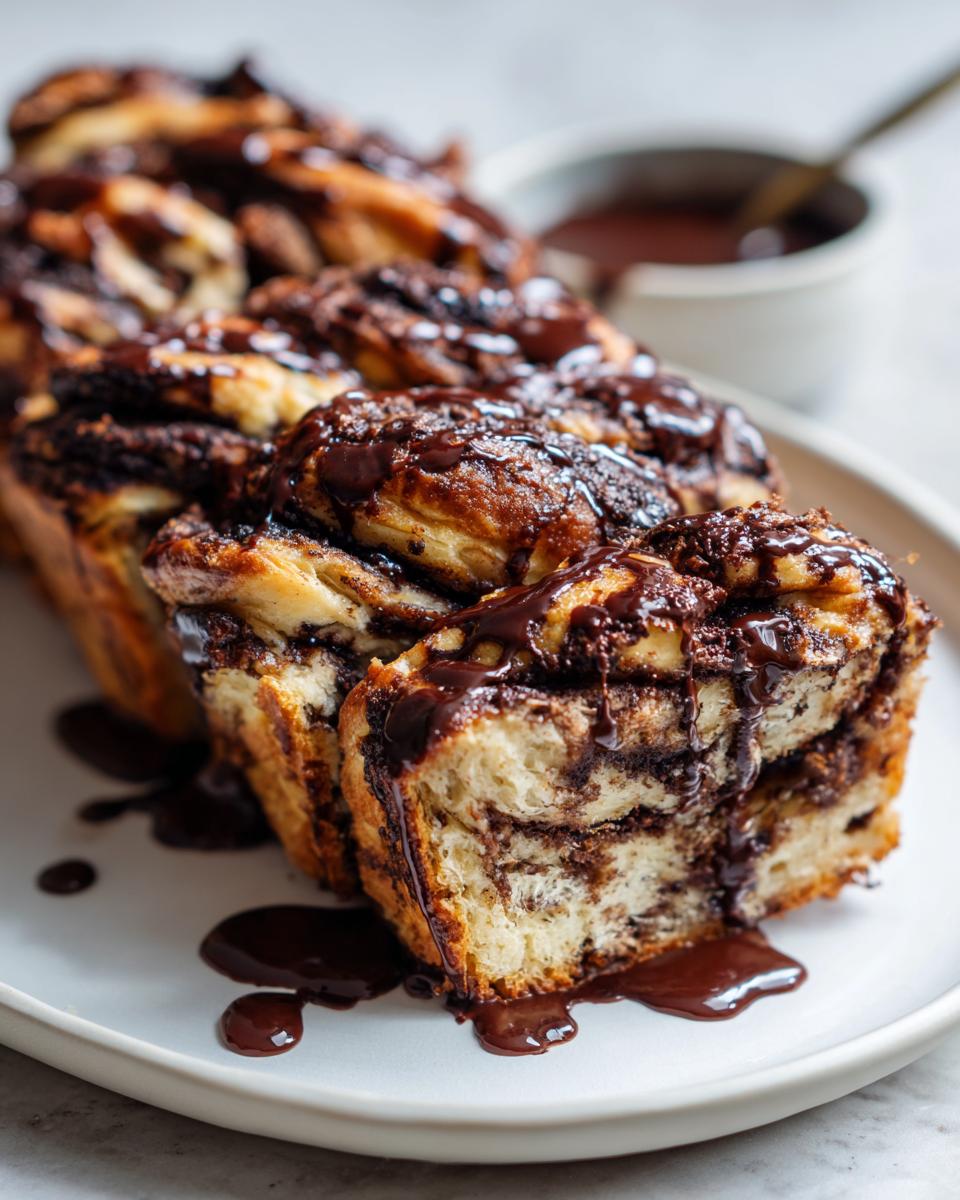
The heat of the bread pulls that simple syrup right down into the crumb, sealing in moisture and giving you that beautiful, slightly sticky, bakery-quality shine. Let it soak in for about 15 minutes before you ease it out of the pan. It’s worth the rush!
Tips for Success with Your Weekend Baking Project
Making a chocolate babka is definitely an adventure, and I want you to have the best possible experience! Since I’ve made enough of these to know exactly where things can go sideways, I wanted to share a few key takeaways from my professional testing. Think of these as shortcuts to getting that absolute best, softest loaf without the frustration that used to plague me!
First up: the butter in the dough. You absolutely *must* let it come to room temperature before adding it slowly. If you rush the creaming or incorporation phase, the dough won’t develop enough strength. Under-kneaded dough equals a dense, sad loaf that just sits there instead of rising high in that beautiful twist. Seriously, feel that elasticity before you put it away for the first rise!
The real secret weapon, which I mentioned briefly but needs reiterating for your own Best Chocolate Babka Bread, is the chill time. If you can manage it, after the first rise, put the dough in the fridge overnight. Cold dough is stiff dough. Stiff dough is easy dough! When you roll out that cold, slightly firm dough the next morning, the filling stays put when you spread it, and you get much cleaner lines when you slice and twist it. If you try to roll out warm, puffy dough, the filling squishes out because the butter is too soft, and you end up with chocolate sludge instead of beautiful swirls.
Finally, don’t panic during the bake. If you see those ends starting to get dark before the center feels done, go grab a piece of aluminum foil and lightly tent it over the top. It acts like a little sunshade, letting the center cook through without turning your beautiful loaf into a charcoal briquette. Patience is your final ingredient here!
Storage & Reheating Instructions for Moist Chocolate Sweet Bread
Because we used that fantastic, magical syrup glaze—remember? The one we brushed on right when it came out of the oven? That syrup is your best friend for keeping this Moist Chocolate Sweet Bread tasting amazing long after you’ve finished the first slice.
Storing leftovers is really simple. Once the babka has cooled completely, you want to wrap it tightly. I usually use plastic wrap first, and then tuck that whole thing into a large, zip-top bag or an airtight container. If you keep it sealed up nicely, it should stay wonderfully soft at room temperature for about three to four days. Honestly, mine never lasts that long, but I know some people have better self-control than I do!
If you made two loaves (because who only makes one chocolate babka?), freezing is a wonderful option. Wait until the loaf is completely cool, then wrap it super snugly in two layers of plastic wrap, followed by aluminum foil. This double barrier prevents freezer burn. It freezes perfectly for up to three months!
Now, for the best part: reheating! If you eat it cold, it’s still good, but you’re missing out. When you want a slice, wrap that piece in a tiny bit of foil and pop it into a 300°F oven for just 5 to 7 minutes. The residual heat from the oven warms the sugar syrup back up just a touch, making the brioche dough feel like it was just pulled from the oven. You won’t believe how soft it gets again—it’s like time travel!
Frequently Asked Questions About Chocolate Babka
Baking is science, but sometimes things just confuse us, right? I get so many questions about making sure this chocolate babka turns out perfect, especially since it has so many steps. Don’t worry if you’re worried about the technical parts; that’s why Jules is here to help simplify things so you can nail that flavor balance!
Can I make this a simpler chocolate swirl loaf recipe without braiding?
Oh, absolutely! If the twisting and braiding step makes you nervous, you can still get an amazing look with totally different shaping. After you roll out your dough and spread the filling, instead of slicing it down the middle, just roll the entire thing up tightly into a log like a giant cinnamon roll. Place this log seam-side down right into your prepared loaf pan. When it bakes, you’ll get a gorgeous, cross-section of chocolate layers within the final loaf, making it a fantastic chocolate swirl loaf recipe without the fancy twists. It still gets that lovely syrup glaze, so the results are just as moist!
What is the best type of chocolate to use in the rich chocolate filling bread?
This is so important for flavor! You have a sweet dough, so you need complexity in that filling. I strongly recommend chopping up high-quality bittersweet or semi-sweet chocolate—aim for something around 60% to 70% cacao content. If you use milk chocolate, the whole loaf can become overly sweet and lack that necessary deep, dark contrast. Using good quality chopped bars or chips ensures you get pockets of melted chocolate goodness throughout your rich chocolate filling bread instead of just a cocoa paste.
My chocolate babka dough didn’t rise well. What went wrong?
If your dough didn’t give you that beautiful, fluffy rise, it almost always comes down to two culprits, and they are easy to fix next time. First, check the water temperature when you activated the yeast. If your milk was too hot (over 130°F), you killed the yeast before it even started working. If it was too cold, the yeast just got lazy and didn’t wake up. Second possibility is kneading time. This dough needs a good long 8 to 10 minutes of kneading to build structure. If you pull it too soon, the gluten network isn’t strong enough to hold all that gas, and it just collapses into a sad, dense blob. Don’t underestimate the power of that final knead for your fluffy babka dough recipe!
Share Your Alchemy Chef Chocolate Babka Creation
Now you have officially unlocked the secrets to crafting your very own glorious, bakery-quality chocolate babka! I truly hope you enjoyed the process of turning simple flour and butter into that incredible, swirling holiday bread. Baking this is a journey, and now you’ve mastered the dough, the rich filling, and that essential syrup glaze.
The best part of what we do here at Alchemy Chef isn’t just making reliable recipes; it’s seeing the joy you create in your own kitchens! Don’t keep this gorgeous loaf a secret. If you take pictures of your finished, shiny babka, please tag me on social media—I absolutely love seeing your results!
If this recipe worked its magic for you, please take a second to leave a rating and a comment below. Your feedback helps me know exactly what’s making your kitchen happy, and it inspires me to keep creating these reliable, delicious transformations for you. Happy baking, friends!
PrintUltimate Homemade Soft Chocolate Babka Recipe

Bake a decadent, bakery-style chocolate babka from scratch. This recipe yields a soft, rich brioche dough with perfect chocolate swirls and a glossy finish, making it an ideal weekend baking project or holiday treat.
- Prep Time: 45 min
- Cook Time: 45 min
- Total Time: 3 hr 30 min
- Yield: 1 loaf (about 10 servings) 1x
- Category: Dessert
- Method: Baking
- Cuisine: Jewish/Eastern European
- Diet: Vegetarian
Ingredients
- For the Dough: 1 cup whole milk, warmed to 110°F
- 2 1/4 teaspoons active dry yeast
- 1/2 cup granulated sugar
- 3 large eggs, room temperature
- 1 teaspoon vanilla extract
- 4 cups all-purpose flour, plus more for dusting
- 1 teaspoon salt
- 1/2 cup (1 stick) unsalted butter, softened and cut into pieces
- For the Chocolate Filling: 1 cup (2 sticks) unsalted butter, softened
- 1 cup packed light brown sugar
- 3/4 cup unsweetened cocoa powder
- 1 teaspoon instant espresso powder (optional)
- 1 cup bittersweet chocolate, finely chopped
- For the Syrup Glaze: 1/2 cup granulated sugar
- 1/2 cup water
- 1 teaspoon vanilla extract
Instructions
- Activate the yeast: In a small bowl, combine the warm milk, yeast, and a pinch of sugar. Let stand for 5-10 minutes until foamy.
- Mix the dough: In a large bowl or stand mixer, combine the flour, remaining sugar, and salt. Add the yeast mixture, eggs, and vanilla extract. Mix on low speed until a shaggy dough forms.
- Incorporate butter: Gradually add the softened butter, one piece at a time, mixing until fully incorporated after each addition. Increase speed to medium-low and knead for 8-10 minutes until the dough is smooth and elastic.
- First rise: Place the dough in a lightly oiled bowl, cover, and let rise in a warm place for 1.5 to 2 hours, or until doubled in size.
- Prepare the filling: While the dough rises, beat together the softened butter, brown sugar, cocoa powder, and espresso powder until smooth. Stir in the chopped chocolate.
- Shape the dough: Punch down the risen dough. On a lightly floured surface, roll the dough into a large rectangle, approximately 12×18 inches.
- Spread the filling: Evenly spread the chocolate filling over the entire surface of the dough, leaving a small border on one long edge clean.
- Roll and slice: Starting from the long edge opposite the clean border, tightly roll the dough into a log. Using a sharp knife or bench scraper, slice the log lengthwise down the center, exposing the layers.
- Braid: Turn the cut sides up. Twist the two halves around each other, keeping the cut sides facing up to expose the swirls. Pinch the ends together.
- Second rise: Carefully transfer the twisted dough to a greased 9×5 inch loaf pan. Cover loosely and let rise for 45-60 minutes, or until puffy. Preheat your oven to 350°F (175°C) during the last 15 minutes of rising.
- Bake: Bake for 35-45 minutes, or until deep golden brown. If the top browns too quickly, loosely tent with foil.
- Make the syrup: While the babka bakes, combine the sugar and water in a small saucepan. Bring to a boil, stirring until the sugar dissolves. Remove from heat and stir in the vanilla.
- Glaze: Immediately upon removing the babka from the oven, brush the hot syrup evenly over the entire top surface. Let the babka cool in the pan for 15 minutes before transferring to a wire rack to cool completely.
Notes
- For best results and deep flavor, chill the dough overnight after the first rise. Roll and shape it the next day.
- To achieve distinct chocolate layers, use cold butter in the filling mixture.
- This rich chocolate swirl loaf benefits from the syrup glaze; do not skip this step for a moist crumb.
Nutrition
- Serving Size: 1 slice
- Calories: 450
- Sugar: 35g
- Sodium: 250mg
- Fat: 28g
- Saturated Fat: 17g
- Unsaturated Fat: 11g
- Trans Fat: 0.5g
- Carbohydrates: 45g
- Fiber: 2g
- Protein: 7g
- Cholesterol: 85mg