
If you think making a truly elegant dessert means spending hours fussing in the kitchen, let me stop you right there! I’m Juliana Cruz, and my background in Food Science taught me that fantastic flavor is about technique, not complexity. That’s why I developed this recipe for Vanilla Bourbon Poached Pears with Mascarpone Cream. It guarantees that perfect, melt-in-your-mouth texture every single time. Honestly, who doesn’t love warm, spiced poached pears bathed in a glossy syrup? It looks like it took all day, but it comes together so smoothly. We’re using reliable methods to turn simple fruit into something truly gourmet for you.
- Why You Will Create Perfect Poached Pears Every Time
- Gathering Ingredients for Vanilla Bourbon Poached Pears
- Step-by-Step Instructions for Poached Pears
- Crafting the Mascarpone Cream Topping
- Flavor Variations for Your Poached Pears
- Serving Suggestions for Elegant Pear Dessert
- Storage and Make Ahead Dessert Ideas for Poached Pears
- Essential Equipment for Fruit Poaching Techniques
- Frequently Asked Questions About Poached Pears
Why You Will Create Perfect Poached Pears Every Time
When you stick to this plan, those fancy restaurant desserts suddenly feel totally doable at home. Seriously, this isn’t just another fruit recipe; it’s designed for success. I’ve tested the ratios dozens of times, ensuring the sugar isn’t too aggressive and the bourbon infuses just right. You get that high-end look without any of the stress. It’s the dream elegant pear dessert without the fuss!
- Guaranteed Flavor Infusion: The pears actually sit in the cooling liquid, letting that vanilla and spice soak deep into the fruit.
- Sturdy Shape: We pick the right pears so they don’t turn into sweet mush.
- Easy Cleanup: We talk about techniques to prevent sticking!
Achieving Tender Poached Pears Tutorial
The secret to that famous melt-in-your-mouth texture starts way before the heat even goes on. You absolutely need firm pears—I swear by Bosc for poaching because they just hold their shape beautifully. The key is the simmer; it needs to be *gentle*. If it’s boiling hard, the outside cooks too fast and gets mushy while the inside stays hard. You want a bare, lazy bubble. Once you test it near the end, if a thin knife slips through with almost no resistance, the fruit is done, and that’s my favorite part of this tender poached pears tutorial!
Gathering Ingredients for Vanilla Bourbon Poached Pears
Okay, now for the fun chemical reaction part—the ingredients! Sourcing the right stuff makes all the difference when you’re aiming for an elegant dessert. Remember, this isn’t just about basic fruit; we are building complex, warm flavor, so we need quality components here. We’re using bourbon for warmth and a whole vanilla bean because I just can’t skip the real deal when it comes to vanilla infusion. Having everything measured before you start means your poached pears will cook evenly and beautifully.
Selecting the Best Pears for Poaching
Don’t just grab any pear from the bowl! The firmness is everything here. For this recipe, you need pears that are ripe but still quite firm—they shouldn’t yield much when you squeeze the neck. I always stick to Bosc or Anjou when I make these; they are the gold standard for best pears for poaching because they keep their shape perfectly in the simmer. If you use something too soft, like a Bartlett that’s ready to eat raw, it will just collapse into sauce during cooking. We want structure!
Step-by-Step Instructions for Poached Pears
Alright, let’s get these Pears into the magic bath! This stage is where the alchemy really happens, turning firm fruit into that unbelievable, soft delight. Don’t rush any part of this, especially when it comes to cooling down—that’s when the deep flavor sinks in! Once you see that beautiful golden hue on the fruit, you know you nailed the technique for amazing poached pears.
Preparing the Pears and Poaching Liquid
First, we prep the canvas: the pears. You need to peel them carefully; keep the stems on—it looks so much more elegant for serving! Then, using a little spoon or a melon baller, scoop out the core from the bottom only, getting rid of all those pesky seeds. Set them aside. Now for the good stuff: Grab your widest, deepest pot. Toss in the water, sugar, that gorgeous bourbon, the scraped vanilla bean (don’t lose those little seeds!), orange slices, cinnamon sticks, and peppercorns. Bring this whole mixture up to a gentle simmer until that sugar melts completely. Give it a good stir!
The Gentle Simmer: How to Cook Poached Pears
Once your liquid is simmering nicely, carefully nestle those prepared pears right down into the pot. They don’t have to be totally submerged right away, but they need to be mostly covered. This is where you need that old-school baker’s trick—cut a circle of parchment paper (we call that a cartouche) that fits right on top of the liquid. It keeps steam trapped and makes sure the tops of your poached pears don’t dry out. Drop the heat down low! We want the smallest, laziest bubble you can manage. They’ll cook for about 25 to 40 minutes. Watch them closely, turning them gently every ten minutes or so until a knife slides in easily. If they feel tough, they need more time; if they feel squishy, you cooked them too fast!
Crafting the Mascarpone Cream Topping
While the pears are soaking up all that wonderful vanilla bourbon flavor, we’re going to whip up the *perfect* companion—a cloud of rich, slightly sweet mascarpone cream. This is such a genius pairing because the mild tanginess cuts through the sweetness of the syrup perfectly. I’ve seen people try to use whipped cream, but honestly, mascarpone just has a luxurious density that other toppings can’t match.
When mixing this, you have to watch your speed like a hawk! We aren’t trying to make butter here, so gentle mixing is the goal. You want soft peaks, nothing stiff or grainy. Make sure your mascarpone is softened up on the counter for about thirty minutes before you start; cold, hard cheese won’t blend evenly, and you’ll end up with lumps, which ruins the smooth finish we’re looking for.
Just whisk the softened mascarpone with the heavy cream, a little honey for sweetness (I usually skip powdered sugar here because the syrup is rich enough), and a dash of vanilla extract. Mix it on low speed—or honestly, just by hand with a whisk if you’re feeling energetic—until everything just comes together into a gorgeously silky texture. It should look like thick, luxurious frosting when you scoop it. Pop it back in the fridge to chill while you get those gorgeous pears ready for plating.
Flavor Variations for Your Poached Pears
While the vanilla bourbon version is certainly my favorite for a cozy night, sometimes you want something different, right? That’s the beauty of mastering good poached pears—the base technique works for just about anything! If you’re looking for a more dramatic, deep color, or maybe something lighter for a summer evening, we can totally switch up the liquid. I’ve seen beautiful results using honey or even apple juice if you want to skip the liquor entirely. It proves that simple fruit poaching can handle so many different flavor profiles!
Creating a Red Wine Dessert Recipe
If you want that intense, jewel-toned color and a drier, richer flavor, you have to try the red wine option. It’s surprisingly easy! You simply ditch most of the water in the original recipe. Instead of four cups of water, use about three cups of a dry red wine—Merlot or Cabernet work wonderfully—and maybe one cup of water to make sure the pears stay covered. The wine cooks down with the sugar and spices, creating that iconic, glossy crimson syrup that just screams holiday gathering. It makes for an incredibly impressive red wine dessert recipe!
For a lighter flavor, try swapping out sugar for honey. Just be aware that honey browns faster, so keep that simmer extra gentle! You can even look up some of the saffron-infused recipes out there for a truly unique, floral take, though I haven’t tested that one yet. Check out this great honey recipe when you’re ready to pivot: Honey Poached Pears Dessert!
Serving Suggestions for Elegant Pear Dessert
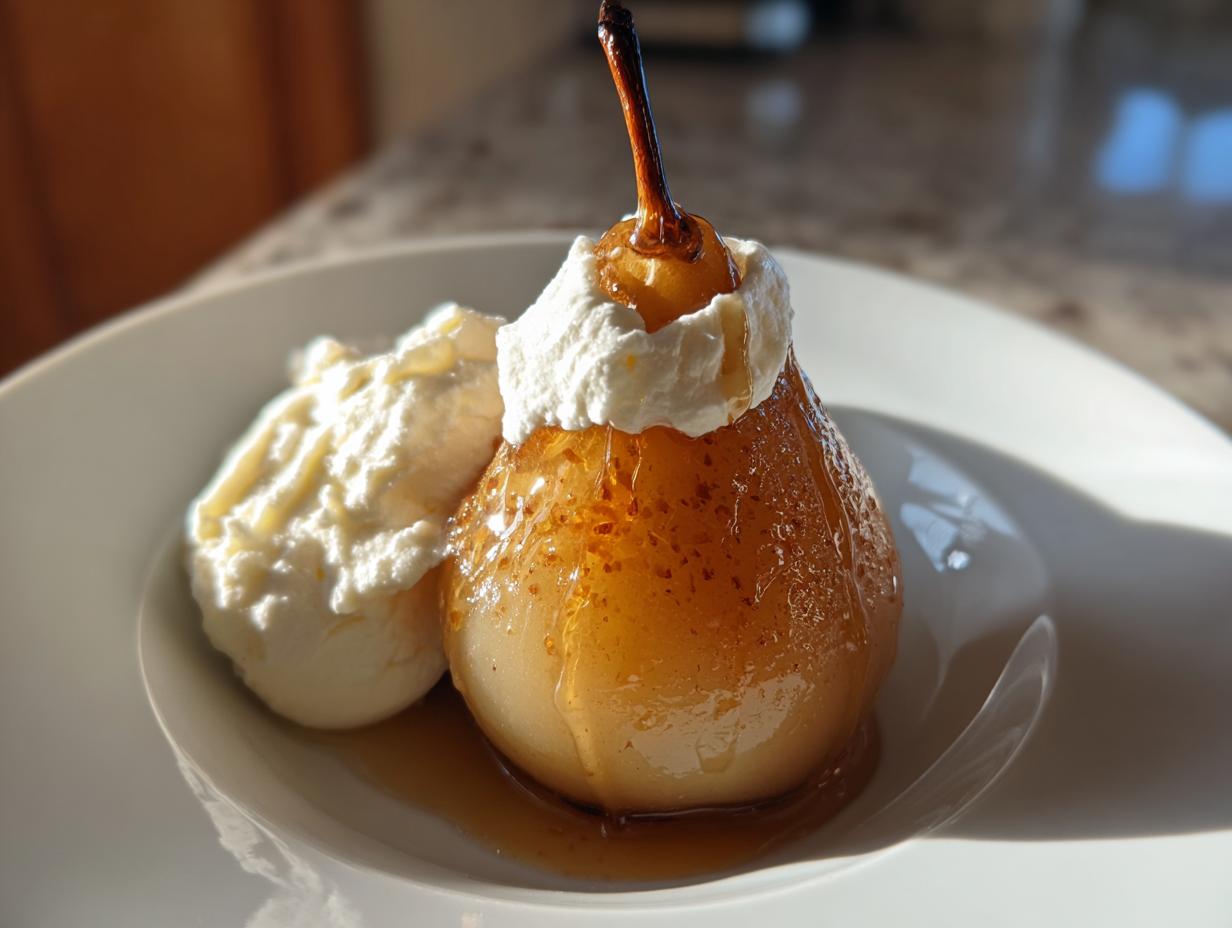
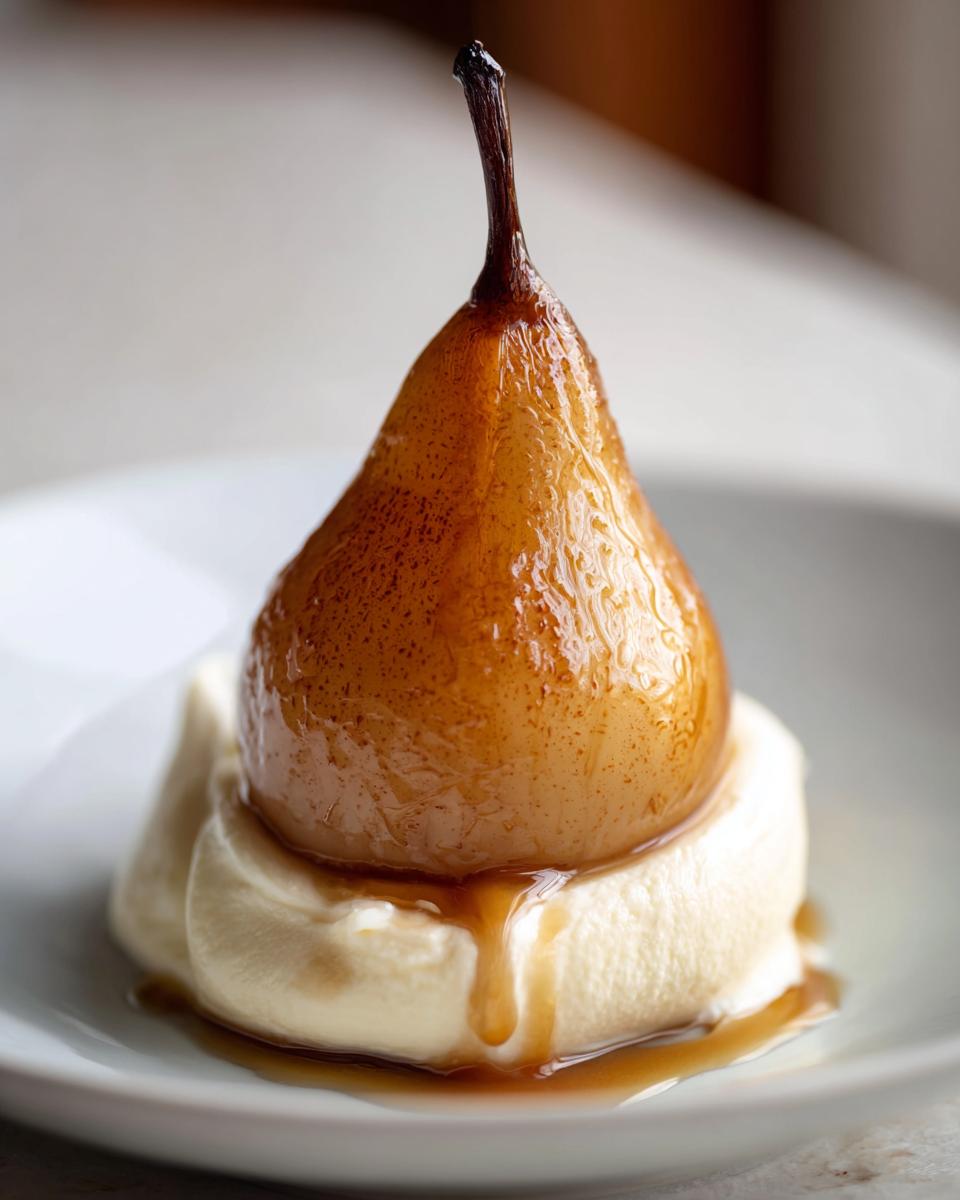
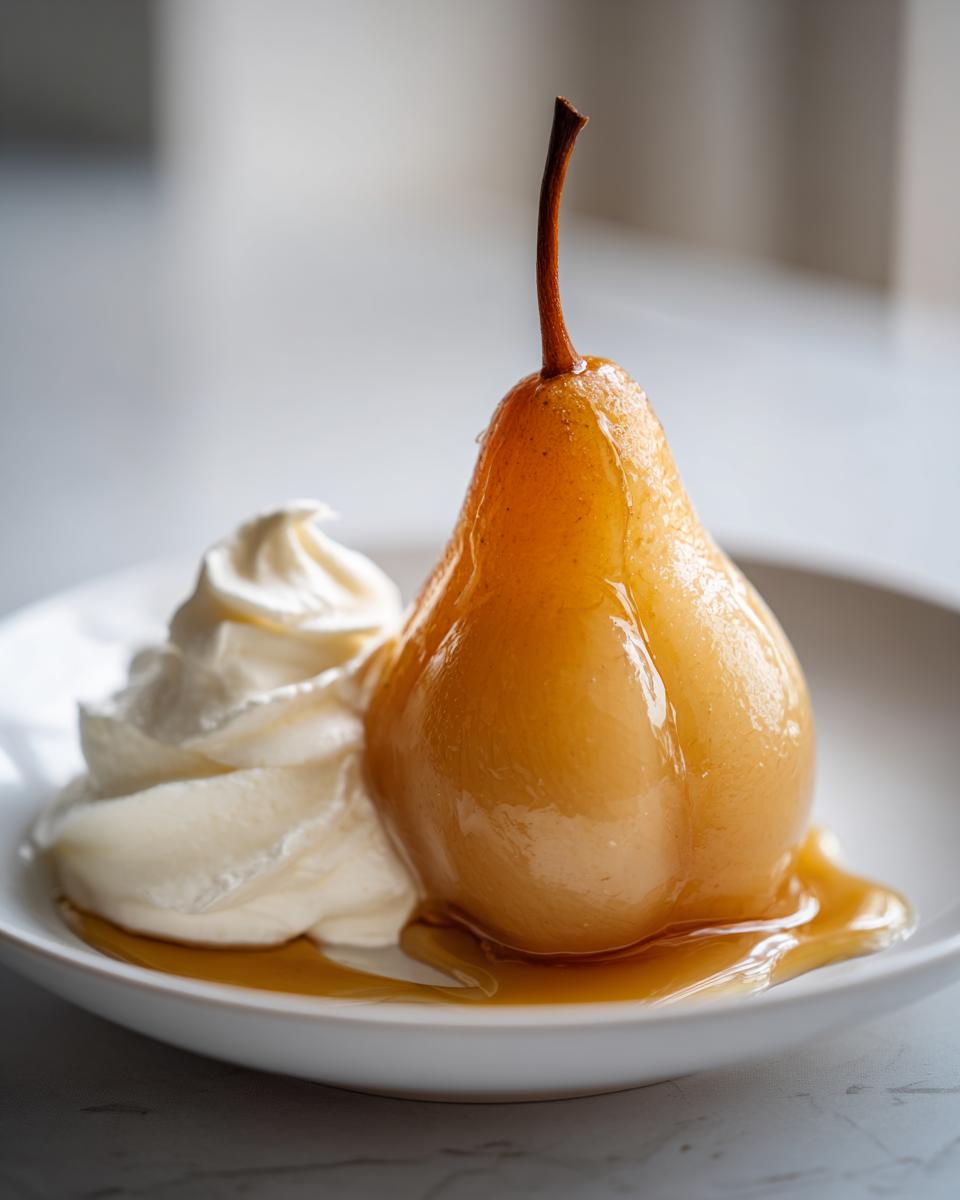
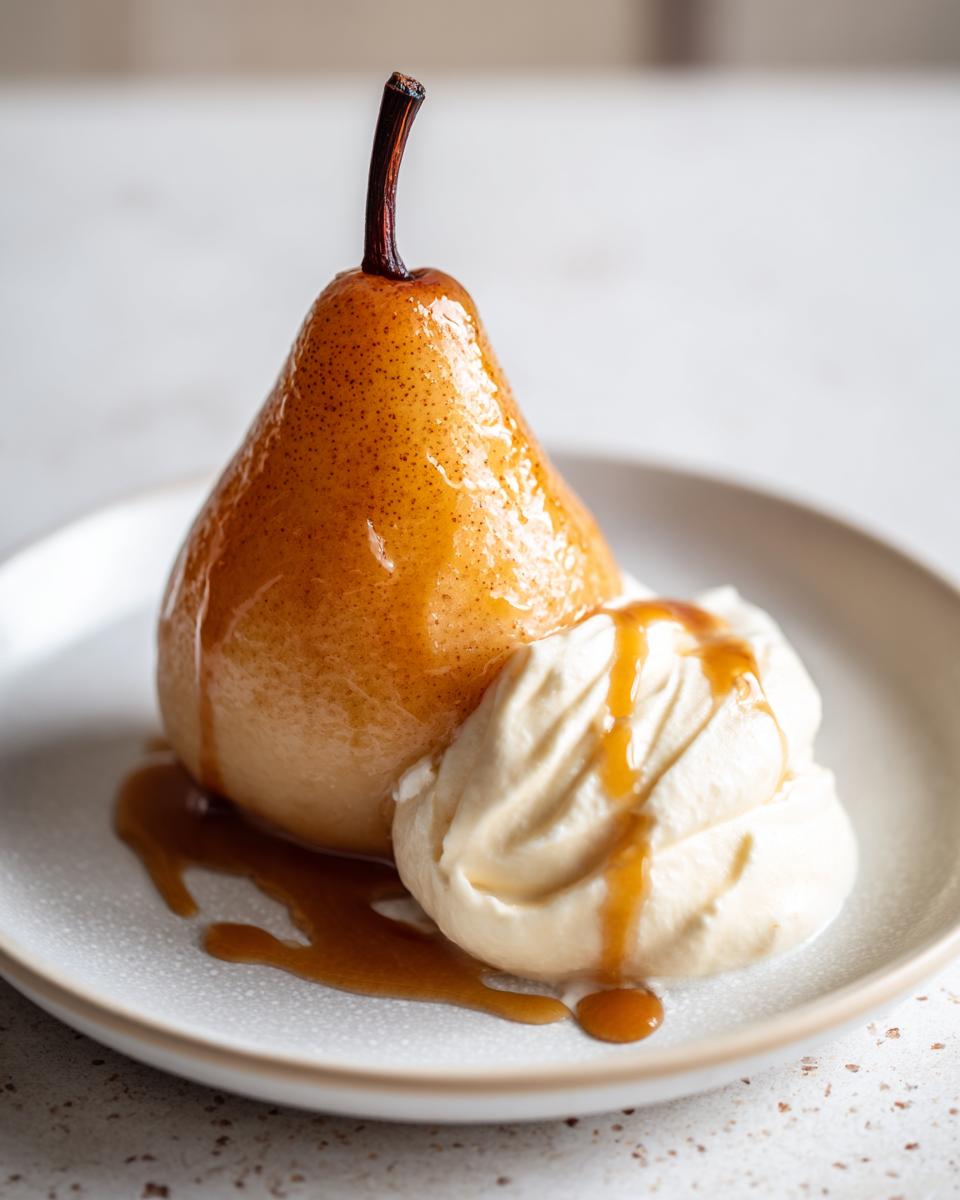
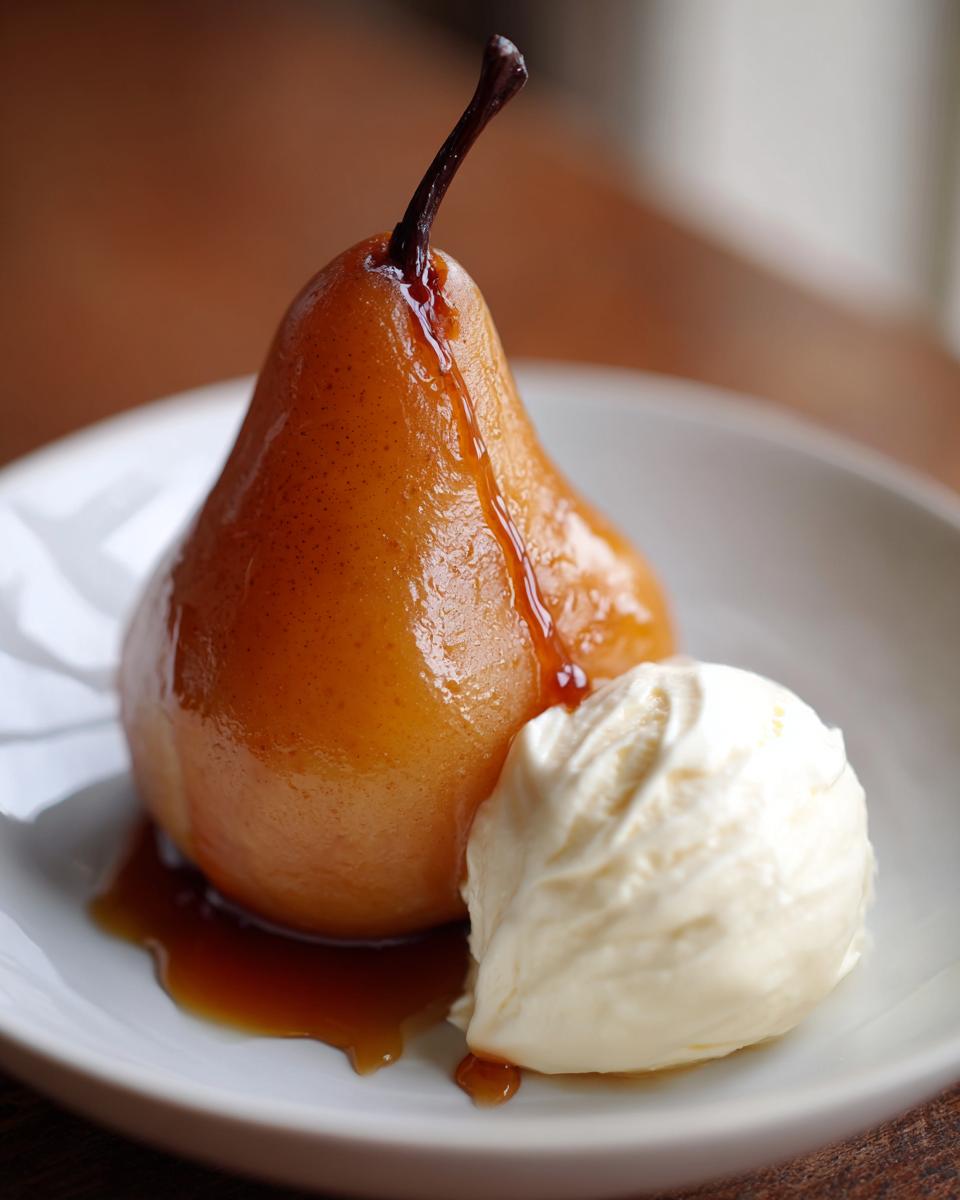
Now that we have these perfectly tender poached pears, the final step is making them look like they belong on a magazine cover. This is where the “elegant” part really shines, and honestly, it takes less than five minutes. Remember that liquid we simmered them in? We can’t just dump that thin juice over the top; we need to turn it into a thick, glossy glaze. Take that leftover poaching liquid—the one smelling intensely of bourbon and cinnamon—and pour it into a small saucepan. Crank the heat up to medium-high and just let it boil hard. Watch it carefully, because it reduces fast! You’re looking for it to coat the back of a spoon slightly. That intense reduction turns thin liquid into a sticky, shiny syrup. That’s your crowning glory.
When it’s time to plate, you have to use those beautiful, peeled pears. I always place one standing up right in the middle of a small dessert plate. Then, take a generous dollop of that chilled mascarpone cream—remember how silky we made it?—and nestle it right beside the pear, or even just resting against the stem.
For the ultimate presentation that screams gourmet, drizzle that reduced syrup all over the pear, letting it pool beautifully around the bottom. If you want an extra bit of crunch, grab some toasted slivered almonds or maybe some finely chopped dark chocolate shavings. And look, if you skipped the bourbon and went for the vanilla base, serving it warm with a scoop of good quality vanilla bean ice cream is non-negotiable. The hot syrup hitting the cold ice cream? Pure magic. You won’t believe how easy this elegant pear dessert is to assemble!
Storage and Make Ahead Dessert Ideas for Poached Pears
One of the best things about this recipe—and why I love making poached pears for parties—is that they truly get better the next day! They are the perfect make ahead dessert idea because the longer they sit in that flavorful liquid, the more intense that vanilla bourbon flavor becomes. You don’t have to stress about last-minute dessert creation!
When you’re finished poaching them, just turn off the heat and let them cool completely right there in the pan submerged in the syrup. Once they are room temperature, carefully seal the entire pot—pears and all that glorious liquid—and slide it into the fridge. They hang out happily for up to a full week! Seriously, one week. They might even taste better on day four than they did on day one.
When it’s time to serve, you have two fantastic options. You can pull them out and let them sit on the counter for about an hour to come up to a cool room temperature, which is delicious with the mascarpone cream. Or, if you prefer them warm—and maybe serving them warm with cinnamon really screams cozy comfort food dessert—you just gently reheat them. Don’t bring the syrup back to a rolling boil, please! Just a low simmer until they are warmed through. The key is gentle reheating so you don’t accidentally overcook them and lose that perfect, tender texture we worked so hard to achieve in the initial poached pears!
Essential Equipment for Fruit Poaching Techniques
You don’t need a ton of fancy gadgets to make fantastic slow-cooked spiced pears, which is the beauty of this style of cooking. It’s mostly about having the right foundational pieces of cookware. If you are going to start poaching fruit regularly, having these few items on hand makes the process totally smooth. When I was developing these recipes, I found that certain tools just made the timing so much easier to manage.
First up, you absolutely need a pot that is deep and wide enough. I mean it needs to be wide enough so that the pears can sit upright—or sideways, if you prefer—without being too cramped. A cramped pot means uneven cooking, and we want every piece of fruit to be cooked perfectly. A heavy-bottomed stainless steel or enameled Dutch oven works like a dream because the heat distributes so evenly, preventing those hot spots that scorch the sugar on the bottom.
- Deep, Wide Saucepan: Must accommodate the fruit and enough liquid to almost cover it.
- Parchment Paper: This is my secret weapon for keeping the fruit submerged. You’ll cut a circle just slightly smaller than the diameter of your pot opening. We call it a cartouche, and it keeps the tops from drying out while simmering.
- Vegetable Peeler and Melon Baller: You need a good, sharp peeler for taking off the skin in long strips without gouging the flesh. The melon baller is perfect for gently scooping out the core and seeds from the bottom end without damaging the stem or the pear’s integrity.
- Tongs: Use smooth, silicone-coated tongs for turning the fruit gently during cooking; you don’t want to pierce the skin!
Frequently Asked Questions About Poached Pears
I know when you’re looking at a recipe like this, you’re going to have a few last-minute thoughts or necessary substitutions floating around your brain. Trust me, I’ve been there! My recipe development background means I’ve answered all these hypotheticals already. Whether you’re worried about the alcohol or what to use instead of Bosc pears, we’ve got you covered for making fantastic poached pears.
Can I skip the bourbon or alcohol entirely?
Absolutely, yes! I get it—not everyone keeps hard liquor lying around, or maybe you’re cooking for kids. If you skip the bourbon, just use an equal amount of water. To keep that deep, caramel undertone we love so much for that cozy comfort food dessert feeling, I highly recommend adding an extra tablespoon of dark brown sugar or a tiny splash of vanilla in its place. It won’t be bourbon-y, but it will still be delicious!
What happens if my pears fall apart while simmering?
Oh no! That usually means one of two things happened: either your pears were a bit too soft to start with (remember, firmer is better!), or your heat was too high. If they start looking floppy, turn the heat off immediately and let them cool down in the liquid. If they are truly ruined, don’t sweat it! They are still edible. Just fish them out, reduce that syrup aggressively—that’s your best caramel sauce for poached pears right there—and serve the mushy bits spooned over ice cream or mixed into yogurt. Homemade jam, basically!
Can I use maple syrup instead of granulated sugar?
You definitely can use maple syrup! It’s a great way to bring in more of that *fall and winter dessert* flavor profile. If you substitute maple syrup for the sugar, you need to reduce the amount of water in the pot slightly, as maple syrup is already liquid. It lends a beautiful, cozy sweetness, but because it’s a different kind of sugar, the resulting syrup might not reduce quite as thickly. If you follow the linked recipe for honey pears, you’ll see how to manage that sweetness!
Which pears are the best for poaching?
I’ve already mentioned Bosc and Anjou, but to really nail that textbook texture, Bosc is my top pick. They are naturally denser and hold up best against the simmering liquid. If you are aiming for that truly unforgettable, melt-in-your-mouth result, make sure they are only slightly soft when you start. That way, by the time they are done poaching, they hit that perfect sweet spot!
PrintVanilla Bourbon Poached Pears with Mascarpone Cream
Create an elegant, melt-in-your-mouth dessert by poaching pears in a fragrant vanilla and bourbon syrup. This recipe yields tender fruit bathed in a glossy syrup, served with a simple, rich mascarpone topping.
- Prep Time: 20 min
- Cook Time: 40 min
- Total Time: 60 min
- Yield: 4 servings 1x
- Category: Dessert
- Method: Simmering
- Cuisine: American
- Diet: Vegetarian
Ingredients
- 4 firm Bosc or Anjou pears, peeled, stems intact
- 4 cups water
- 1 cup granulated sugar
- 1/2 cup bourbon
- 1 vanilla bean, split and scraped (or 1 tablespoon vanilla extract)
- 1 orange, sliced
- 2 cinnamon sticks
- 1/2 teaspoon whole black peppercorns
- 1 cup heavy cream
- 8 ounces mascarpone cheese, softened
- 2 tablespoons honey
- 1 teaspoon vanilla extract (if using extract in poaching liquid)
Instructions
- Prepare the pears: Peel the pears carefully, leaving the stems on for presentation. Use a melon baller or small spoon to core them from the bottom, removing the seeds while keeping the pear shape whole.
- Make the poaching liquid: In a large, deep saucepan wide enough to hold the pears standing up, combine the water, sugar, bourbon, vanilla bean (and seeds), orange slices, cinnamon sticks, and peppercorns. Bring the mixture to a simmer over medium heat, stirring until the sugar dissolves completely.
- Poach the pears: Gently place the prepared pears into the simmering liquid. The liquid should mostly cover the pears. If necessary, place a circle of parchment paper directly on top of the liquid to keep the fruit submerged.
- Cook until tender: Reduce the heat to low and maintain a gentle simmer. Cook for 25 to 40 minutes, turning the pears occasionally, until they are tender when pierced with a thin knife. The cooking time depends on the ripeness of your pears.
- Cool and infuse: Remove the saucepan from the heat. Allow the pears to cool completely in the poaching liquid. This step allows the pears to absorb maximum flavor. For best results, chill them in the liquid for several hours or overnight.
- Make the mascarpone cream: In a medium bowl, whisk together the softened mascarpone cheese, heavy cream, honey, and 1 teaspoon of vanilla extract until smooth and creamy. Do not overmix.
- Serve: Remove the cooled pears from the syrup. If you want a thicker syrup, boil the remaining poaching liquid rapidly until it reduces by half and becomes glossy. Serve each pear warm or chilled, drizzled generously with the reduced syrup and a dollop of the mascarpone cream.
Notes
- For a red wine variation, substitute 3 cups of the water with a dry red wine like Merlot or Cabernet Sauvignon.
- If you do not have bourbon, substitute it with an equal amount of dark rum or skip it and add 1/4 cup more water.
- Use Bosc pears for poaching as they hold their shape better during cooking.
- This is an excellent make ahead dessert idea; the pears store well in their syrup for up to one week in the refrigerator.
Nutrition
- Serving Size: 1 pear with syrup and cream
- Calories: 450
- Sugar: 65
- Sodium: 35
- Fat: 18
- Saturated Fat: 11
- Unsaturated Fat: 7
- Trans Fat: 0
- Carbohydrates: 75
- Fiber: 8
- Protein: 6
- Cholesterol: 55