
When you think about the true icons of American baking, what comes to mind? For me, it’s got to be the Boston Cream Pie. Even though it’s technically a cake, oh boy, does it deliver on that perfect dessert promise! I’m Juliana, and when I set out to develop this recipe for Alchemy Chef, my goal was simple: make a scratch version that tastes even better than the ones you wait in line for.
Because I spent years studying Food Science and working as a professional recipe developer, I’ve obsessed over the chemistry here. We aren’t guessing; we’re making sure every layer—the fluffy vanilla cake, the silky pastry cream, and that shining chocolate top—works in perfect harmony. Trust me, this isn’t just a dessert; it’s a genuine Showstopper Dessert ready for your table.
- Why This Homemade Boston Cream Pie Recipe Works (The Alchemy Chef Promise)
- Ingredients for Your Classic Boston Cream Pie
- How to Make Boston Cream Pie: Step-by-Step Instructions
- Tips for the Best Boston Cream Pie Success
- Ingredient Notes and Substitutions for Boston Cream Pie
- Storage and Reheating Instructions for Boston Cream Pie
- Frequently Asked Questions About Boston Cream Pie
- Nutritional Estimates for This Boston Cream Pie Recipe
- Share Your Boston Cream Pie Creations
Why This Homemade Boston Cream Pie Recipe Works (The Alchemy Chef Promise)
I know there are shortcuts out there, but if you want that truly “bakery-worthy” experience, you have to go from scratch, and I promise it’s worth the few extra steps. This is about reliability. I tested this recipe dozens of times using my food science background so you don’t have to worry if it’ll turn out right.
When you follow these steps, you secure three major wins that make this the best Boston Cream Pie:
- The cake is perfectly moist, not dry or crumbly.
- The vanilla pastry cream filling is firm enough to hold its shape but melts in your mouth.
- That chocolate topping sets up beautifully with a gorgeous shine.
We’re building something spectacular here, and you can see more tips on making this masterpiece work perfectly when you check out other great scratch Boston Cream Pie techniques.
Achieving That Bakery Style Cake Texture
For that light, fluffy vanilla cake, temperature is everything! Make sure your butter, eggs, and milk have really come up to room temperature. When they mix together smoothly, they trap air bubbles. That trapped air is what expands in the oven, giving you that tender, airy structure we associate with the best layer cakes.
Ingredients for Your Classic Boston Cream Pie
Okay, deep breath! We’re making this Classic Boston Cream Pie completely from scratch, which is always more rewarding, right? Forget those disappointing, flavorless store-bought mixes. Here, we build flavor in three distinct stages: the tender cake base, the intensely flavorful vanilla custard, and the crowning jewel, that unbelievably glossy chocolate topping. Gather your ingredients—make sure everything for the cake is at room temperature, please! It makes a difference, I promise.
For the Fluffy Vanilla Cake Recipe
This is the foundation of our masterpiece! Remember what I said about temperature? Get your butter, eggs, and milk ready before you even turn on the oven. It’s the secret to a truly Fluffy Vanilla Cake Recipe that won’t feel heavy under that rich cream.
- 1 3/4 cups all-purpose flour
- 1 1/2 cups granulated sugar
- 1 tablespoon baking powder
- 1/2 teaspoon salt
- 1/2 cup unsalted butter, softened
- 2 large eggs (room temperature, please!)
- 1 teaspoon vanilla extract
- 1 cup whole milk (room temperature)
For the Rich Vanilla Custard Filling (Pastry Cream Recipe)
This is where things get serious. We rely on those egg yolks and cornstarch here to give us that perfectly set yet creamy texture—you want a phenomenal Rich Cream Filling, not watery sludge! This is our luxurious Pastry Cream Recipe.
- 1/2 cup granulated sugar
- 1/4 cup cornstarch
- 1/4 teaspoon salt
- 2 cups whole milk
- 4 large egg yolks
- 2 tablespoons unsalted butter
- 1 teaspoon vanilla extract
For the Decadent Chocolate Ganache Topping
This topping needs to set up looking smooth and expensive, like something you’d get at a fancy cake shop right? The heavy cream melts the chocolate beautifully, and I always include the light corn syrup—it’s optional, but it is the absolute key to getting that reflective, glossy homemade finish.
- 4 ounces semi-sweet chocolate, finely chopped
- 1/2 cup heavy cream
- 1 tablespoon light corn syrup (this gives it that amazing shine!)
How to Make Boston Cream Pie: Step-by-Step Instructions
Okay, this is the part where we put the science to work and create magic! Making the Homemade Boston Cream Pie Recipe requires patience because these three components—cake, filling, and glaze—need to happen in sequence. Don’t rush the chilling time, I promise you, that’s what separates a good cake from a great one. Follow every step closely, and you’ll end up with a Bakery Style Cake masterpiece that truly honors this American Classic Dessert.
Baking the Layers for Your Boston Cream Pie
First thing’s first: preheat that oven to 350°F (175°C). Get your two 8-inch round cake pans greased and floured, or use your favorite cake release spray—whatever works best for you! We want zero sticking tragedy later on.
In a big bowl, whisk together all your dry things: the flour, sugar, baking powder, and salt. Now, add the softened butter, the eggs, and that vanilla extract right in there. Set your mixer to medium speed and beat it just until everything starts to look combined, but don’t get too enthusiastic!’; we want to keep some air in there!
Next, we add the milk slowly while mixing until the batter looks smooth. My biggest warning here is this: Do not overmix! Overmixing develops gluten and will give you a tough cake, and we are aiming for fluffy layers here, remember?
Divide that beautiful batter evenly between your two pans. Slide them into the oven for about 25 to 30 minutes. You’re looking for a toothpick inserted right in the center to come out clean. Once they look done, let them chill out in those pans for a full 10 minutes. This helps them firm up just enough before you gently flip them out onto a wire rack to cool completely. They must be totally cool before we even think about the filling.
Creating the Vanilla Pastry Cream Filling
While those cakes are cooling, turn your attention to the Vanilla Custard Filling. This is another place where organization helps you avoid lumps!
Grab a medium saucepan and whisk together the sugar, cornstarch, and salt first. Then, slowly whisk in the 2 cups of whole milk until it’s all smooth—no dry pockets allowed!
Put that saucepan over medium heat. You have to stir constantly here. Seriously, don’t look away! You need to cook it until it gets really thick and starts bubbling gently. Once it bubbles, keep stirring and cooking for just one minute more to cook out that starchy taste. Now, kill the heat.
Here comes the delicate part: tempering the egg yolks. In a separate small bowl, whisk your four egg yolks really well. You need to slowly, slowly dribble about 1 cup of that hot milk mixture into the yolks while whisking the yolks nonstop. If you dump it all in at once, you’ll end up with scrambled eggs in your filling, and nobody wants that!
Once those yolks are warmed up (tempered), pour that yolk mixture back into the saucepan with the rest of the milk base. Return it to the medium heat. Keep stirring constantly until it thickens up again and comes to a good boil. Boil it for one final minute while stirring.
Remove it from the heat, stir in that butter and vanilla until everything is glossy and melted. To prevent a gross skin from forming while it chills—which ruins the texture—press a piece of plastic wrap directly onto the surface of the cream. Pop this in the fridge for at least 2 hours. You need this gorgeous Pastry Cream Recipe to be thoroughly chilled before assembly!
Finishing with the Chocolate Ganache Topping
Time for the chocolate drizzle! Take your finely chopped semi-sweet chocolate and put it into a heatproof bowl. Don’t skimp on the quality here; it makes a huge difference in the final look of that Decadent Chocolate Glaze.
In a little saucepan, heat your heavy cream until it just starts to simmer—you’ll see tiny bubbles around the edges. Don’t let it boil over, or you’ll scorch it!
Gently pour that hot cream right over the waiting chocolate. Set a timer for 5 minutes! Seriously, just leave it alone so the heat can work its magic. After 5 minutes, start whisking gently from the middle outwards until you have a smooth, beautiful mixture. If you have your optional corn syrup, whisk that in now; it helps keep the top soft and super shiny.
Let this ganache cool down until it’s thick enough to coat a spoon but still very pourable. If it gets too stiff, just warm it ever so slightly over a double boiler, but be gentle!
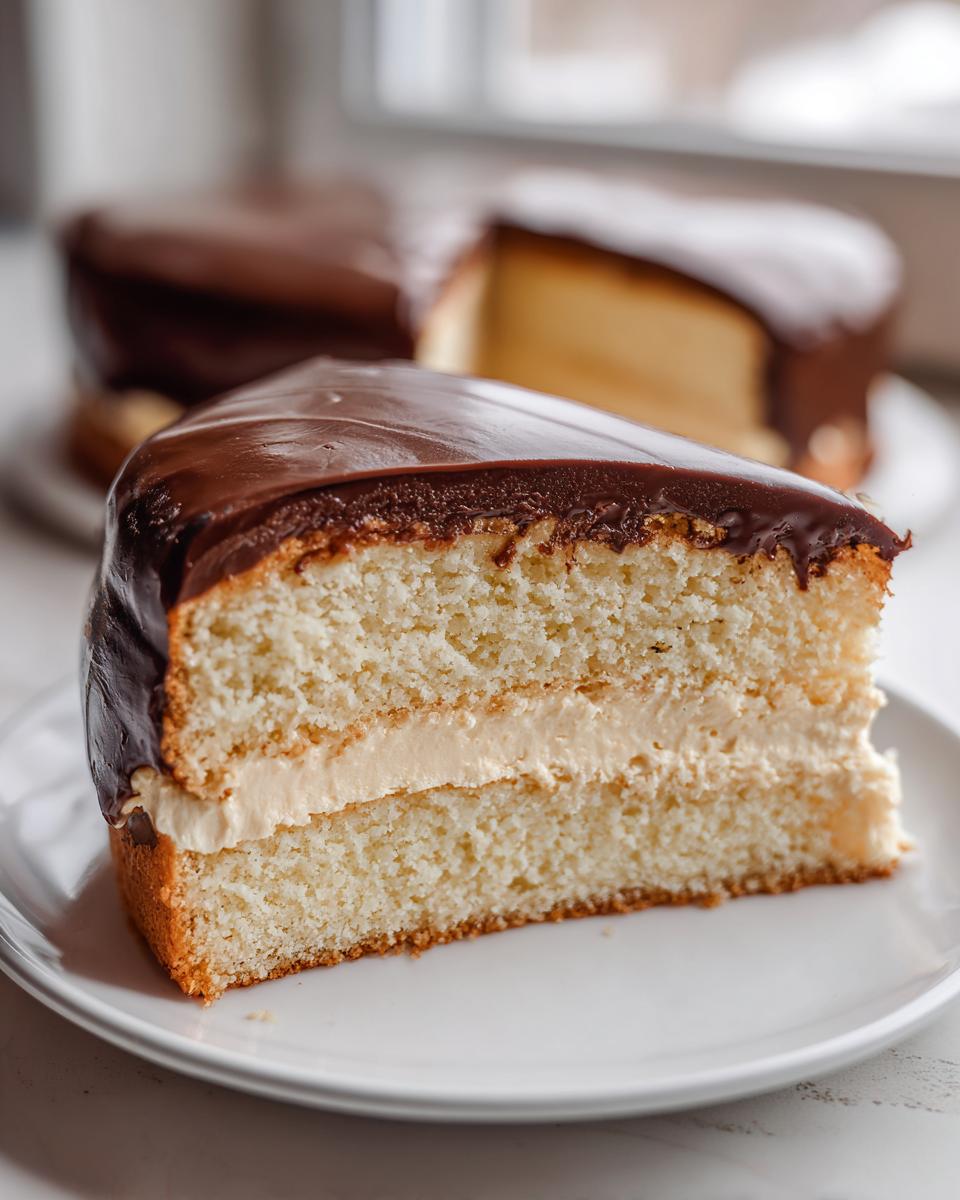
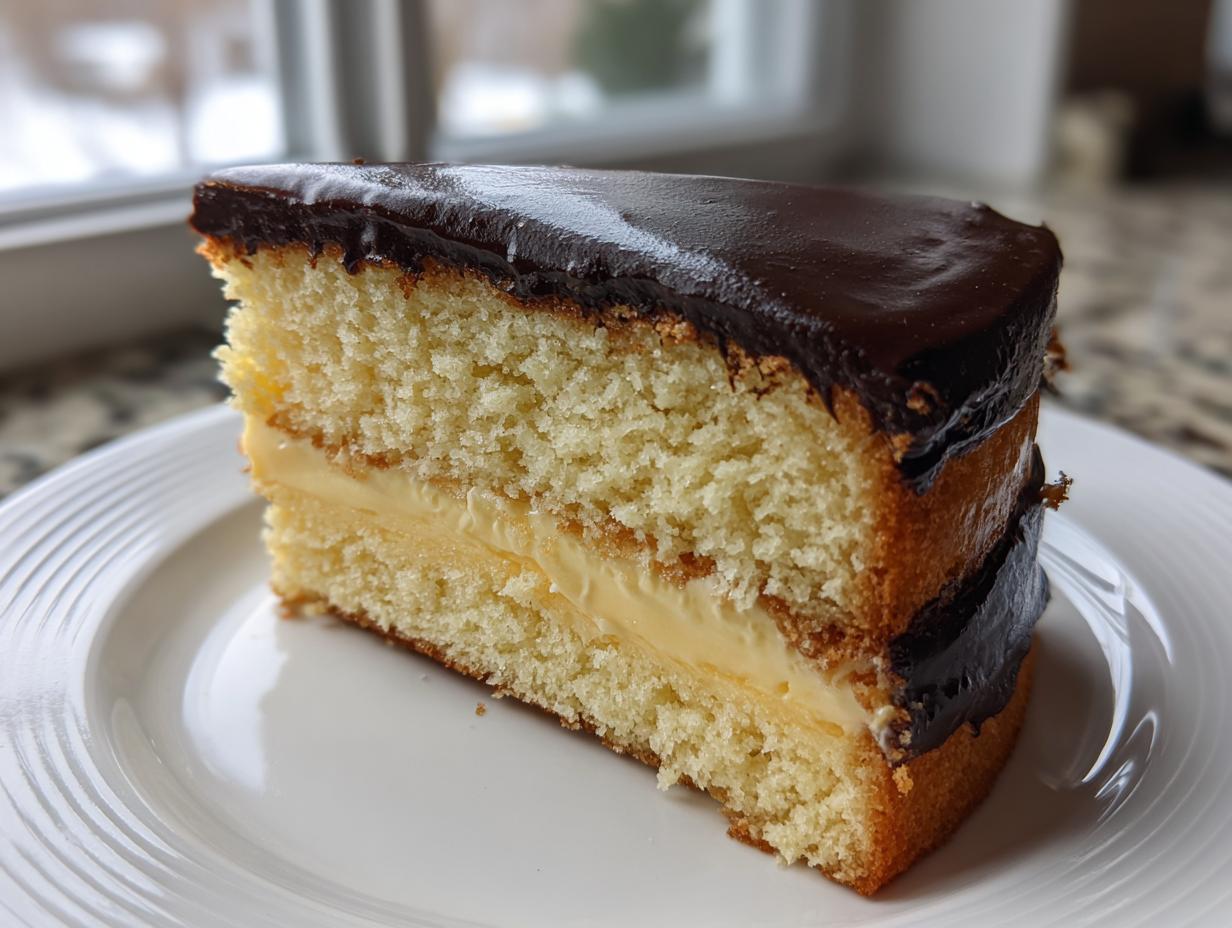
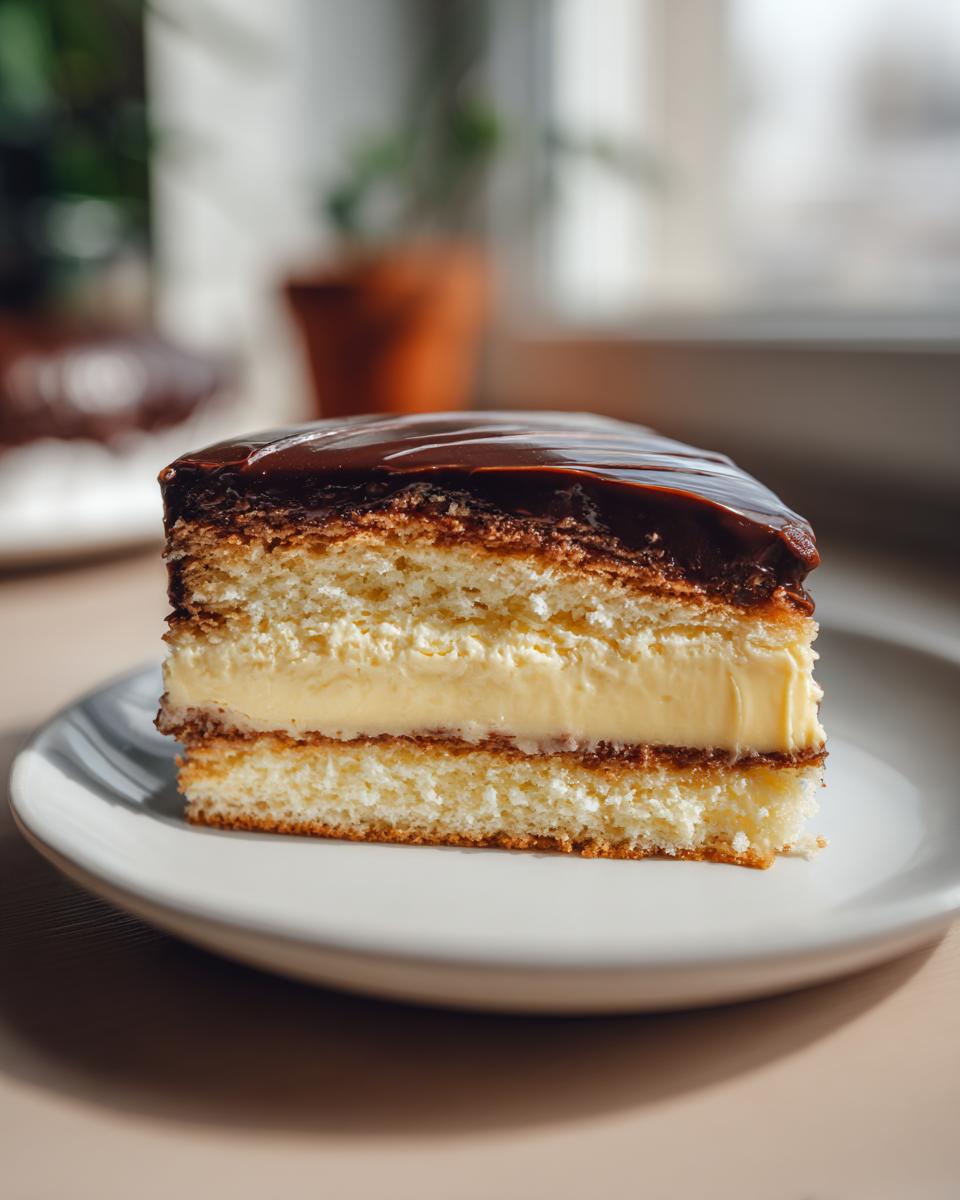
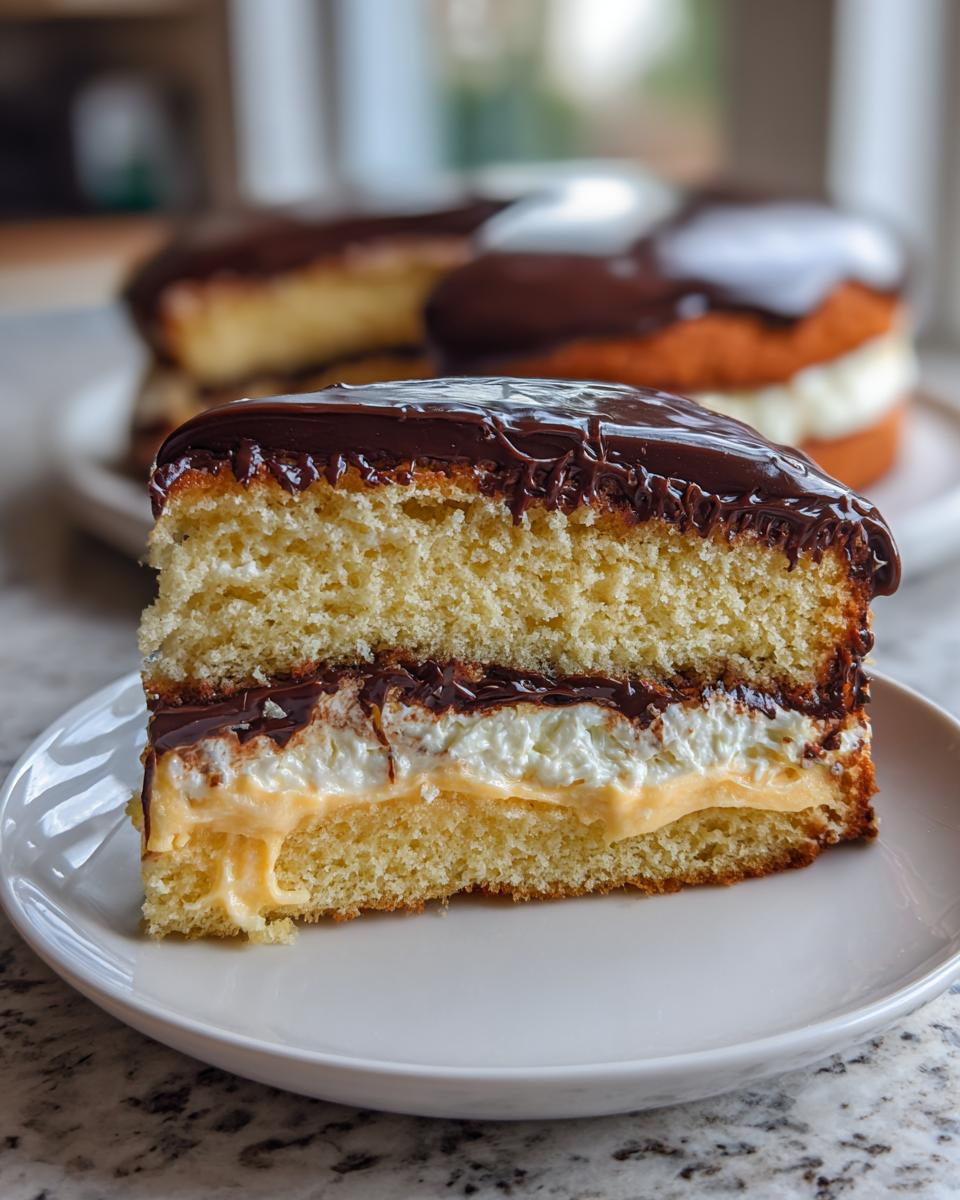
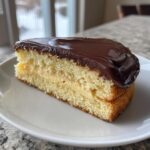
Assembling Your Showstopper Boston Cream Pie
It’s the moment of truth! Take one cooled cake layer and set it immediately on your final serving plate. This is important because once the chocolate goes on, it’s staying put!
Take the chilled, firm pastry cream out of the fridge. Give it a quick whisk to loosen it up slightly, then spread that entire batch evenly across your bottom cake layer. Don’t push down too hard, you don’t want to compress the fluffy cake!
Carefully place the second cake layer right on top of the cream mound. Try to center it nicely!
Now, pour that slightly cooled chocolate ganache right over the very center of the top cake. Use a spatula or the back of a spoon to gently nudge the chocolate out towards the edges. You want some of it to drip naturally down the sides—that’s the classic look! If you want to read more about making beautiful layer cakes, check out this Boston Cream Pie with Custard and Chocolate Glaze guide.
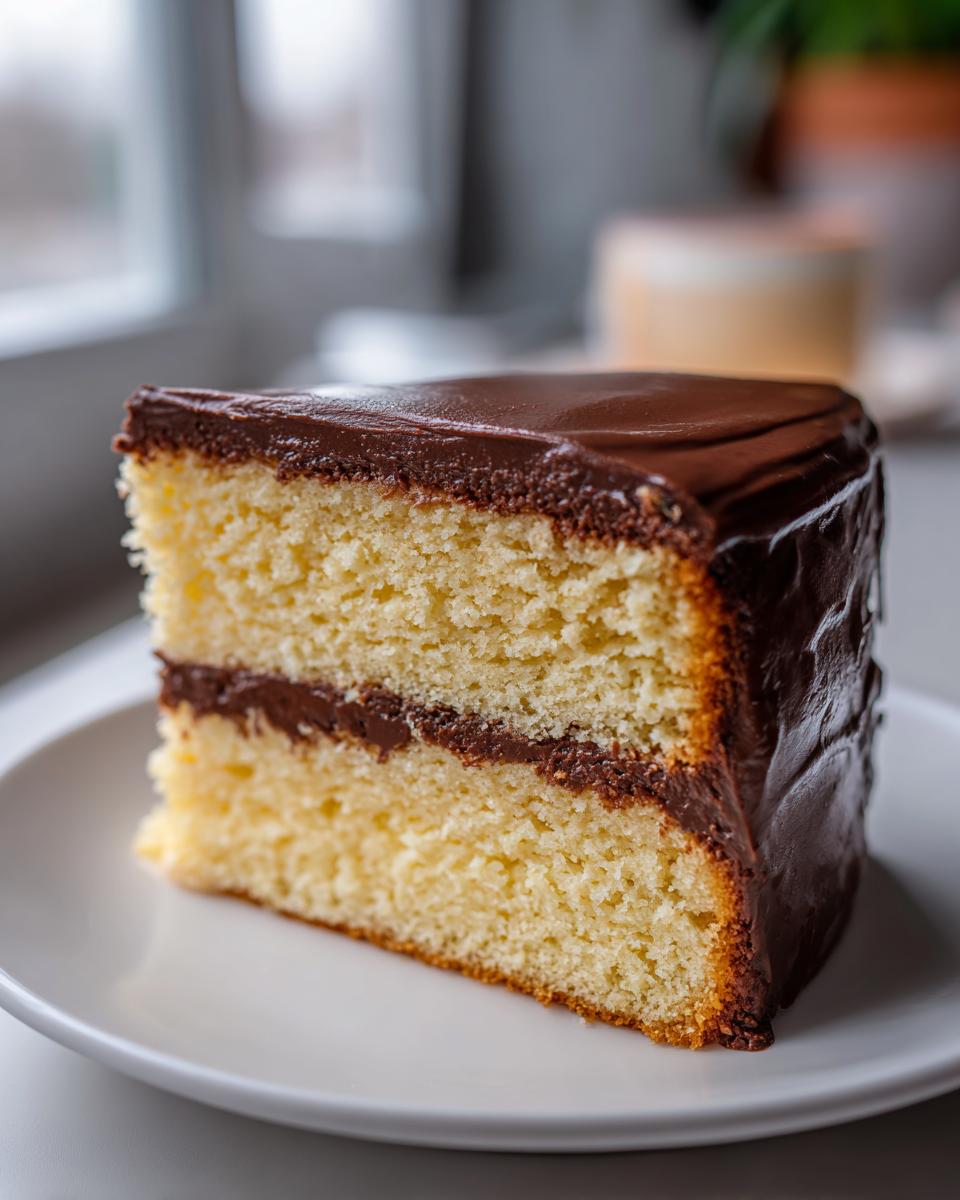
Finally, cover the whole thing loosely and let it chill in the refrigerator for at least one hour. This sets the cream and the glaze beautifully, making it sturdy enough to slice cleanly. You’re done! Get ready for those amazing compliments.
Tips for the Best Boston Cream Pie Success
Even though I’ve done all the heavy lifting with testing by using my science background, a few little quirks can still pop up at home. These are the tips I use every single time to make sure my Boston Cream Pie is flawless, just like my father taught me with his testing methods in the Navy kitchens.
First, let’s talk about that filling. If your pastry cream is too runny, it’s usually because you didn’t cook it long enough after tempering. Remember how I told you to boil it for a full minute after it came back together? That minute is essential to activate the cornstarch fully. If you skip this even by 30 seconds, your filling will weep out the sides when you slice it. It needs to be thick enough to stand up on its own!
Secondly, the glaze needs attention right before assembly. If you use the chocolate ganache when it’s blazing hot, it will soak right into the top cake layer, making it soggy, and you’ll lose that beautiful distinction between cake and topping. If you let it cool too long, it won’t spread. You need that sweet spot—it should be thick enough that when you tilt the bowl, it moves slowly like thick honey. That’s the perfect consistency for a perfect drape.
When it comes to chilling, don’t cheat it! That hour of chilling after assembly isn’t just for looks; it lets the flavors meld, and critically, it firms up the filling. If you try to cut into it warm, you’ll just get a messy pile of cake, cream, and chocolate everywhere. You want clean slices for that perfect presentation, so make sure it’s seriously cold before slicing. For more detailed thoughts on working with scratch recipes, you can peek at how others conquer the scratch Boston Cream Pie.
And one last thing: humidity is the enemy of the ganache. If it’s a super humid day, your chocolate topping might not set as nicely or it might stay sticky. If that happens, try adding just a tiny extra half-teaspoon of corn syrup, or make sure to chill it well in the fridge, but don’t leave it out too long before serving!
Ingredient Notes and Substitutions for Boston Cream Pie
I always encourage people to dive deep into their pantry, but with a classic like this, we need to be careful about powerful substitutions. Since I come from a Food Science background, I want to give you the “why” behind the ingredients we chose for this Classic Boston Cream Pie Recipe. Mainly, we stick to the recipe because the structure is delicate, but I know sometimes you need a workaround!
For the cake layers, we asked for whole milk for a reason—it provides the necessary fat content to keep the crumb tender while still interacting correctly with the leavening agents. If you are out of whole milk, 2% works, but you might get a slightly less rich texture. Skim milk is honestly a no-go; the lack of fat can make the cake taste a little dull.
When it comes to vanilla, if you have lovely vanilla bean paste but no pure extract, feel free to swap! Paste gives you those tiny black specks of actual vanilla bean, which makes the cream filling look absolutely stunning—it really ups the Showstopper Dessert factor. Start with 1 and 1/4 teaspoons of paste for every teaspoon of extract called for, or just use exactly what the recipe calls for; either way, that vanilla needs to shine in the custard!
Sourcing Chocolate for the Boston Cream Pie Glaze
Talking about the Chocolate Ganache Topping again—the chocolate you choose drastically changes the flavor profile of that glaze. We called for semi-sweet because it balances the sweetness of the pastry cream perfectly. It keeps things rich but not overly sugary.
If you decide to use bittersweet chocolate (say, 60% or higher cacao), you’ll notice the final topping is much deeper, almost dark chocolatey, and less sweet overall. That works beautifully if you love a more intense chocolate hit! On the flip side, using milk chocolate is rarely recommended here; it has too much sugar and fat, and your glaze will likely end up running right off the cake and won’t set properly. Stick to semi-sweet or bittersweet for that perfect, shiny, sliceable finish.
Storage and Reheating Instructions for Boston Cream Pie
So, you made a glorious, bakery-quality, completely from-scratch American Classic Dessert! Now what how do we keep that vanilla custard filling happy and safe? Since this Boston Cream Pie relies heavily on that dairy-based filling, storage is less about reheating and more about optimal chilling.
You absolutely must store this cake in the refrigerator. Don’t even think about leaving it on the counter for longer than about two hours. That rich cream filling just isn’t stable at room temperature, and we don’t want to take any chances with spoilage!
When you cover it to store it, use a cake dome if you have one, or cover the serving plate loosely with plastic wrap. Try to keep the plastic wrap from touching the chocolate topping directly if you can. If it does touch, don’t worry too much, but if you press it down hard, it might pull some of that beautiful chocolate glaze off when you unwrap it later. Trust me, I learned that one the hard way!
The best part about this cake is that it actually tastes better the next day! All the flavors—the vanilla, the chocolate, the slightly sweet cake—meld together beautifully overnight. You can safely keep this in the fridge for 3 to 4 days.
Now, about slicing this beauty! Since this cake needs serious chilling to keep that filling neat, pull it out of the fridge about 20 to 30 minutes before you plan to serve it. If it’s rock-hard right out of the fridge, the cake layers might actually crack when you try to slice through them. Letting it temper slightly on the counter softens the cake just enough for the knife to glide through cleanly. Use a long, sharp knife, and wipe the blade between each cut for the cleanest possible presentation. You want those beautiful layers to show!
If you’re looking for some other fantastic ways to serve or store classic desserts, check out this resource for other Boston Cream Pie ideas; sometimes repurposing leftovers is half the fun!
Frequently Asked Questions About Boston Cream Pie
Wait, It’s Called a Pie, But It’s Cake? What Gives?
That’s the funniest part of this whole dessert! It’s totally a cake, but it got its historical name because when it was first invented way back in the 1800s, pie pans were often still what most bakers used for any round, filled dessert. Honestly, if you search up other Best Pie Recipes, you might find this one mixed in, but don’t be fooled—it’s all sponge cake, rich custard, and chocolate glaze goodness. Sometimes in baking, the name just sticks!
Can I cheat and use a box mix for the cake layers?
Oh, I totally get the temptation when you’re short on time! While I strongly advocate for our Scratch Boston Cream Pie approach for the best results, if you are truly pressed for time, you *can* use a box mix. If you look at great resources like the one I found about Boston Cream Pie with Boxed Cake Mix, they’ll show you how to adjust for moisture loss.
When you do this, make sure you whip the batter extra well to try and incorporate more air—that’s the only way to get close to that genuinely fluffy texture we want for an Easy Layer Cake Recipe. But honestly, try making the cake from scratch once; you won’t go back!
How do I stop my bottom cake layer from getting soggy from the cream?
This is where the chilling time becomes essential. The moisture from the pastry cream *will* try to soak into that cake foundation. The trick is twofold: first, make sure your pastry cream is completely chilled and firm before it ever touches the cake. Second, you absolutely need that final chill time after assembly!
Once you’ve layered the cake, the cream, and the chocolate glaze, pop the whole thing in the fridge for at least an hour. This allows the set cream to act as a protective barrier before slicing. If you don’t chill it, the cake absorbs the moisture too quickly and turns into mush.
What if I prefer a different dessert idea instead of the traditional pie?
That’s the fun part of loving a classic—you can tweak it! People turn this into amazing treats. You can make Boston Cream Pie Cupcakes, which are fantastic for parties because they are pre-portioned. Or, if you want something completely over-the-top and no-bake, you can even find recipes for things like Boston Cream Pie Lasagna! If you’re curious about those fun twists, check out this wild Boston Cream Pie Lasagna idea.
Can I make the vanilla custard filling ahead of time?
You certainly can, and I highly recommend it! The Vanilla Custard Filling actually tastes better after it’s had a full day in the fridge for those flavors to deepen up. Just follow the steps, chill it with plastic wrap directly touching the surface, and keep it refrigerated for up to three days before you bake your cake layers. As long as both components are cold when you assemble, you’re golden!
Nutritional Estimates for This Boston Cream Pie Recipe
Alright, let’s talk about the ‘enjoyment factor’ versus the ‘nutrition facts.’ We all know an incredible, deeply decadent dessert like this isn’t exactly a salad substitute! Since we built this Classic Boston Cream Pie from scratch using real butter, rich cream, and quality chocolate, it is definitely designed to be a special occasion treat.
These numbers below are just estimates, remember, based on that yield of 8 generous slices. If you cut it smaller, or if you used margarine instead of butter (which, frankly, I hope you didn’t!), those numbers will change. But for a true, from-scratch experience, here is the breakdown per slice:
- Serving Size: 1 slice
- Calories: 450
- Sugar: 45 grams (Yes, it’s high, because deliciousness!)
- Fat: 24 grams
- Saturated Fat: 14 grams
- Carbohydrates: 55 grams
- Protein: 6 grams
- Cholesterol: 150 mg
See? It’s a showstopper across the board! This is meant to be savored, not tracked daily. When you pull out this Timeless Dessert Recipe, know that every calorie is earned through the amazing combination of fluffy cake and rich custard. Eat it with happiness!
Share Your Boston Cream Pie Creations
Well, we did it! We turned simple pantry staples into an incredible, bakery-quality Boston Cream Pie using completely scratch methods. I learned so much from my mom’s traditional cooking mixed with my formal food science training, and I truly hope that foundation shines through in how easy this felt for you.
This recipe is my promise—a promise of reliability and exceptional taste for your table. Now that you’ve created this Timeless Dessert Recipe, the magic really happens when you share it!
I absolutely love hearing from everyone who tries Alchemy Chef recipes. Did you manage to get that chocolate ganache perfectly glossy? Was your vanilla pastry cream perfectly thick? Don’t keep all that success to yourself!
- Please head back up to the top of the page and leave a star rating that reflects your experience.
- Then, jump down to the comments section and tell me exactly how it went! Did you make any little tweaks? Did you serve this on a special occasion? I read every single comment.
- If you snapped a picture of your beautiful, layered creation, please tag me on social media! Seeing your homemade masterpieces is the reason I do all this recipe development work. You can find inspiration for styling your layers over at Pretty. Simple. Sweet.!
Thank you for trusting me with your baking adventure. Go enjoy that incredible slice of Boston Cream Pie—you totally earned it, chef!
PrintClassic Boston Cream Pie From Scratch
Make the iconic Boston cream pie at home. This recipe yields soft vanilla cake layers, rich vanilla pastry cream filling, and a glossy chocolate ganache topping for a bakery-style dessert.
- Prep Time: 45 min
- Cook Time: 30 min
- Total Time: 3 hours 15 min
- Yield: 8 servings 1x
- Category: Dessert
- Method: Baking
- Cuisine: American
- Diet: Vegetarian
Ingredients
- For the Vanilla Cake:
- 1 3/4 cups all-purpose flour
- 1 1/2 cups granulated sugar
- 1 tablespoon baking powder
- 1/2 teaspoon salt
- 1/2 cup unsalted butter, softened
- 2 large eggs
- 1 teaspoon vanilla extract
- 1 cup whole milk
- For the Vanilla Pastry Cream Filling:
- 1/2 cup granulated sugar
- 1/4 cup cornstarch
- 1/4 teaspoon salt
- 2 cups whole milk
- 4 large egg yolks
- 2 tablespoons unsalted butter
- 1 teaspoon vanilla extract
- For the Chocolate Ganache Topping:
- 4 ounces semi-sweet chocolate, finely chopped
- 1/2 cup heavy cream
- 1 tablespoon light corn syrup (optional, for shine)
Instructions
- Prepare the Cake: Preheat your oven to 350°F (175°C). Grease and flour two 8-inch round cake pans.
- In a large bowl, whisk together the flour, sugar, baking powder, and salt.
- Add the softened butter, eggs, and vanilla extract to the dry ingredients. Beat with an electric mixer on medium speed until just combined.
- Gradually add the milk and mix until the batter is smooth. Do not overmix.
- Divide the batter evenly between the prepared pans. Bake for 25 to 30 minutes, or until a toothpick inserted into the center comes out clean.
- Let the cakes cool in the pans for 10 minutes before inverting them onto a wire rack to cool completely.
- Prepare the Vanilla Pastry Cream: In a medium saucepan, whisk together the sugar, cornstarch, and salt.
- Gradually whisk in the milk until smooth. Cook over medium heat, stirring constantly, until the mixture thickens significantly and begins to bubble. Continue to cook and stir for 1 minute more.
- In a separate bowl, whisk the egg yolks. Temper the yolks by slowly whisking about 1 cup of the hot milk mixture into the yolks.
- Pour the tempered yolk mixture back into the saucepan with the remaining milk mixture. Cook over medium heat, stirring constantly, until the cream thickens again and comes to a boil. Boil for 1 minute.
- Remove from heat. Stir in the butter and vanilla extract until smooth.
- Press plastic wrap directly onto the surface of the pastry cream to prevent a skin from forming. Chill in the refrigerator for at least 2 hours, or until completely cold.
- Prepare the Chocolate Ganache: Place the chopped chocolate in a heatproof bowl.
- Heat the heavy cream in a small saucepan until it just begins to simmer around the edges. Do not boil.
- Pour the hot cream over the chocolate. Let it stand undisturbed for 5 minutes.
- Whisk gently until the mixture is smooth and glossy. Stir in the corn syrup, if using. Let the ganache cool slightly until it reaches a thick, pourable consistency.
- Assemble the Pie: Place one cooled cake layer on a serving plate.
- Spread the chilled pastry cream evenly over the first cake layer.
- Top with the second cake layer.
- Pour the slightly cooled chocolate ganache over the top center of the cake, allowing it to drip naturally down the sides.
- Chill the assembled Boston Cream Pie for at least 1 hour before slicing and serving.
Notes
- For the fluffiest cake, make sure your butter and eggs are at room temperature before mixing.
- If you want a very thick, bakery-style filling, chill the pastry cream for longer than two hours.
- Use high-quality chocolate for the best flavor in your chocolate ganache topping.
Nutrition
- Serving Size: 1 slice
- Calories: 450
- Sugar: 45
- Sodium: 250
- Fat: 24
- Saturated Fat: 14
- Unsaturated Fat: 10
- Trans Fat: 0.5
- Carbohydrates: 55
- Fiber: 2
- Protein: 6
- Cholesterol: 150