
You know those moments? When the craving hits, and you need something rich, creamy, and ridiculously chocolatey *right now*? Forget complicated baking; we’re talking about pure dessert alchemy. I’m Juliana Cruz, and as someone who lives in the world of food science, I promise you reliability, but I also absolutely love a good shortcut. That’s why this oreo fudge recipe is my secret weapon. It uses just three simple ingredients to deliver that unmistakable cookies and cream decadence in minutes. If you want the absolute easiest, fastest, and most dependable no-bake fudge you’ve ever made to satisfy that sweet tooth, you’ve come to the right place.
- Why This Oreo Fudge Recipe Is Your New Go-To Shortcut Fudge Recipe
- Gathering Ingredients for Your White Chocolate Oreo Fudge
- Step-by-Step Guide to Making Easy Oreo Fudge
- Tips for Success with No Bake Fudge
- Storage and Reheating Instructions for Homemade Candy
- Serving Suggestions for Decadent Chocolate Treats
- Frequently Asked Questions About Oreo Fudge
- Nutritional Estimates for This Simple Dessert Idea
- Share Your Indulgent Sweets Creations
Why This Oreo Fudge Recipe Is Your New Go-To Shortcut Fudge Recipe
Honestly, sometimes I need a treat yesterday. This recipe cuts out all the fuss, which is why it became an instant favorite for busy weeknights or unexpected company. It’s pure, effortless indulgence. When I test recipes professionally, I look for reliability, and this one never fails to deliver that signature crunch and smooth melt. You can’t go wrong when the base is this simple!
It’s great to know that when you need something truly decadent, you don’t need an hour of standing over a stove. I know so many cooks who keep the two required shelf-stable ingredients tucked away just for emergencies!
The Magic of 3 Ingredient Fudge
The core of this recipe’s genius is its simplicity. We are talking about just three essential players to get this done: white chocolate, condensed milk, and the cookies. By using sweetened condensed milk, we skip the tedious process of candy-making—you know, the part where you have to hit a specific temperature! That means no sugar crystallization, no grainy texture, just perfectly creamy results every single time.
Achieving Perfect Cookies and Cream Fudge Every Time
Because the structure relies on that high-quality melted chocolate and the sugar content of the condensed milk, the consistency is always spot on. You get that satisfying, thick bite you expect from homemade candy. I actually shared a variation of this over at Made in a Pinch once, and the comments were full of people realizing they could nail fudge without any struggle. It’s the ultimate foolproof method for that classic cookies and cream experience.
Gathering Ingredients for Your White Chocolate Oreo Fudge
Okay, before we even think about melting anything, let’s look at what you need. Since this is a three-ingredient wonder, every component really gets a moment to shine, so make sure they’re good! The precision here is key, but don’t panic, it’s still super easy. Remember, we want that beautiful richness in our homemade candy, and these components deliver it.
- 1 (14 ounce) can sweetened condensed milk
- 2 cups white chocolate chips
- 3 cups crushed Oreo cookies (about 24 cookies)
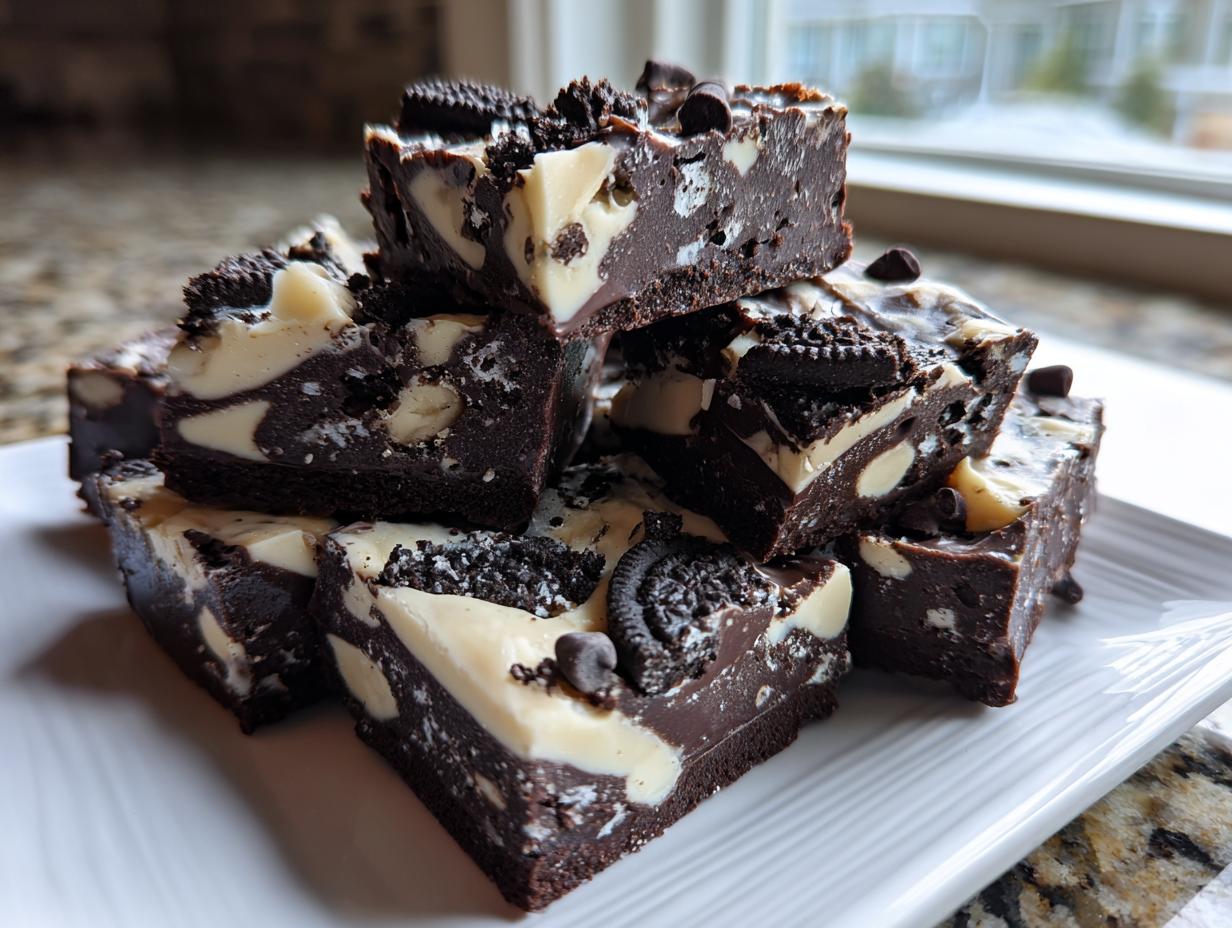
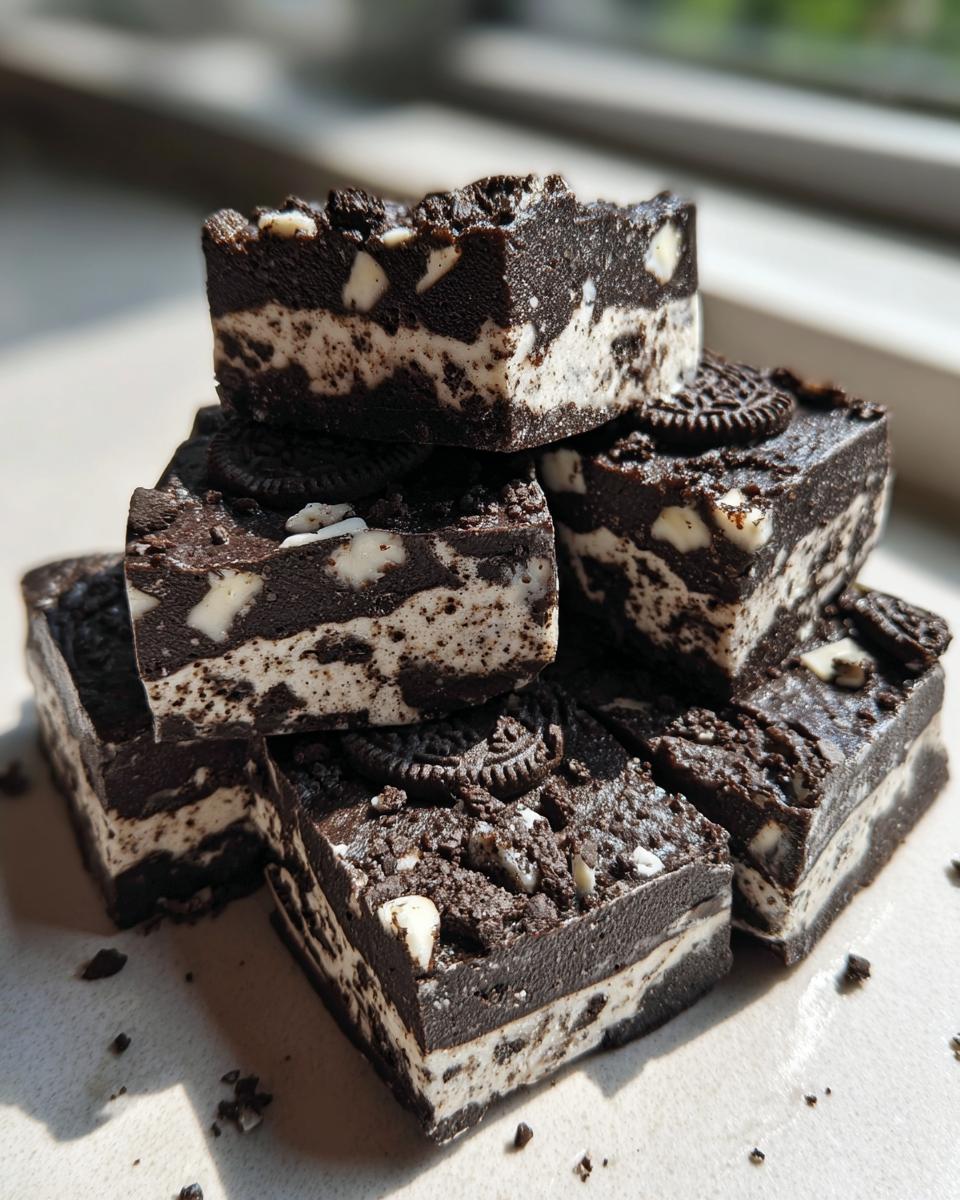
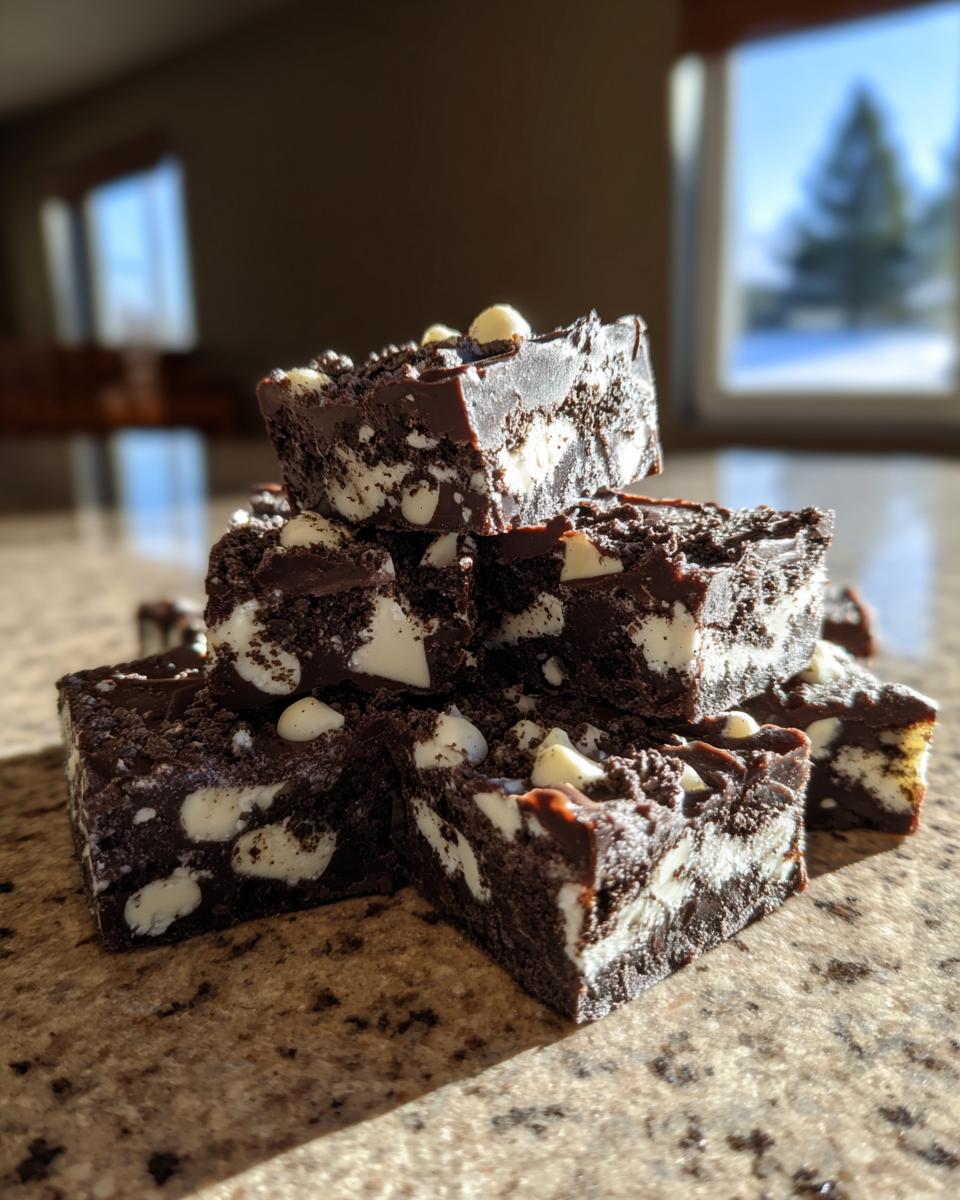
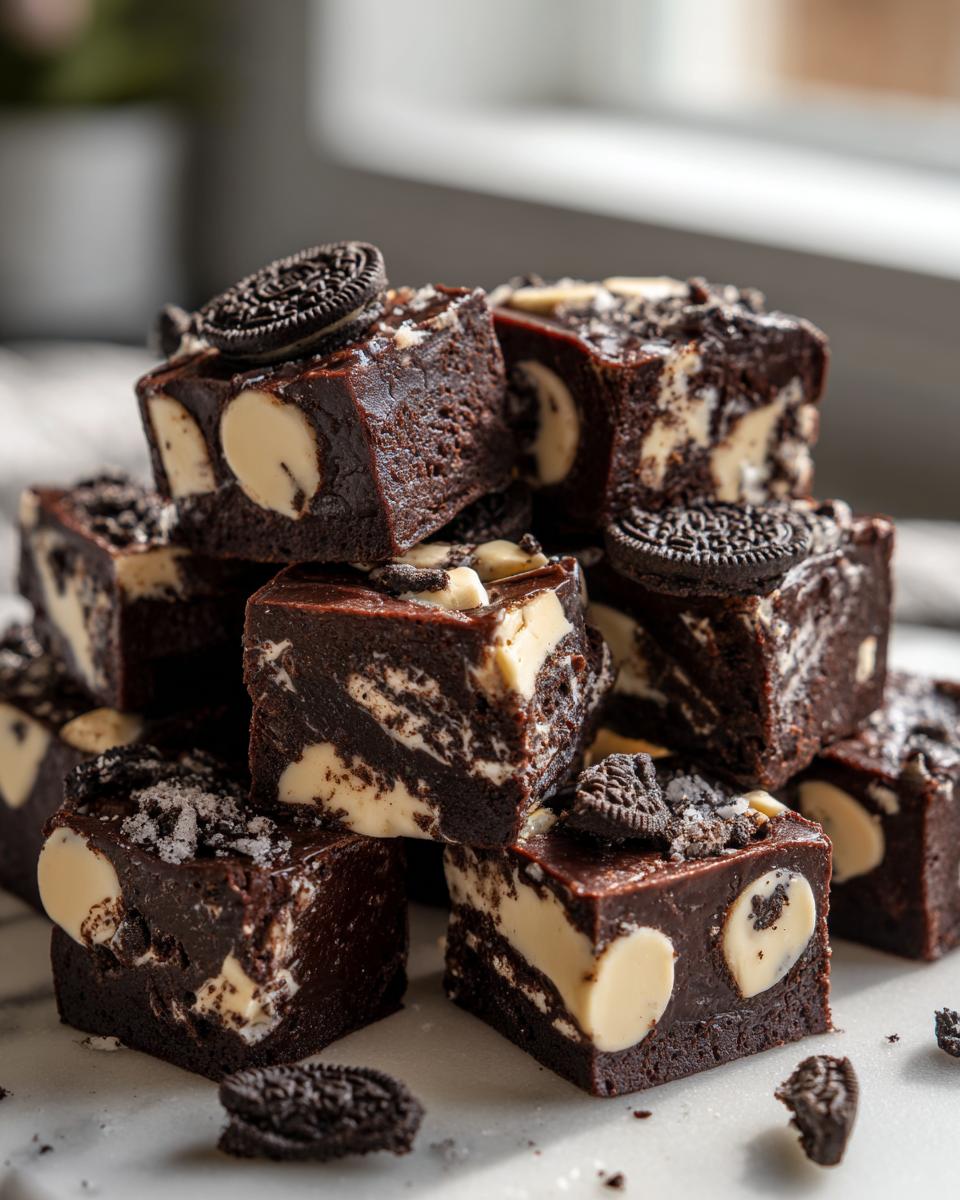
When you crush those Oreos, remember my food science training kicks in here: we crush the whole thing! Yes, cream filling and all. That cream filling melts slightly and helps bind the fudge together beautifully while adding extra sweetness and that signature look. Don’t worry about getting a perfect fine dust; some chunks are exactly what we are aiming for in this white chocolate oreo fudge.
Ingredient Notes and Substitution Tips
That note about the white chocolate is important. Since it’s doing a lot of the heavy lifting for texture, use chips you know melt well—sometimes those baking bars have stabilizers that make them tough to work with in a microwave. But what if you aren’t a pure white chocolate fanatic? If you want a slightly darker, maybe deeper profile in your cookies and cream fudge, you absolutely can swap out half of those white chips for semi-sweet chocolate chips. Trust me, it takes the flavor profile up a notch but keeps it firmly in the easy category. Just make sure they are nice quality chips for the best melt!
Step-by-Step Guide to Making Easy Oreo Fudge
This section is where the alchemy truly happens, and it’s so fast you won’t even need to preheat an oven! I remember one Thanksgiving when my Aunt Clara showed up unexpectedly after driving six hours, and I realized I hadn’t made any homemade candy for the dessert table. I whipped up a batch of this easy oreo fudge while she was catching up on stories, and it was chill time by the time we sat down for dinner. Saves lives, I tell you!
Since this is a no bake fudge recipe, precision isn’t about temperature, it’s about careful mixing. Follow these steps exactly, and you’ll have the richest, creamiest fudge ready to go. I even got asked about how I make mine so quickly over on Baking Envy’s page once!
Preparing Your Pan and Melting the Base
First things first: get your pan ready! You need an 8×8 inch dish, and lining it with parchment paper is a non-negotiable step. Make sure you leave an overhang—those paper ‘handles’ are what we use later to lift the entire block out cleanly. A little light greasing on the paper won’t hurt either, just for good measure. Next, the white chocolate chips go into a sturdy, microwave-safe bowl. Here’s the trick so your chocolate doesn’t seize up: zap it in 30-second bursts. Stir thoroughly after every single burst, even if it looks mostly melted. If you rush this part, you end up with hard, grainy chunks instead of that dreamy smooth base we need.
Combining Ingredients for the Quick Fudge Recipe
Once that white chocolate is absolutely silken smooth, pour in the entire can of sweetened condensed milk. Now, mix well until everything looks unified—like thick, pale caramel. Don’t stop stirring until you see no streaks of pure white chocolate left. Then, we introduce the crunchy bits! Gently fold in your pre-crushed Oreos. I stress ‘gently’ because we want the cookie pieces suspended nicely throughout the fudge, not smashed further into dust. Use a spatula and cut the mixture a couple of times, then scrape the bowl bottom and repeat until the cookies are just distributed.
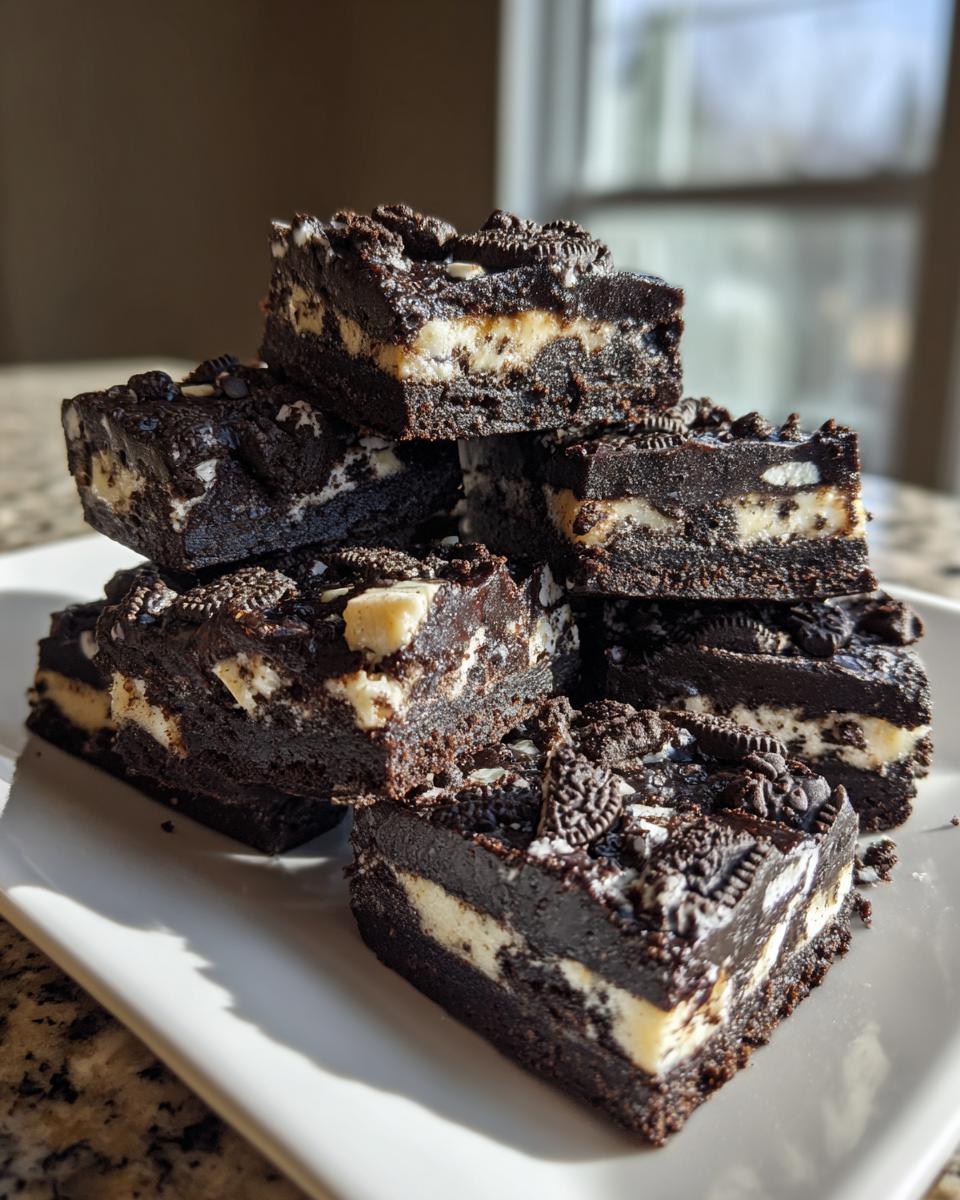
Setting and Slicing Your Oreo Fudge
Spread that glorious mixture evenly into your prepared pan. Give it a little tap on the counter to settle any air pockets. Now it needs time to firm up so we can handle it. You must set this aside to refrigerate for a minimum of two hours. If you try to cut it before that two-hour mark, you’ll just end up with a gooey mess on your knife, which, while tasty, isn’t neat oreo fudge! Once it’s completely firm, use the parchment overhang to lift the whole slab out onto a cutting board. Slice it into neat squares—I aim for about 36 pieces—and you are officially ready to enjoy the best shortcut fudge recipe ever.
Tips for Success with No Bake Fudge
Even though this is a shortcut recipe, a couple of little nudges can ensure your no bake fudge is perfection and not just a puddle. Since we aren’t using the traditional boiling method, we rely entirely on the ingredients setting correctly. If your fudge comes out too soft after the chilling time, nine times out of ten, it’s because the white chocolate wasn’t fully melted or you didn’t use the full can of condensed milk. That milk is crucial for structure!
A handy tip from my kitchen notes is about crushing those cookies. If you want that ultra-creamy melt but still need visible cookie pieces, throw the Oreos right into a sturdy zip-top bag and smash them with a rolling pin. It’s way faster than a food processor and gives you more control over the chunks. Remember what I shared earlier: if you really want to deepen that white chocolate flavor, you can always swap half the chips for semi-sweet chocolate chips, but make sure they blend out smoothly before adding the cookies. Check out a similar technique here.
Storage and Reheating Instructions for Homemade Candy
So you made it—you have a gorgeous slab of homemade candy, and now you need to know how to keep it tasting fresh for as long as possible. Since this fudge relies on chocolate and condensed milk rather than eggs or butter right out of the fridge, it’s pretty stable, which is part of why it makes such a great holiday fudge gift!
The absolute best way to store this oreo fudge is to keep it covered tightly in an airtight container. Here’s where things get interesting: depending on how warm your kitchen is, you might prefer the fridge or the counter. If you live somewhere cool, keeping it in an airtight container at cool room temperature is fine for about a week. It will stay slightly softer that way, which some people love!
If your kitchen tends to run warm, or if you made a huge batch and want it to last longer—say, up to two weeks—pop that airtight container into the refrigerator. It will firm up quite a bit when chilled, so if you plan on serving fridge fudge, pull your pieces out about 15 minutes before you want to eat them. That little bit of time lets the texture relax back into that creamy dream state. And trust me, you won’t need to reheat it—it’s designed to be eaten cool or at room temp straight from the container!
Serving Suggestions for Decadent Chocolate Treats
Now that you’ve mastered the simplest, most satisfying decadent chocolate treats, the hard part is over—unless you are me, and the hardest part is making sure I don’t eat the entire batch before it gets shared! This cookies and cream fudge is so rich and intensely sweet that it pairs wonderfully with beverages that cut through that richness. Think about it: you don’t want to overload on sweetness, you want balance!
My absolute favorite way to serve this is alongside a steaming hot cup of black coffee. The slight bitterness of a good brew really makes the white chocolate and vanilla notes pop. Or, if I’m serving this to the kids, a tall glass of cold milk is non-negotiable. That classic combination never fails, and it makes the small squares feel even more satisfyingly indulgent.
But here’s an idea I sometimes use when I want to make it feel a little fancier, maybe for a holiday platter: pair a small square of this oreo fudge with a little bit of fresh, slightly tart fruit. Raspberries or a few slices of kiwi offer a wonderful acidic contrast to the sweet dairy base. It just brings everything together beautifully. If you’re looking for more ways to elevate easy treats like this, check out some great ideas over at SugarHero for inspiration!
Frequently Asked Questions About Oreo Fudge
I always get questions when people see how simple this recipe is! When you’re dealing with a shortcut fudge recipe, people naturally wonder about swapping components. I’ve collected the most common questions I get asked about making this the absolute best cookies and cream fudge possible. Don’t worry if you don’t have every exact ingredient; we can usually work around it!
Can I use dark chocolate instead of white chocolate in this oreo fudge recipe?
Oh, absolutely you can! This is one of the best parts about knowing the ‘why’ behind the recipe—you can adapt it! If you aren’t crazy about the very sweet profile that comes from using only white chocolate, feel free to substitute half of the white chocolate chips with semi-sweet or even milk chocolate chips. Just remember that the white chocolate is what helps bind it into that stable, creamy texture when combined with the condensed milk because of its specific fat content. If you switch to all dark chocolate, the fudge might come out a touch firmer, but it will be delicious! You can see a variation using dark chocolate foundations over at Cucina De Yung.
How long does this no bake fudge stay fresh?
This is the beauty of using sweetened condensed milk; it acts as a preservative because of its high sugar content. If you store your no bake fudge tightly sealed in an airtight container, it generally stays fantastic at room temperature for about a week. If you happen to refrigerate it—which I sometimes do if my kitchen is super warm—it can easily last up to two weeks. Just remember to let those chilled squares sit out for 15 minutes before serving so they soften up back to that perfect, melt-in-your-mouth consistency!
What happens if I use regular milk instead of sweetened condensed milk?
Please, please don’t try to substitute regular milk for the sweetened condensed milk in this recipe! This is a critical point in any quick fudge recipe. Regular milk is mostly water, and it won’t provide the necessary sugar content or thickness required to make the white chocolate set up into that fudgy block. If you used regular milk, you would end up with a runny, sweet chocolate soup, not a sliceable dessert. The condensed milk is what gives us that signature creamy structure without any candy thermometer!
Can I use different kinds of cookies in this simple dessert idea?
While the name screams Oreo, this is your kitchen, so you can totally experiment! If you want to try a different sandwich cookie that has a similar filling structure, like a chocolate wafer cookie, go for it. If you use something drier, like just graham crackers, you might find the fudge is a bit too soft since you lose the filling’s melting fat. For the best results matching the recipe’s intent, stick with a chocolate sandwich cookie of some kind for that classic ‘wow’ factor in your indulgent sweets.
Nutritional Estimates for This Simple Dessert Idea
Now, I know some of you are focused purely on the joy of eating this amazing oreo fudge—and I totally get it! But for those who like to keep track, I always provide estimates for transparency. Think of this as part of the science behind the magic; knowing what’s in your treat helps you enjoy it fully. Remember, because this is a homemade candy recipe built on rich ingredients like white chocolate and cookies, these squares are definitely an indulgence!
These numbers are based on cutting the entire batch into 36 neat little squares, as suggested in the recipe instructions. Every recipe developer I know will tell you that exact nutrition can vary slightly depending on the brand of white chocolate you use or how thick you cut your pieces, but this gives you a really solid benchmark for this simple dessert idea.
Here’s a general breakdown per square:
- Serving Size: 1 square
- Calories: 180
- Sugar: 18g
- Sodium: 95mg
- Fat: 11g
- Saturated Fat: 6g
- Carbohydrates: 19g
- Protein: 2g
Keep in mind that this is definitely richer than a standard baked good because we aren’t adding any bulky fillers—it’s pure, delicious, condensed-milk-and-cookie magic! For a more detailed look at how similar no-bake recipes balance out, you can check out the resources over at Winding Creek Ranch. Enjoy your decadent treat responsibly!
Share Your Indulgent Sweets Creations
Well, look at you! You’ve just created something truly fantastic with just a few simple moves. That’s the whole point of Alchemy Chef—turning the ordinary into these absolutely indulgent sweets without needing to spend an entire afternoon in the kitchen. Now that you have your beautiful, creamy, rich oreo fudge ready, I’d be thrilled if you shared your results with me!
Did you manage to keep your hands off the pan long enough to slice it cleanly? I want to see how you styled those little squares! Please, take a picture of your finished chocolate cookie fudge and tag me on social media. Seeing your successes is the best part of my job; it proves that everyone has that spark of kitchen alchemy inside them.
When you post, tell me what you loved most—was it how fast it came together, or the intense, creamy flavor bomb that hits you on the first bite? Hearing your feedback helps me keep developing recipes that are reliable and exciting for all of you. If you found this quick fudge recipe changed the way you think about making dessert for holidays or just Tuesday night, let me know! You can find more amazing, tested recipes like this one over at Flavorsimp.
Don’t forget to leave a star rating right here on the recipe card as well. Your direct feedback helps others trust this method as much as I do. Happy creating, and I can’t wait to see your cookies and cream masterpieces!
PrintEasy 3-Ingredient Oreo Fudge

Create rich, creamy cookies and cream fudge using only three simple ingredients. This no-bake shortcut recipe delivers decadent flavor fast, perfect for quick treats or holiday gifts.
- Prep Time: 10 min
- Cook Time: 0 min
- Total Time: 2 hr 10 min
- Yield: About 36 pieces 1x
- Category: Dessert
- Method: No Bake
- Cuisine: American
- Diet: Vegetarian
Ingredients
- 1 (14 ounce) can sweetened condensed milk
- 2 cups white chocolate chips
- 3 cups crushed Oreo cookies (about 24 cookies)
Instructions
- Line an 8×8 inch baking pan with parchment paper, leaving an overhang on two sides for easy removal. Lightly grease the paper.
- Place the white chocolate chips in a microwave-safe bowl. Microwave in 30-second intervals, stirring well after each interval, until the chocolate is completely melted and smooth.
- Pour the sweetened condensed milk into the melted white chocolate. Stir until the mixture is fully combined and uniform.
- Gently fold in the crushed Oreo cookies until they are evenly distributed throughout the fudge base.
- Pour the fudge mixture into the prepared baking pan and spread it evenly using a spatula.
- Refrigerate for at least 2 hours, or until the fudge is firm enough to slice.
- Use the parchment paper overhang to lift the fudge out of the pan. Cut the fudge into 1-inch squares. Store leftovers in an airtight container.
Notes
- For a shortcut, you can crush the Oreo cookies inside a zip-top bag using a rolling pin.
- If you prefer a darker fudge, substitute half of the white chocolate chips with semi-sweet chocolate chips.
- This **quick fudge recipe** sets best when chilled completely.
Nutrition
- Serving Size: 1 square
- Calories: 180
- Sugar: 18
- Sodium: 95
- Fat: 11
- Saturated Fat: 6
- Unsaturated Fat: 5
- Trans Fat: 0
- Carbohydrates: 19
- Fiber: 0
- Protein: 2
- Cholesterol: 10