
Oh, you are going to fall head-over-heels for this one! If you’ve ever scrolled through food photos and stopped dead because one dessert looked both utterly rustic and completely gourmet at the same time, I bet you were looking at a **Basque Cheesecake**. This simple Spanish sensation completely blew my mind when I first tried to crack the code. Forget everything you know about classic cheesecakes that need endless bowls of hot water; this one is pure magic born from high heat.
As someone who spent years studying the science behind baking—I’m Juliana Cruz, by the way—I truly appreciate recipes that look complicated but are scientifically simple. I took my background in professional recipe development and focused on nailing that incredible contrast: the deeply caramelized, almost burnt exterior giving way to the most decadent, creamy center imaginable. Trust me when I say, this Ultimate Easy Burnt Basque Cheesecake recipe is absolutely reliable; it’s tested to perfection so you get that beautiful jiggle every single time!
- Why This Ultimate Easy Basque Cheesecake Recipe Works
- Ingredients for Your Creamy Cheesecake Dessert
- How to Make Basque Cheesecake: Step-by-Step Instructions
- Basque Cheesecake Baking Tips for a Perfectly Burnt Exterior Cake
- Variations on the Classic Basque Cheesecake
- Loaf Pan Cheesecake Baking: A Simple Serving Solution
- Storage & Reheating Instructions for Your Basque Cheesecake
- Frequently Asked Questions About the Burnt Basque Cheesecake Recipe
- Nutritional Estimates for This Decadent Homemade Dessert
- Share Your Basque Cheesecake Creations
Why This Ultimate Easy Basque Cheesecake Recipe Works
I have two big things to tell you about this dessert that will change your baking game. First, it’s ridiculously easy. We’re talking about a decadent, **creamy cheesecake dessert** that requires zero fuss—no graham crackers, no crust prep, and definitely no scary water bath! Second, the flavor profile is addictive. That deeply caramelized top is crucial for the **best Basque Cheesecake flavor**, and that interior? It’s like a rich, set custard. It’s why I love sharing this no water bath cheesecake method.
When I finally nailed this version, I remember pulling it out of the oven, and it looked totally wrong—dark, cracked, floppy in the middle! But after chilling, that jiggle was perfect. That’s the moment I knew I had unlocked that **silky smooth cheesecake center** our family craves. It’s trustworthy baking, I promise!
Achieving the Perfect Caramelized Top Dessert
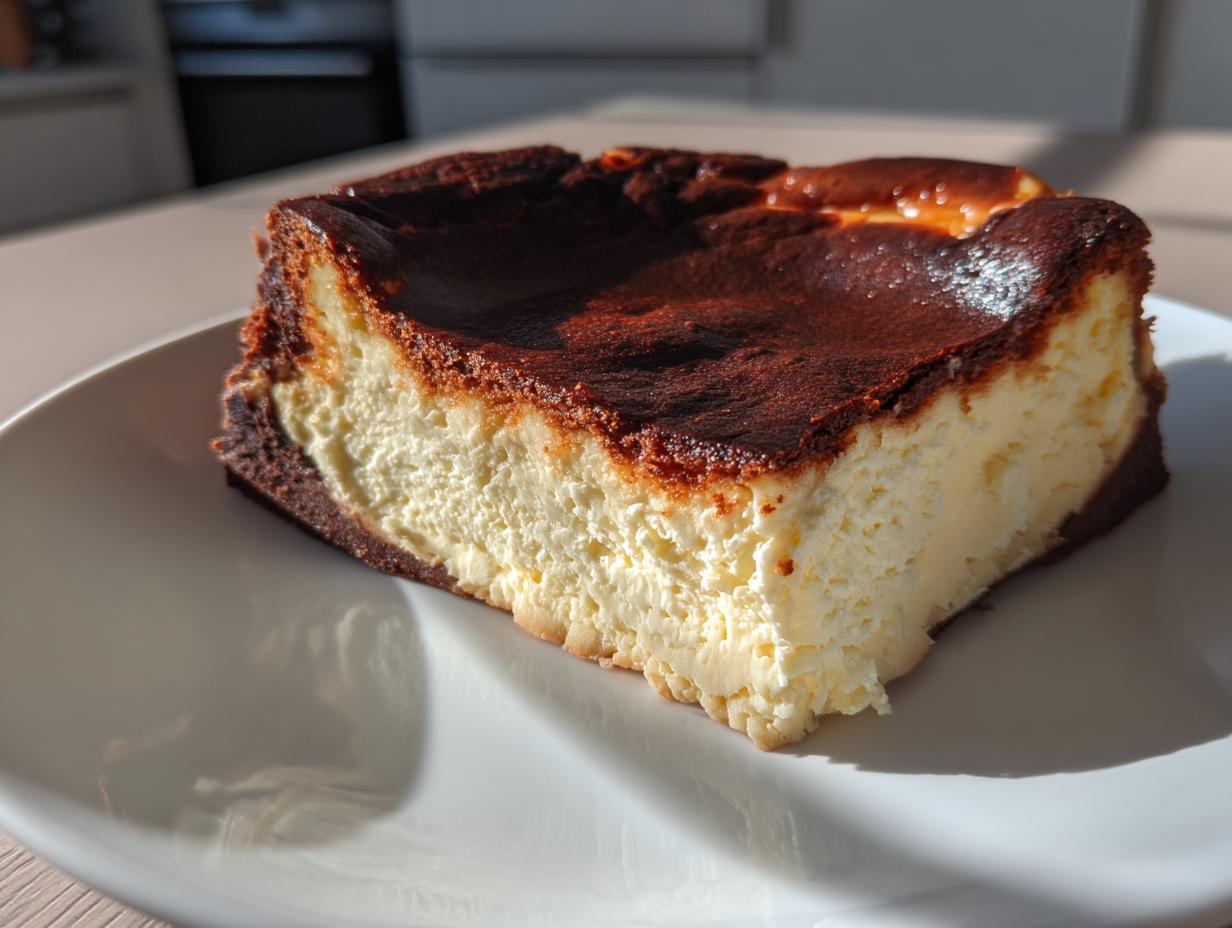
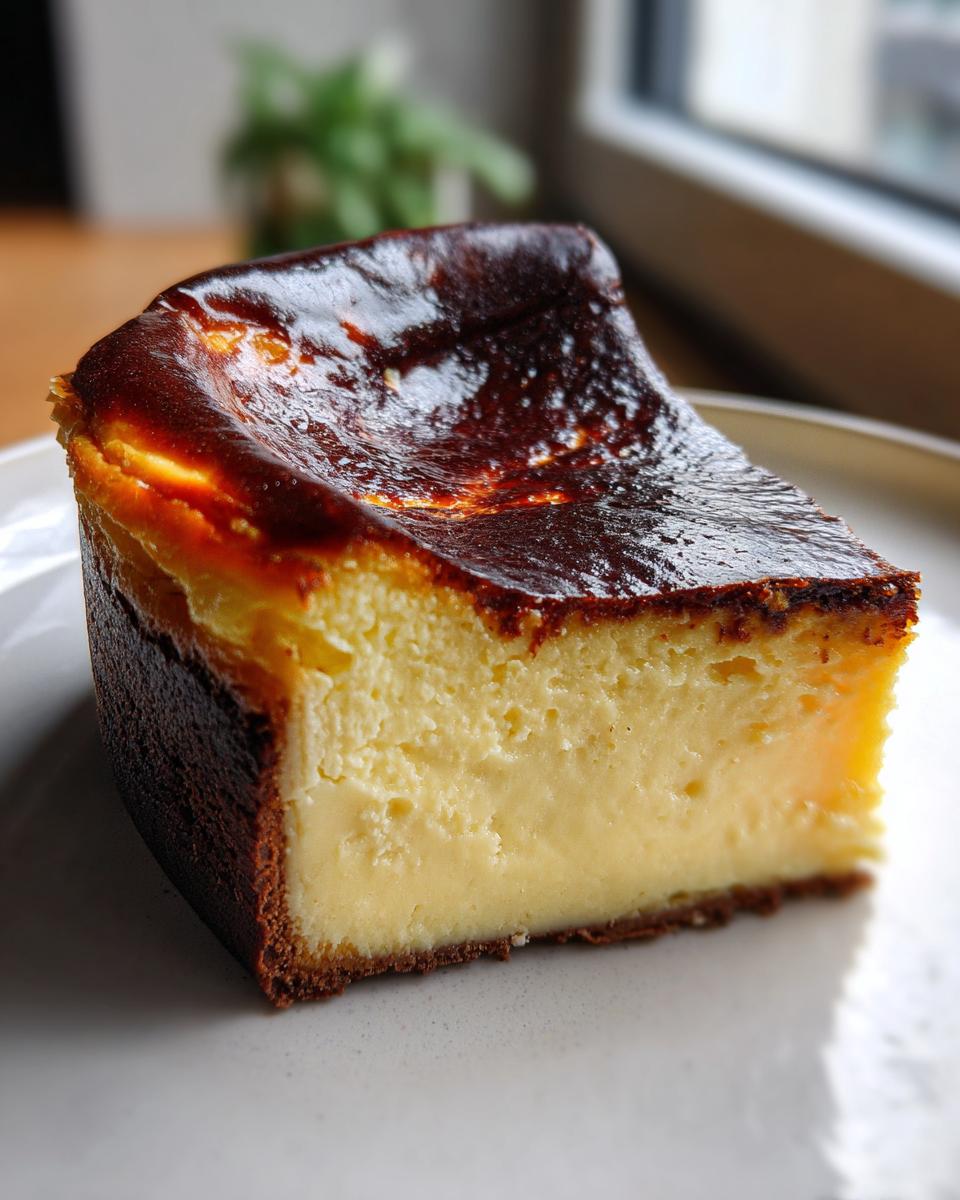
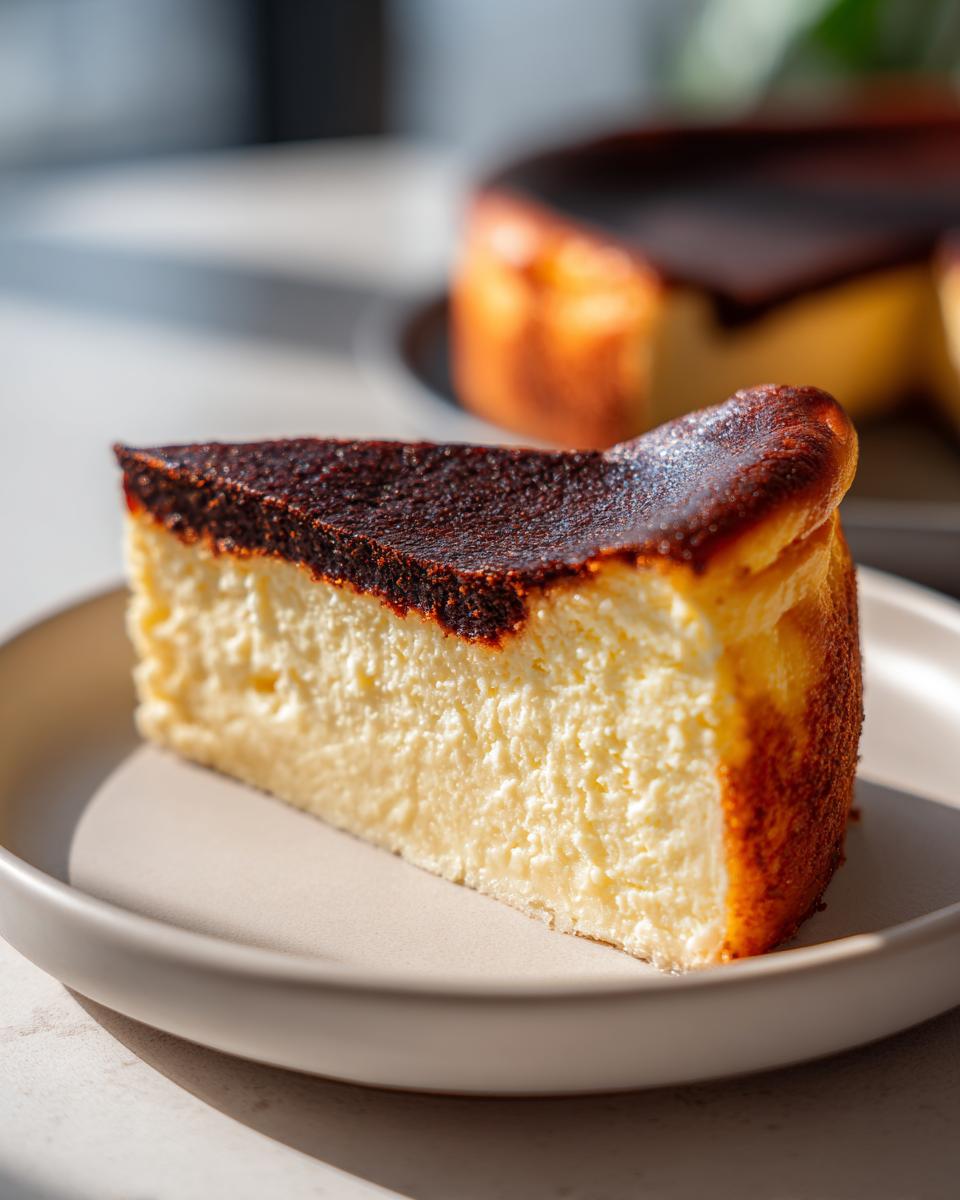
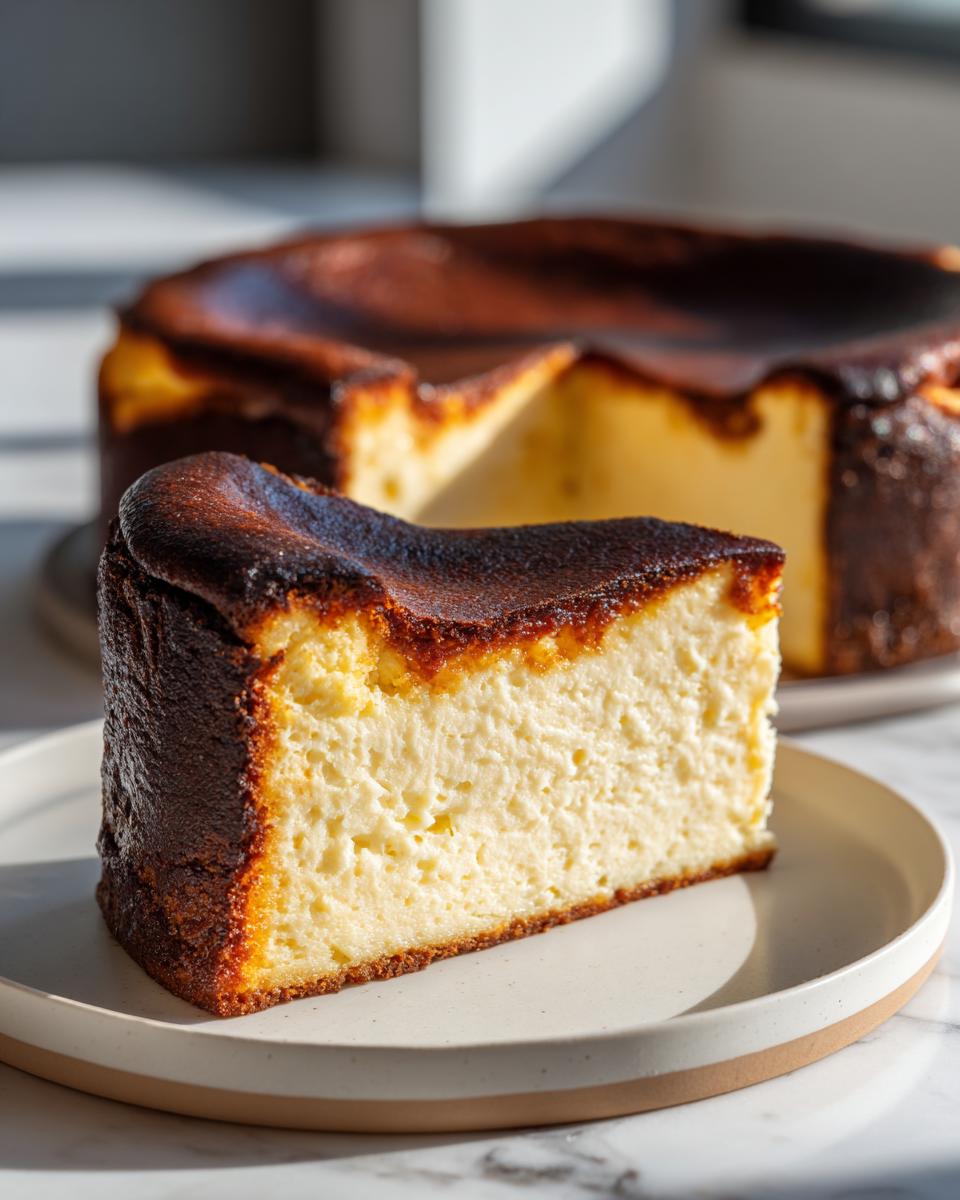
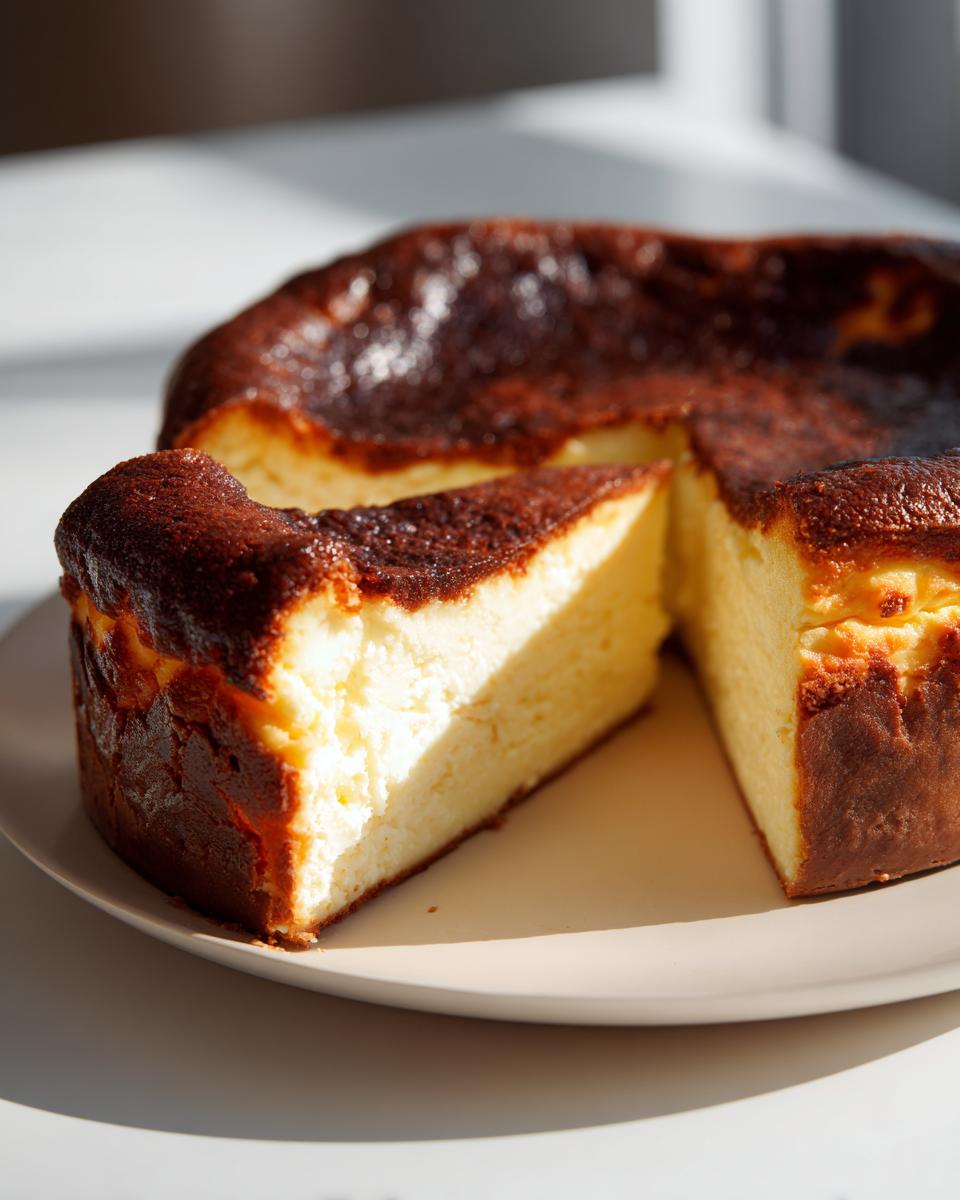
The entire mystique of the **Burnt Basque Cheesecake recipe** comes down to temperature. We bake this super hot, usually around 400°F, and that intense heat quickly browns the high-sugar top layer. It caramelizes incredibly fast, turning dark brown, even black in spots. Honestly, don’t panic! That exterior flavor is what balances the sweet, rich interior. It’s controlled caramelization, not failure!
Ingredients for Your Creamy Cheesecake Dessert
One of the things I adore about this San Sebastian dessert is how few things you actually need to buy! It’s truly a **minimal ingredient cheesecake**, which makes it so accessible for a **gourmet simple dessert**. For the best results—you know, achieving that perfect velvety texture—you absolutely must make sure your cream cheese and eggs are at room temperature. This isn’t a place to rush things! Getting those cold ingredients warm ensures your batter stays smooth, which is vital for a **crustless cheesecake tutorial** like this one. Check out this Basque burnt cheesecake guide if you want to see how temperature affects texture!
Here’s exactly what you need for this show-stopping, **decadent homemade dessert** experience:
- 900g full-fat cream cheese, softened
- 1 1/4 cups granulated sugar
- 6 large eggs, room temperature
- 2 cups heavy cream
- 1 teaspoon vanilla extract
- 1/4 teaspoon salt
- 1/4 cup all-purpose flour
How to Make Basque Cheesecake: Step-by-Step Instructions
Okay, let’s get serious about baking this beauty! This is where the magic happens, and I promise you, this process is so straightforward that you’ll wonder why you ever feared cheesecake. This **no fuss cheesecake** comes together fast, which is why it’s the ultimate crowd-pleaser. We’re aiming for that signature jiggle, so pay close attention to the mixing order.
First things first: crank that oven up! We need the heat ready to go before the thin batter hits the pan. Once it’s baking, it moves fast. We don’t want to waste any energy! Remember, the final, most important step isn’t baking—it’s chilling. That long chill time is what transforms this batter into a truly **creamy cheesecake dessert**.
Preparing the Pan for Your Rustic Cheesecake Recipe
You need to treat your pan right! Take two large pieces of parchment paper—I mean really large—and crisscross them inside your 9-inch springform pan. Really press that paper into the corners. You want the sides sticking up way over the edge. This overhang is crucial because it gives the **Basque cheesecake** room to climb high and then sink dramatically as it cools. It’s supposed to look dramatic!
Mixing the Batter for a Silky Smooth Cheesecake Center
Start by beating that softened cream cheese until it’s completely gone—no lumps allowed! That takes patience. Once the sugar is beaten in and it looks light, add those room-temperature eggs in one by one. Mix each one until it just disappears, but stop right there! Overmixing the eggs is how you introduce too much air, which leads to cracks later, and we want that **silky smooth cheesecake center**, not an airy one. After the cream, vanilla, and salt go in, sift that flour right over the top and gently fold it in with a spatula. Only fold until you don’t see white streaks. That’s it; you’re done mixing!
Pour everything into that prepared pan—don’t worry, it will look thin! Bake it for about 50 to 60 minutes. When you pull it out, the center should still be noticeably jiggly when you give the pan a gentle shake. If you’re looking for more technical deep dives, this external guide really breaks down the science of why that jiggle matters. After it cools on the rack, cover it loosely and let it chill in the fridge for at least six hours. I always do mine overnight. You can see some great before-and-after shots for visual confirmation over at this post!
Basque Cheesecake Baking Tips for a Perfectly Burnt Exterior Cake
Okay, let’s talk about that beautiful, scary-looking top. When you see the deep, dark color of a truly **perfectly burnt exterior cake**, I know your first instinct is to pull it out early. Don’t do it! This is where my Food Science brain kicks in, because that dark color is entirely surface level. I crank the heat up—we’re talking 400°F or higher—because the outside happens so fast that the inside has time to bake into that soft, melt-in-your-mouth custard we want.
My number one tip for making this **Basque cheesecake** work perfectly is trusting the jiggle. When you gently nudge your oven rack, the center should look like soft pudding that’s definitely not set yet. If it’s firm, you’ve gone too far and you might end up with denser cheesecake texture, which defeats the whole purpose! I used to worry about cracking, but honestly, a few cracks on the top just add to the rustic charm. If you want to see what I mean about keeping that high heat going, I always refer back to the testing results over at this resource!
Room Temperature vs. Chilled Serving for Basque Cheesecake
This is the final crucial decision you make, and it changes the whole experience! If you eat this **Basque cheesecake** straight from the fridge, it’s firm and rich, more like a traditional cake. But here’s the secret: let it sit on the counter for at least an hour, even two. When it comes up toward room temperature, that center turns gloriously soft and custardy. That’s when you discover the **best Basque Cheesecake flavor** in all its gooey glory.
Variations on the Classic Basque Cheesecake
While the classic version of this **Basque cheesecake** is stunning all on its own, sometimes I just crave a little extra *oomph*, right? Creating **cheesecake variations** is actually super easy because the base batter is so forgiving. Remember, we aren’t dealing with delicate crusts or stressful water baths here, so we have freedom!
My favorite simple switch-up is adding citrus zest before pouring the batter into the pan. A full teaspoon of fresh orange or lemon zest brightens up the richness beautifully. Or, if you’re feeling extra indulgent, swap out that teaspoon of vanilla extract for one of those gorgeous almond or bourbon extracts. I saw someone mention adding a swirl of melted white chocolate once—genius! You can find some amazing flavor ideas over at this link if you’re looking for inspiration before experimenting with your next batch.
Loaf Pan Cheesecake Baking: A Simple Serving Solution
Okay, so sometimes you don’t need a giant, bakery-sized cheesecake, right? Maybe it’s just you and your partner, or maybe you want to transport a dessert easily without worrying about a huge springform pan sliding around. That’s why I wholeheartedly recommend trying the **loaf pan cheesecake baking** method! It takes our main recipe and shrinks it down into this elegant little brick.
You don’t need to adjust the batter ratios much, but you absolutely have to adjust how you line the pan. Instead of crisscrossing huge sheets, you’ll want to cut strips to fit the bottom and line the sides, letting the parchment stick way up high again—maybe 3 inches over the top edge. This overhang is essential for lifting it out later!
Because the loaf pan is narrower and deeper than the standard 9-inch round, you’ll need to check it early. Don’t bake it for the full 50 or 60 minutes. Start checking around the 40-minute mark for that signature jiggle. You can see some great adaptations for smaller formats right here. This smaller format is just as impressive as the big one, and honestly, it makes slicing for servings so much easier. I love this approach when I want something rustic but don’t want leftovers for days. Check out photos of how beautiful the loaf pan versions look over at this site—it really drives home how gourmet this **Basque cheesecake** variation looks!
Storage & Reheating Instructions for Your Basque Cheesecake
I know it seems impossible that you’d have leftovers of this **Basque cheesecake**, but just in case you’re lucky enough to save some, storage is super easy! Wrap the leftovers tightly in plastic wrap, making sure you keep that glorious caramelized top protected. It keeps beautifully in the fridge for about four days.
But here’s the most important part: you *must* let it come back toward room temperature before eating it. When it’s ice-cold, it firms up almost too much. Pull your slice out of the fridge about 45 minutes to an hour before you plan to enjoy it. That little bit of warming is what brings back the creamy, almost gooey texture that makes this dessert famous!
Frequently Asked Questions About the Burnt Basque Cheesecake Recipe
I get so many questions when people first try this recipe, and honestly, that’s the best part! It means you’re excited to make this **EASY Basque Burnt Cheesecake recipe**. I’ve gathered the ones I hear most often here to make sure your first attempt at this **rustic cheesecake recipe** is absolutely flawless.
Why is my Basque cheesecake cracking?
If you’re seeing cracks, don’t panic; that usually means you’ve over-baked it just a touch! Remember, we want a massive jiggle left in the center when it comes out. Cracks happen when the proteins have set too firmly in the oven. Also, make sure you aren’t whipping the eggs too vigorously; we want creaminess, not air bubbles that expand and collapse too much. A couple of small surface cracks, though, just add character to your **Basque cheesecake**!
Can I use low-fat cream cheese?
Oh, please don’t! This is one of those recipes where you absolutely need the full-fat stuff. The high fat content in the cream cheese is what creates that signature dense yet **silky smooth cheesecake center**. Low-fat versions have more water, and that water interferes with the texture, likely making it runny or grainy instead of rich and creamy.
How long exactly does it need to chill?
While your temptation will be high, you really need that minimum six-hour chill time, and overnight is always better. The chilling process is when the filling stabilizes from a soft custard into that perfect sliceable texture. If you rush it, it will almost certainly deflate too much and feel sloppy rather than like a **creamy cheesecake dessert**.
What is the ideal temperature for serving this cheesecake dessert?
This is the secret to unlocking the very best texture! While you chill your **Basque cheesecake** in the fridge, you shouldn’t serve it cold. Take it out of the refrigerator about an hour, maybe 90 minutes, before you plan on slicing into it. Letting it come up near room temperature transforms the interior into that custardy, almost warm pudding texture that everyone raves about. You can see why this is served warmer at authentic spots in Spain over at The Spanish Apron!
Nutritional Estimates for This Decadent Homemade Dessert
Look, I’m a baker, not a nutritionist, but since we’re making such a rich and **decadent homemade dessert**, I know some of you are curious! Keep in mind, as a recipe developer, I can only give you ballpark figures based on the ingredient quantities we used here. This **Basque cheesecake** is definitely a treat, and these numbers reflect that richness. These estimates are based on dividing the recipe into 10 generous servings; obviously, if you cut larger slices, the numbers will shift!
When you’re indulging in this **creamy cheesecake dessert**, here is what we generally see per slice, according to my calculations. Don’t worry too much about the details—just savor the flavor! If you want to dive deeper into the macro breakdown, you can check out more analysis on recipes like this one over at this great resource.
Here’s a quick snapshot of what goes into one slice of our **Ultimate Easy Burnt Basque Cheesecake Recipe**:
- **Serving Size:** 1 slice
- **Calories:** About 450
- **Fat:** Roughly 35g (Yes, we use full-fat ingredients for that amazing texture!)
- **Carbohydrates:** Around 28g
- **Sugar:** About 35g
- **Protein:** Near 8g
- **Cholesterol:** Approximately 180mg
The main takeaway here is that this is a rich dessert meant for savoring, not snacking! Enjoy it responsibly, preferably with a cup of coffee in the evening, and let the deliciousness speak for itself!
Share Your Basque Cheesecake Creations
Now that you’ve experienced the magic of this easy, **creamy cheesecake dessert**, I really, truly want to see what you made! Don’t let this just be a one-time bake. Head over to the comments below and tell me honestly: did you nail the jiggle? Did your top get perfectly caramelized? Seeing your beautiful, rustic cheesecakes popping up on my feed makes my day.
Snap a photo and tag us! Knowing that this recipe, born from culinary science, is bringing joy to homes everywhere proves that the alchemy works. Don’t forget to leave a rating—it helps other home bakers trust this recipe as much as I do. You can find inspiration for your next bake or share tips for this easy Basque burnt cheesecake recipe right there in the comments!
PrintUltimate Easy Burnt Basque Cheesecake Recipe

Make this **creamy cheesecake dessert** with a signature caramelized top. This **crustless cheesecake tutorial** requires no water bath and delivers a rustic, elegant Spanish dessert.
- Prep Time: 15 min
- Cook Time: 60 min
- Total Time: 7 hours 15 min
- Yield: 10 servings 1x
- Category: Dessert
- Method: Baking
- Cuisine: Spanish
- Diet: Vegetarian
Ingredients
- 900g full-fat cream cheese, softened
- 1 1/4 cups granulated sugar
- 6 large eggs, room temperature
- 2 cups heavy cream
- 1 teaspoon vanilla extract
- 1/4 teaspoon salt
- 1/4 cup all-purpose flour
Instructions
- Preheat your oven to 400°F (200°C). Line a 9-inch springform pan with two large sheets of parchment paper, pressing them firmly into the corners and allowing the excess paper to stick up over the sides.
- In a large bowl, beat the softened cream cheese with an electric mixer until completely smooth. Scrape down the sides of the bowl.
- Gradually add the sugar and beat until the mixture is light and creamy, about 2 minutes.
- Add the eggs one at a time, mixing well after each addition until just combined. Do not overmix.
- Slowly mix in the heavy cream, vanilla extract, and salt until smooth.
- Sift the flour over the batter and gently fold it in using a spatula until no streaks of flour remain.
- Pour the batter into the prepared pan. The batter will be thin.
- Bake for 50 to 60 minutes. The top should be deeply browned, almost black in spots (the ‘burnt’ exterior), and the center should still jiggle significantly when the pan is gently shaken.
- Remove the cheesecake from the oven. It will deflate as it cools. Let it cool completely on a wire rack at room temperature for about 2 hours.
- Once cool, cover the pan loosely and chill in the refrigerator for at least 6 hours, or preferably overnight, for the best **silky smooth cheesecake center**.
- Before serving, carefully remove the parchment paper sides. Serve at room temperature for the creamiest texture.
Notes
- For a perfectly burnt exterior, do not be afraid of high heat; the high temperature creates the signature caramelization.
- Use room temperature ingredients for the smoothest batter and best texture.
- This **Basque cheesecake** is best served slightly warm or at room temperature, not ice cold, to achieve the custard-like center.
- If you prefer a smaller batch, use this recipe for a **loaf pan cheesecake baking** variation, reducing the bake time slightly.
Nutrition
- Serving Size: 1 slice
- Calories: 450
- Sugar: 35g
- Sodium: 250mg
- Fat: 35g
- Saturated Fat: 22g
- Unsaturated Fat: 13g
- Trans Fat: 0.5g
- Carbohydrates: 28g
- Fiber: 0g
- Protein: 8g
- Cholesterol: 180mg