
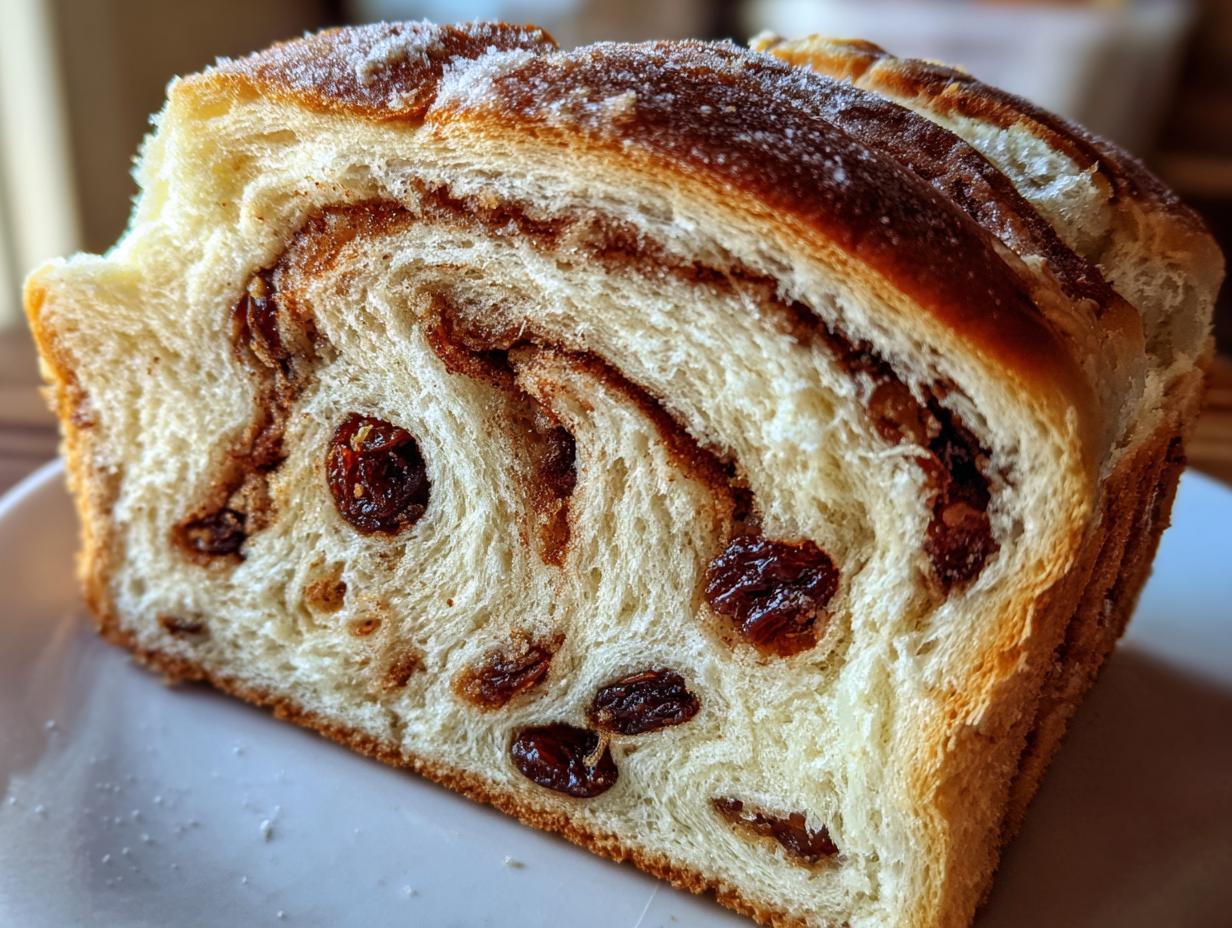
Oh, the smell! If there is one aroma that instantly transports me back to cozy mornings in my San Diego home—blending my mom’s heritage recipes with my dad’s structured chef techniques—it’s the smell of cinnamon and yeast baking together. That’s exactly what happens when you make this Soft Homemade Cinnamon Raisin Bread. For years, I chased that perfect bakery texture using my background in Food Science, trying to stabilize the airy crumb while maximizing that glorious swirl. I think I finally cracked the code. Forget dry, disappointing loaves; this is a reliable, wonderfully rich recipe that delivers true, bakery-style results right on your counter. Get ready for your kitchen to smell incredible!
- Why This Soft Sweet Raisin Bread Recipe Works
- Essential Ingredients for Your Homemade Raisin Bread Recipe
- Step-by-Step Instructions for Baking Raisin Bread
- Tips for Success When Baking Raisin Bread
- Storage and Reheating Instructions for Your Raisin Bread
- Serving Suggestions for Warm Spiced Bread
- Common Questions About Homemade Cinnamon Raisin Bread
- Estimated Nutritional Data for This Raisin Bread
- Share Your Baking Transformation
- Common Questions About Homemade Cinnamon Raisin Bread
- Estimated Nutritional Data for This Raisin Bread
- Share Your Baking Transformation
Why This Soft Sweet Raisin Bread Recipe Works
When you’re making something as wonderfully comforting as homemade raisin bread, you need reliability. That’s what I bring to the table with this recipe! It’s taken the guesswork out of yeast baking so you can focus on enjoying that warm slice.
Here’s where the alchemy happens:
- That Cloud-Like Texture: We use an enriched dough base—meaning we add fat (butter) and egg—which naturally leads to much softer, fluffy bread recipes that stay tender longer.
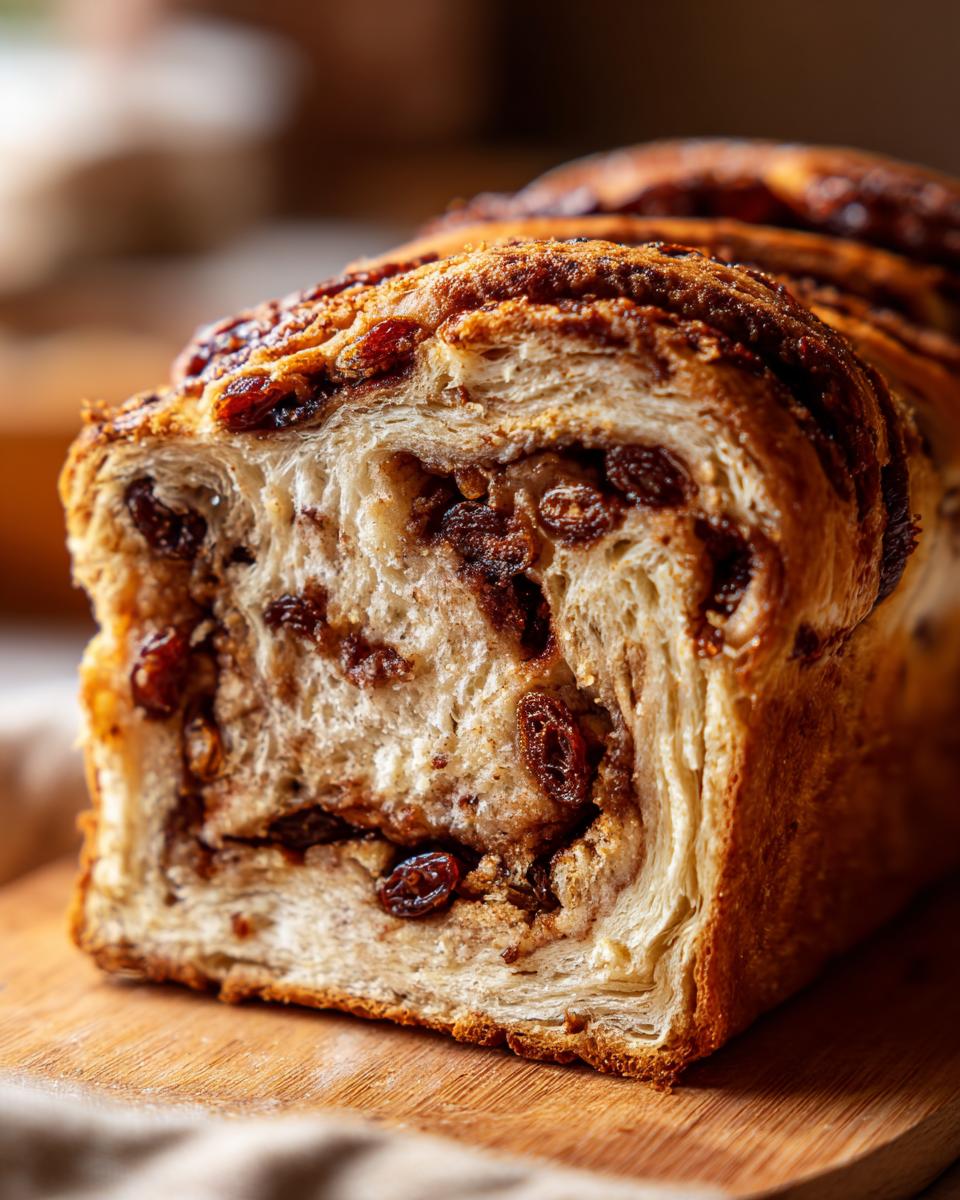
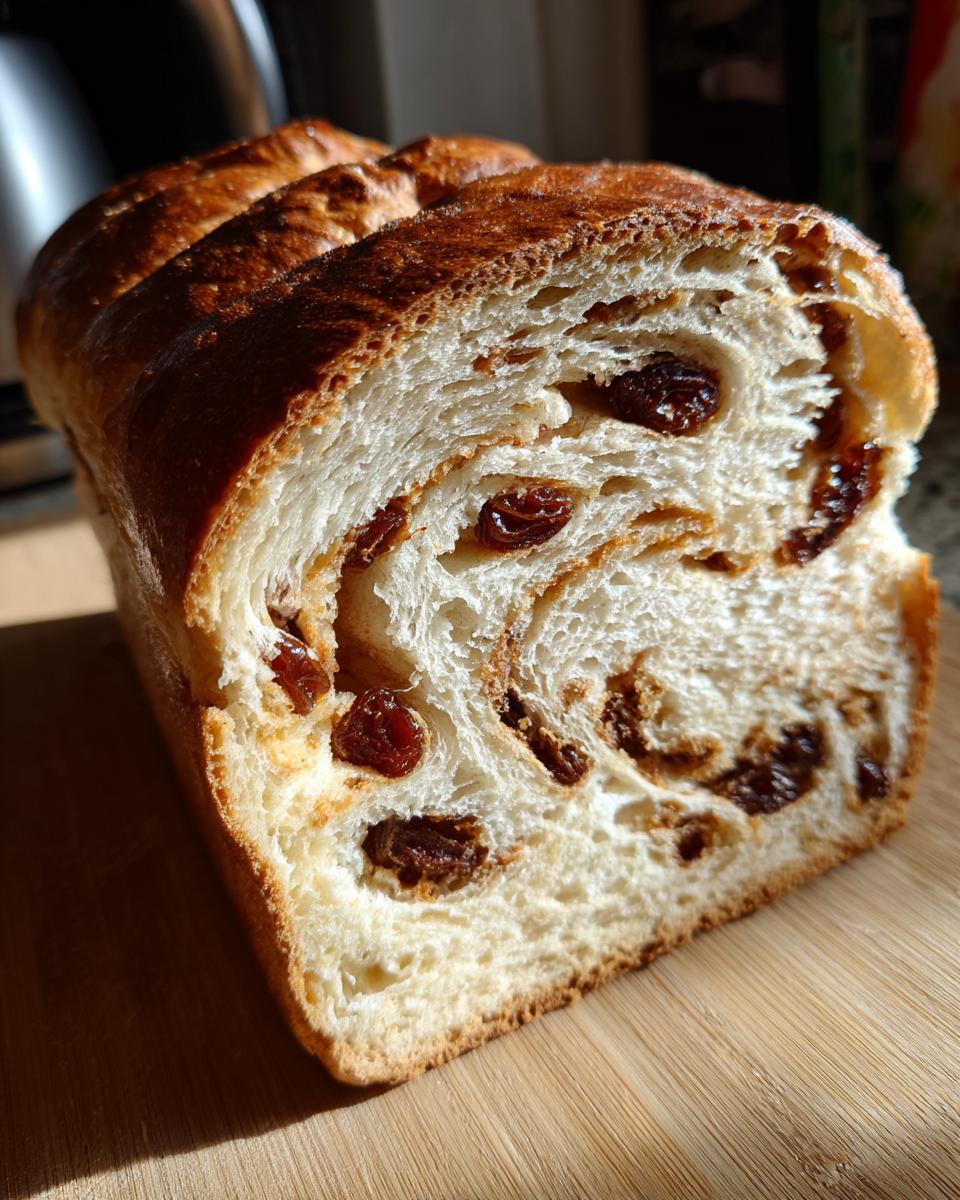
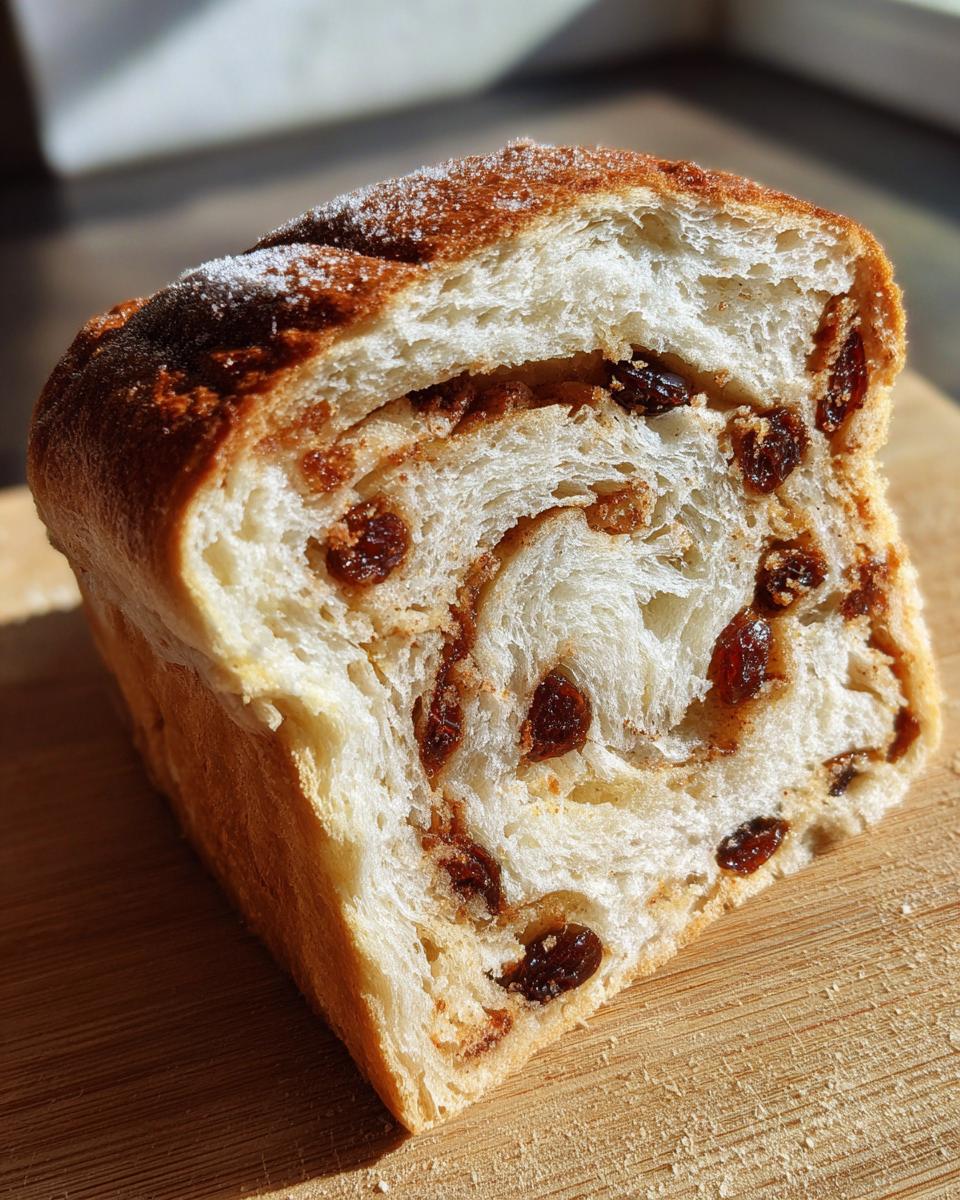
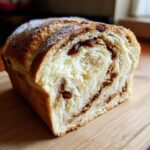
- The Perfect Swirl: I spent ages testing the swirl application. If you spread the cinnamon butter right to the edge, it melts out! My method keeps the filling centered for those beautiful, distinct ribbons you see in the best loaves.
- Guaranteed Soft Sweet Raisin Bread: My process ensures the raisins are plump and happy, integrating perfectly without making your dough sticky or dense. It’s all about balancing moisture, which comes straight from my Food Science training!
If you’re looking for more inspiration on getting those perfect bakery layers, this resource has some fantastic shaping tips that mirror my own approach!
Essential Ingredients for Your Homemade Raisin Bread Recipe
Okay, let’s talk about what you need. If you want that heavenly, soft, bakery-style loaf, you can’t skimp on a few things here. This recipe relies on quality basics, but paying attention to temperature and state—like room temperature eggs—is half the battle when using yeast. I’ve listed everything needed for the dough and that essential cinnamon filling right here so you can check your pantry!
- 1 cup warm milk (needs to be between 105°F to 115°F—not too hot!)
- 2 1/4 teaspoons active dry yeast
- 1/4 cup granulated sugar, plus 1 teaspoon specifically for the yeast
- 1 large egg, and make sure it’s at room temperature
- 1/4 cup unsalted butter, melted down nicely
- 1 teaspoon salt
- 3 1/2 cups all-purpose flour, plus whatever you need for dusting later
- 1 cup raisins (remember, these need to be plumped!),
- 1/2 cup packed light brown sugar for sweetness and moisture in the swirl
- 2 tablespoons ground cinnamon—don’t skimp on the spice!
- 2 tablespoons softened unsalted butter, kept separate for the swirl filling
- 1 large egg, beaten well for the top egg wash
Ingredient Notes and Substitutions for Perfect Raisin Bread
This is where my science training comes in handy! Pay close attention to these small details, and your baking raisin loaf will turn out perfectly every time. For the yeast activation (Step 1), the milk temperature is critical; too hot, and you kill your yeast—just lukewarm to the touch is perfect. If you don’t have brown sugar for the cinnamon swirl, you *can* use all granulated sugar, but I promise you lose that deep, molasses flavor that makes this warm spiced bread so comforting.
Also, for those raisins! Don’t just toss them in dry. I recommend soaking them in hot water for about 10 minutes, then draining them really, really well and patting them dry. This prevents them from stealing moisture from your dough while it proofs. If you skip this, you end up with hard little raisins buried in your otherwise fluffy bread recipes!
Step-by-Step Instructions for Baking Raisin Bread
Now for the fun part! Baking bread from scratch can feel intimidating, which is why I broke this process down into manageable chunks. When you follow these steps for this Enriched Bread Dough, you’ll see just how easy an easy yeast bread can be. Just remember, timing matters when dealing with yeast, so try to get that milk just right in the first step! If you are looking for classic inspiration, I always loved how this simple approach handles the initial dough.
Activating Yeast and Mixing the Enriched Bread Dough
First, we wake up the yeast! In your big mixing bowl, combine that warm milk—remember, 105°F to 115°F—with just the 1 teaspoon of sugar and the active dry yeast. Let it sit there for about five to ten minutes. If it gets foamy on top, you’re golden! That means your yeast is alive and ready to work magic. Once you see that foam, go ahead and stir in the remaining 1/4 cup of sugar, your room temperature egg, that melted butter, and the salt. Now, add the flour gradually, mixing it all up until you have a shaggy, messy dough mass. Don’t obsess over it being perfect yet!
Kneading and First Rise for Fluffy Bread Recipes
Time to build some muscle in that dough! Turn that shaggy mess out onto a lightly floured counter. You need to knead this dough for about six to eight minutes. I know, I know, kneading takes patience, but it’s crucial for a great crumb! You’ll know you’re done when the dough feels really smooth and elastic under your hands—it should spring back gently when you poke it. Once kneaded, pop it into an oiled bowl, cover it up with plastic wrap, and let it rest in a warm spot for an hour to an hour and a half. We are waiting for it to double in size before we do anything else!
Creating the Cinnamon Swirl and Shaping Your Delicious Raisin Loaf
While it’s rising, whisk together your brown sugar, cinnamon, and the softened butter for the filling. This is going to be amazing! Once your dough has puffed up, gently punch it down. Turn it out again and roll it into a big rectangle—about 12 by 18 inches is what I aim for. Spread that glorious cinnamon mixture all over the surface, but leave a tiny one-inch gap on one of the long sides. Now, sprinkle your plumped raisins everywhere! Starting on the opposite side, roll that dough up tightly, like a jelly roll. Pinch that seam shut really well and tuck those ends under so your delicious raisin loaf holds its shape during baking. It takes a little practice to get that perfect internal layer, so checking out how others tackle the shaping really helps!

Final Proof and Baking Your Raisin Bread
Place that plump log, seam-side down, into your greased 9×5 loaf pan. Cover it loosely again and let it have its second rest for about 45 to 60 minutes. This is the time to preheat your oven to 375°F (190°C)! You’ll know it’s ready to bake when the dough has crested about an inch over the rim of the pan—it looks puffy and happy! Brush the top with that beaten egg wash for a beautiful color. Bake for 30 to 35 minutes. I rely on two things for doneness: the top should be golden brown, but more importantly, if you stick a thermometer in the center, it should read 200°F (93°C). That’s how you guarantee you won’t end up with gummy spots in the middle! Don’t forget to turn it out onto a wire rack immediately so the bottom crust stays nice.
Tips for Success When Baking Raisin Bread
Baking any yeast bread, especially an enriched one like this, has a few spots where things can go sideways if you aren’t prepared. But don’t worry! I’ve learned a few tricks over the years using my Food Science background to make sure you get that coveted homemade bakery style bread texture—soft, sliceable, and perfectly structured.
Here are my must-know tips for turning out a winner every time:
Mastering the Melted Butter Crust: Remember that note about brushing melted butter on the hot loaf right after it comes out of the oven? It sounds small, but it’s a game-changer! It instantly softens any crust that might have firmed up too much, keeping the outside tender right alongside the fluffy interior. It gives that wonderful, slightly moist feel that tastes fresh-from-the-bakery.
Why You Must Use Room Temperature Ingredients: I emphasize the room temperature egg for a reason. Cold ingredients shock the yeast mixture, even if the milk is warm, which slows down the whole proofing process. I usually take my egg out about an hour before I start mixing the liquids. If you’re in a hurry, just put the egg in a bowl of warm tap water for ten minutes—that helps big time!
Preventing Sticking Failures: Sticking is the absolute worst way to ruin a beautiful loaf! Since this dough is richer than a standard lean dough, it can cling to the pan. My grandmother used butter and flour, but I rely on a quick homemade ‘cake goop’ or simply generous greasing followed by a light dusting of flour, ensuring every corner of that 9×5 pan is coated. If you are really concerned, line the pan with parchment paper and let the sides hang over slightly, like little handles, so you can lift the loaf straight out when it’s done. You can check out some other great tips for working with sticky components, like the filling in this recipe, over at Baked by an Introvert.
Don’t Rush the Proofing: Yeast is sensitive. If your kitchen is cold, the dough will take forever to rise, and you might think your yeast died or you messed up the recipe. Don’t panic! Just find the warmest spot you can—maybe near a pilot light, or even inside an oven that is completely turned OFF, just warmed slightly by the pilot. Give it the full time it needs. Patience here is the secret ingredient to that incredible volume and lofty texture!
Storage and Reheating Instructions for Your Raisin Bread
The biggest compliment you can pay this bread is that you have leftovers! But since this is such a wonderful weekend baking project, you need to know how to store it so it stays soft. Honestly, the absolute best way to enjoy this bread is within 24 hours, slightly warm, preferably with butter melting into the swirls.
But life happens! Here’s how I keep my loaves tasting like they just came out of the oven:
Storing at Room Temperature
Once the bread is completely, 100% cool—and I mean stone cold, otherwise condensation makes it soggy—wrap it up tightly. I usually double-wrap mine: first in plastic wrap to keep the moisture in, and then I slide that into a large Ziploc bag, squeezing all the air out before sealing. This keeps it fresh for about three to four days on the counter. Avoid storing it in the fridge! Cold temperatures do terrible things to yeast bread structure and make it taste stale much faster, even though it technically keeps longer.
Freezing Your Homemade Raisin Bread
If you baked two loaves, or if you know you won’t get through the whole thing in four days, freezing is your best friend. Again, make sure the loaf is totally cooled. Slice it first! This makes thawing so much easier. Wrap the whole loaf or individual slices extremely tightly in plastic wrap, then cover that securely with aluminum foil. This locks out freezer burn. It stays fantastic in the deep freeze for up to three months. When you pull one out, it’s ready for its quick defrost!
Reheating for Maximum Comfort
Never, ever, ever microwave a whole slice of this bread if you want a good texture. Microwaving makes the crumb tough or gummy later. The best reheat method is simple toasting. Pop a slice in your toaster until it’s just getting golden brown. The heat melts that internal butter and sugar swirl just enough, and it brings back that fresh-baked aroma!
If you have a frozen slice, skip the microwave entirely. Take the plastic wrap and foil off, and microwave it for just 20 seconds to take the chill off, then immediately place that slice in a toaster oven or pan-fry it lightly in a dry skillet for that perfect crispy edge. That little bit of high heat reactivates the crust beautifully, making it taste like it was baked just moments ago.
Serving Suggestions for Warm Spiced Bread
Once this loaf is beautifully golden and finally cool enough to slice (the hardest part, I swear!), you have to think beyond just reaching for the butter dish—though, honestly, melted butter on a warm slice is heaven on earth. Since this recipe leans into those lovely, sweet notes, it pairs just as well with your afternoon tea as it does kicking off a big Sunday breakfast. It’s truly one of those versatile sweet breakfast breads!
My dad, the retired Navy chef, insisted that every slice of this raisin bread needed something equally comforting on top, even if it was just a light dusting of powdered sugar. He used to say the cinnamon and vanilla needed a creamy counterpoint. So, here are a few of my family’s favorite ways to serve this warm spiced bread:
- Whipped Honey Cream Cheese: This is my go-to! Just take softened cream cheese, whip it with a little honey and maybe a tiny splash of vanilla until it’s light and airy. The cool tanginess cuts right through the sweetness of the swirl.
- Apple Butter Magic: If you have homemade apple butter—or even a really good store-bought version—slather it on thick. The slight tartness of the apples, cooked down with spices, complements the cinnamon in the loaf perfectly. It’s perfect for an afternoon snack that feels downright cozy.
- A Savory Sidekick for Breakfast: This might sound odd, but a thin slice toasted and served beside scrambled eggs and bacon is phenomenal. The saltiness of the meat and eggs makes the sweet cinnamon pop even more!
I remember one holiday morning, we were all rushing around, and Dad served slices topped with just a thin smear of good quality salted butter and a strong cup of black coffee. He told me that sometimes, simplicity lets the *bread* shine, and that’s when I truly appreciated the quality of what we baked. It reminded me why we put in the effort for this homemade raisin bread recipe!
If you want to try a slightly different approach to topping, maybe incorporating fruit preserves, check out Laura’s brilliant bread ideas—she often has fantastic topping suggestions for sweeter bakes!
Common Questions About Homemade Cinnamon Raisin Bread
Baking is fun, but when you run into trouble, it can stop you in your tracks! Since this is an enriched dough, some common yeast bread issues pop up that I want to make sure you know how to avoid. Don’t let a tricky first or second rise discourage you—we’re going to squash those common hiccups right now so you can enjoy the best homemade raisin bread recipe!
Why is my cinnamon swirl so weak or uneven in my raisin bread?
This is the number one complaint for anyone trying to make a Cinnamon Swirl Bread! It usually comes down to two things. First, you probably didn’t roll the dough tightly enough when you made the log. You need firm, consistent pressure. Second, check how you spread the filling. If you spread the cinnamon-sugar-butter mixture too close to the edge, it melts out during the bake and blends into the crust instead of staying layered inside. Remember that 1-inch border I mentioned? Stick to it! That border seals the roll shut and forces the filling inward.
How can I adapt this recipe to be a ‘No Knead Raisin Bread’?
I totally get wanting to skip the kneading sometimes! While this recipe is written for a quick knead to develop that soft, enriched structure, you *can* adapt it for a longer, slow rise which minimizes the work. Instead of that 6 to 8 minutes of kneading, just mix the dough until it’s barely combined, place it in the oiled bowl, and let it rise for a much longer period—think 3 to 4 hours at room temperature, or even overnight in the fridge! You still need to perform the shaping steps (rolling out and spreading the filling) before the final proof. For a full guide on adapting yeast recipes like this, I found this guide specifically for easy no-knead versions is fantastic for beginners.
Can I use milk powder instead of liquid milk for this beginner bread baking recipe?
You can, yes, but you have to adjust the water content carefully. My recipe calls for 1 cup of warm *liquid* milk. If you want to switch to dried milk powder (which is great for pantry stocking!), you need to mix the powder with the correct amount of water *before* you warm it up. For most standard brands, 1 cup of liquid milk equals about 1/3 cup of dry milk powder mixed with the remaining water needed to make up the 1 cup volume. Always dissolve the powder fully into the water before adding the yeast, just to make sure you don’t accidentally leave any clumps that could interfere with the yeast activation.
My raisins sank to the bottom of the loaf—what did I do wrong?
If your raisins sank, it means they were either too wet or your dough wasn’t strong enough to hold them up against gravity during the proof and bake. Homemade raisin bread relies on a decent gluten structure to suspend those pockets of fruit and cinnamon. First, always plump and pat your raisins bone-dry! Second, make sure you kneaded long enough to develop that smooth, elastic dough. If the dough is too slack, the heavy raisins will just settle right to the bottom pan before they ever see the inside of the oven. This is a very common worry for anyone new to from scratch bread baking!
Estimated Nutritional Data for This Raisin Bread
I always tell folks that baking is both an art and a science, and understanding what we’re putting into our bodies is part of that science! While this recipe delivers incredible, comforting flavor, it’s good to know roughly where we land nutritionally. Remember, this is what I calculated in my development kitchen using standard measurements, so exact numbers can shift slightly based on the brands of butter or sugar you use, or exactly how much flour clings to your counter!
Think of this as a wonderful holiday or weekend treat—that soft, sweet profile of cinnamon raisin bread comes from the sugar and the enriched dough, so portion control is key!
Here is the estimated breakdown per slice:
- Serving Size: 1 slice
- Calories: 240
- Protein: 5g
- Fat: 6g (including 3.5g Saturated Fat)
- Trans Fat: 0g
- Cholesterol: 30mg
- Sodium: 280mg
- Carbohydrates: 43g
- Fiber: 2g
- Sugar: 14g
This is an enriched bread dough, so the fat and sugar content helps give you that beautiful, deep flavor and softness you crave in a homemade bakery style bread. Enjoy every bite!
Share Your Baking Transformation
Seeing your creations is honestly the best part of sharing these recipes! After you’ve gone through the steps for this wonderful homemade raisin bread recipe, I absolutely want to hear about it. Did you achieve that perfect golden crust? Did the cinnamon swirls turn out beautifully pronounced? This recipe really does turn out like a beautiful artisan raisin bread when you follow the rolling technique, and I’m always so eager to see how it looks coming out of different ovens!
Please take a moment to leave a star rating right here on the page. It helps other home bakers know this recipe is reliable—it’s my way of promising them the same fantastic results you achieved. If you snap a picture of your first slice, tag me on social media! I love seeing the different ways everyone enjoys their sweet bakes.
And I have to ask: What topping did you use on your first slice? Were you a classic salted butter person, or did you try something fun like the honey cream cheese I mentioned? I’m always looking to try new pairings!
If you’re looking for even more inspiration on how other bakers are tackling their swirls and toppings, I saw some really creative ideas over at Love Foodies that might spark your next weekend baking project!
PrintSoft Homemade Cinnamon Raisin Bread
Bake a soft, fluffy loaf of homemade cinnamon raisin bread featuring rich cinnamon swirls and plump raisins. This reliable recipe delivers bakery-style flavor for your breakfast or snack.
- Prep Time: 30 min
- Cook Time: 35 min
- Total Time: 2 hr 40 min
- Yield: 1 loaf 1x
- Category: Breakfast
- Method: Baking
- Cuisine: American
- Diet: Vegetarian
Ingredients
- 1 cup warm milk (105°F to 115°F)
- 2 1/4 teaspoons active dry yeast
- 1/4 cup granulated sugar, plus 1 teaspoon for yeast
- 1 large egg, room temperature
- 1/4 cup unsalted butter, melted
- 1 teaspoon salt
- 3 1/2 cups all-purpose flour, plus more for dusting
- 1 cup raisins, plumped
- 1/2 cup packed light brown sugar
- 2 tablespoons ground cinnamon
- 2 tablespoons softened unsalted butter, for swirl
- 1 large egg, beaten (for egg wash)
Instructions
- Activate the yeast: In a large bowl, combine the warm milk, 1 teaspoon of sugar, and the yeast. Let stand for 5 to 10 minutes until foamy.
- Mix the dough: Add the remaining 1/4 cup sugar, egg, melted butter, and salt to the yeast mixture. Stir to combine. Gradually add the flour, mixing until a shaggy dough forms.
- Knead: Turn the dough out onto a lightly floured surface. Knead for 6 to 8 minutes until the dough is smooth and elastic.
- First Rise: Place the dough in a lightly oiled bowl, turning to coat. Cover the bowl with plastic wrap or a clean towel. Let the dough rise in a warm place for 1 to 1 1/2 hours, or until doubled in size.
- Prepare the filling: While the dough rises, mix the brown sugar, cinnamon, and 2 tablespoons of softened butter in a small bowl until crumbly.
- Shape the loaf: Gently punch down the risen dough. Turn it out onto a lightly floured surface. Roll the dough into a rectangle approximately 12×18 inches.
- Spread the filling: Spread the cinnamon-sugar mixture evenly over the dough surface, leaving a 1-inch border on one long edge. Sprinkle the plumped raisins evenly over the filling.
- Roll and seal: Starting from the long edge opposite the border, tightly roll the dough into a log. Pinch the seam closed and tuck the ends under.
- Second Rise: Place the dough, seam-side down, into a greased 9×5 inch loaf pan. Cover loosely and let rise in a warm place for 45 to 60 minutes, or until the dough has crested about 1 inch over the rim of the pan.
- Bake: Preheat your oven to 375°F (190°C). Brush the top of the loaf lightly with the beaten egg wash. Bake for 30 to 35 minutes, or until the top is golden brown and the internal temperature reaches 200°F (93°C).
- Cool: Remove the bread from the oven and immediately turn it out onto a wire rack to cool completely before slicing.
Notes
- To plump raisins quickly, soak them in hot water for 10 minutes, then drain and pat them completely dry before adding to the dough.
- For a softer crust, brush the top of the hot loaf with 1 tablespoon of melted butter immediately after removing it from the oven.
- This bread freezes well once completely cooled. Wrap tightly in plastic wrap and then foil.
Nutrition
- Serving Size: 1 slice
- Calories: 240
- Sugar: 14g
- Sodium: 280mg
- Fat: 6g
- Saturated Fat: 3.5g
- Unsaturated Fat: 2.5g
- Trans Fat: 0g
- Carbohydrates: 43g
- Fiber: 2g
- Protein: 5g
- Cholesterol: 30mg