

Doesn’t that sound amazing? That rich, savory Italian comfort food you usually save for a Friday night out or a special occasion? I get it—we all crave that restaurant magic, but who has the time (or the grease splatter!) after a long day? Well, that’s why I’m so excited to share this breakthrough recipe with you. This guide to **Easy chicken Parmesan** is the reliable, foolproof standard you’ve been searching for. It takes all the classic flavor and delivers that perfect, crispy cutlet without ever turning on the deep fryer. It’s flavor built on science and heritage, just like my background blending my mom’s traditions with my dad’s professional military cooking techniques!
- Why This Easy Chicken Parmesan Recipe Works for Busy Cooks
- Gathering Ingredients for Your Easy Chicken Parmesan
- Step-by-Step Guide to Perfect Easy Chicken Parmesan
- Tips for Success: Mastering Your Baked Chicken Parm Recipe
- Serving Suggestions for Family Friendly Pasta Night
- Storage and Reheating Instructions for Leftover Easy Chicken Parmesan
- Frequently Asked Questions About Italian Comfort Food at Home
- Nutritional Estimates for This Dish
- Share Your Kitchen Alchemy
Why This Easy Chicken Parmesan Recipe Works for Busy Cooks
This recipe is truly designed for speed. I know your weeknights are packed, but that doesn’t mean you have to skip amazing **Italian comfort food at home**. This is the ultimate **easy chicken dinner idea** because we swap out the fussy deep-frying for a smarter baking method. You’re going to love how fast the cleanup is compared to traditional frying methods. If you’re looking for more quick meals in your rotation, bookmark this one right now!
Achieving Crispy Texture Without Deep Frying
This is where the ‘science’ part of my training comes in handy! The key to a truly **crispy breaded chicken breast** here is combining two simple things: Panko breadcrumbs and a light coat of oil. Panko flakes are larger and sharper than regular crumbs, so they grab onto the chicken better and crisp up beautifully in the oven. We treat them more like we’re roasting than frying. Brushing that olive oil just on the outside of the coating helps catalyze that browning reaction, making this the perfect **baked chicken parm recipe** that stays crunchy while the cheese melts on top. No messy oil baths for us!
Gathering Ingredients for Your Easy Chicken Parmesan
We’re keeping this list short and sweet because great Italian food shouldn’t require a trip to a specialty market every Tuesday. The real heavy lifters here are the chicken and the cheese, so don’t skimp on quality where it counts! You’ll want four boneless, skinless chicken breasts. Now listen closely: they MUST be pounded down uniformally to about half an inch thick. This might seem fussy, but trust me, achieving that even thickness is how we guarantee everything cooks at the same time.
For the coating, we need flour, two eggs whisked up, Panko breadcrumbs, and half a cup of grated Parmesan—make sure you save a little extra Parmesan for that final topping sprinkle! Don’t forget your dried oregano and garlic powder mixed right into the Panko. And for the moisture layer? You need two cups of really good marinara sauce. If you’re buying jarred sauce, this is where you splurge a little; a high-quality, robust red sauce makes all the difference in your final flavor profile. Finally, you need 8 ounces of fresh mozzarella, sliced—that beautiful, milky cheese melts into the perfect blanket over the cutlets.
Ingredient Spotlight: Choosing the Right Breading Components
I want to talk specifically about the Panko for a minute. If you try to use plain old breadcrumbs in this **Easy chicken Parmesan**, you’re going to miss out on that essential crunch factor we achieved earlier. Standard crumbs soak up oil and turn soggy too fast. Panko, those wonderfully jagged, airy flakes, stays light and shatteringly crisp, even after the cheese melts on top. It’s the backbone of our texture!
Also, think of your marinara sauce as the quiet hero. I always recommend finding one with minimal added sugar and rich, clear tomato flavor. Since we aren’t deep-frying, the sauce has a bigger role in bringing that authentic taste since we aren’t relying on fat flavor from the oil. A decent jarred sauce is perfectly fine here, but don’t just grab the cheapest one you see!
Step-by-Step Guide to Perfect Easy Chicken Parmesan
Okay, buckle up! This is where the alchemy really happens. We are turning those pounded cutlets into golden perfection. First thing? Get that oven preheated to 400 degrees Fahrenheit. I always lighty grease my baking sheet, but honestly, lining it with parchment paper makes cleanup almost non-existent. If you want that extra crunchy seal, remember my little trick from the notes: you can quickly pan-sear the breaded cutlets in a hot skillet with just a drizzle of oil for about a minute per side before they hit the oven. That gives you an unbelievable crust! If you’re short on time, skip it, but wow, it’s worth the two extra minutes!
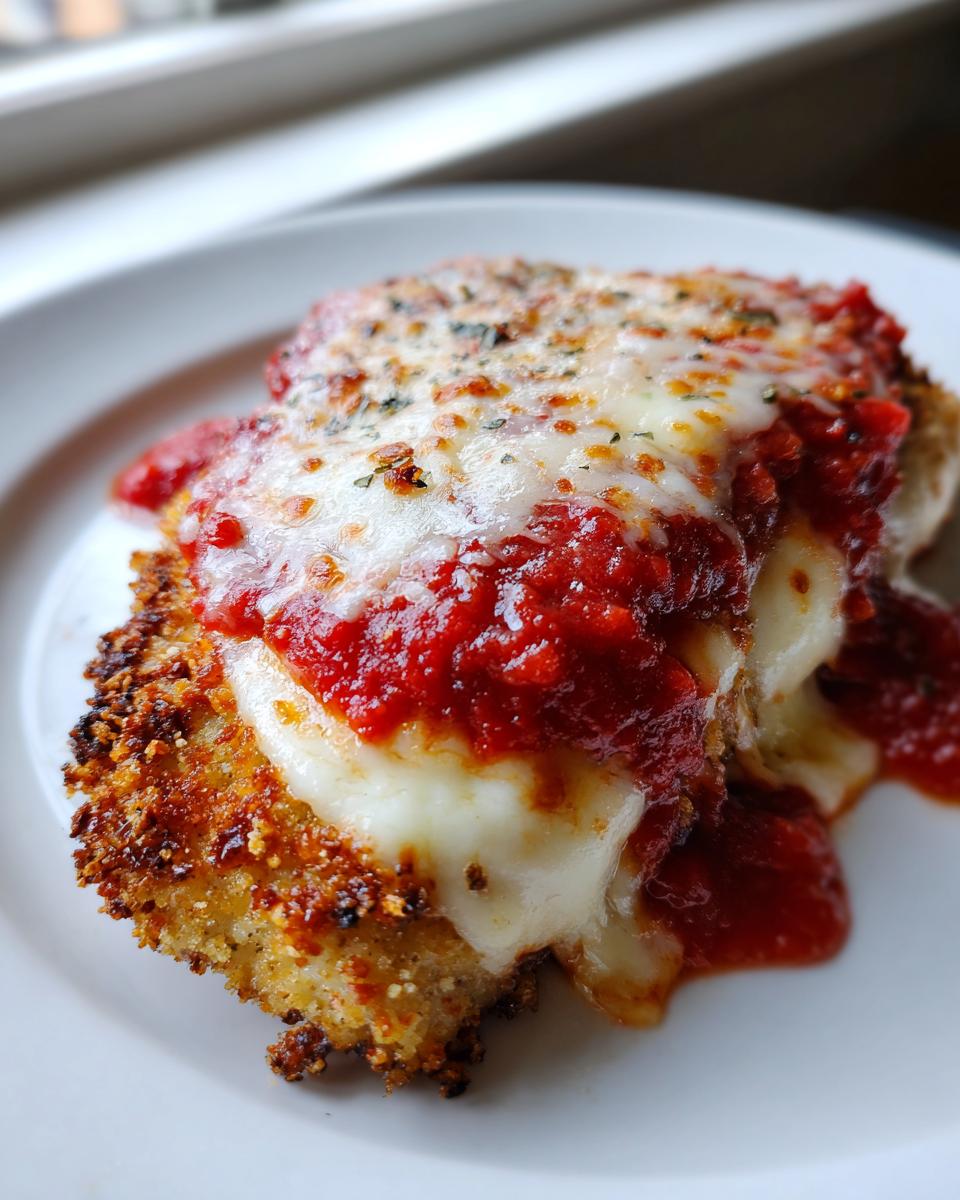
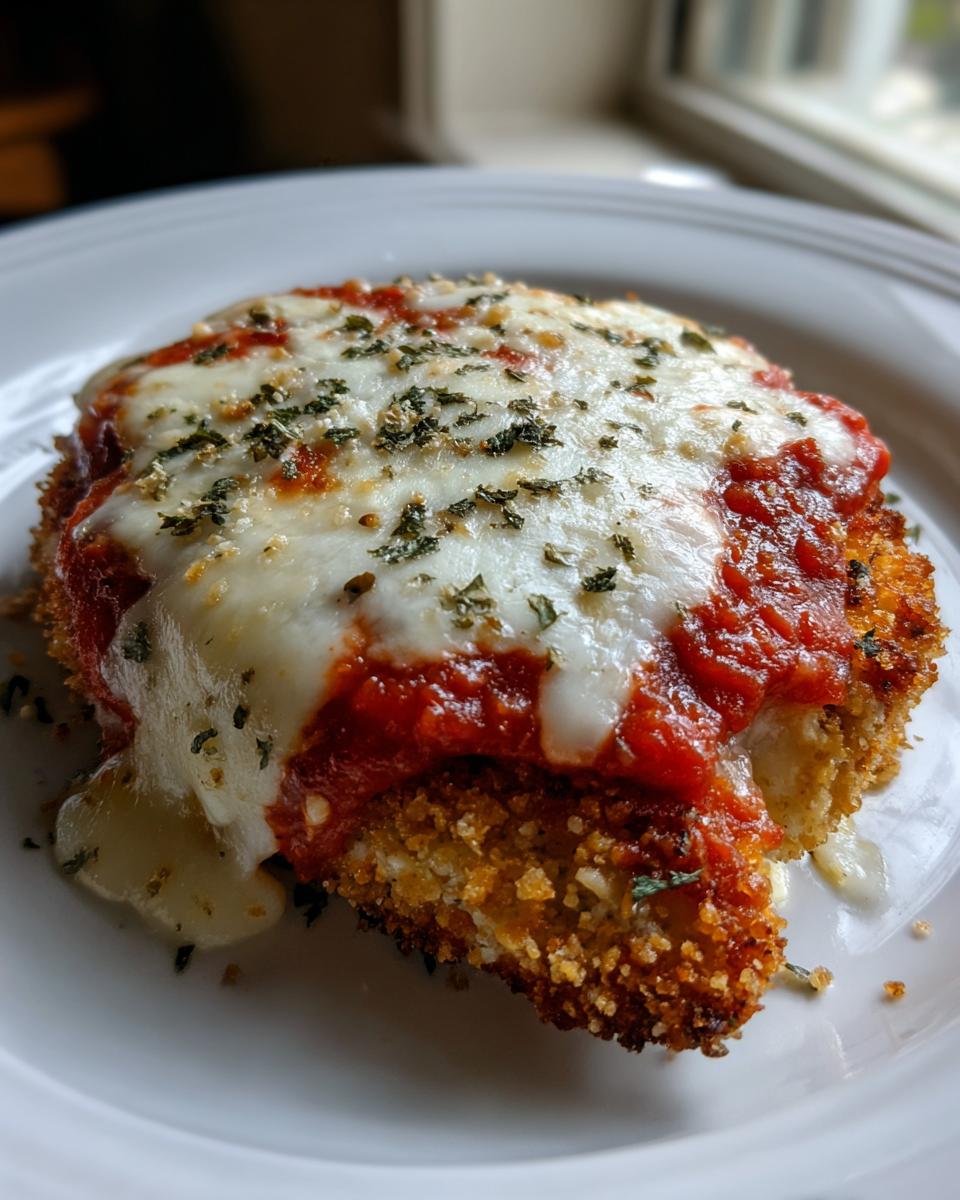
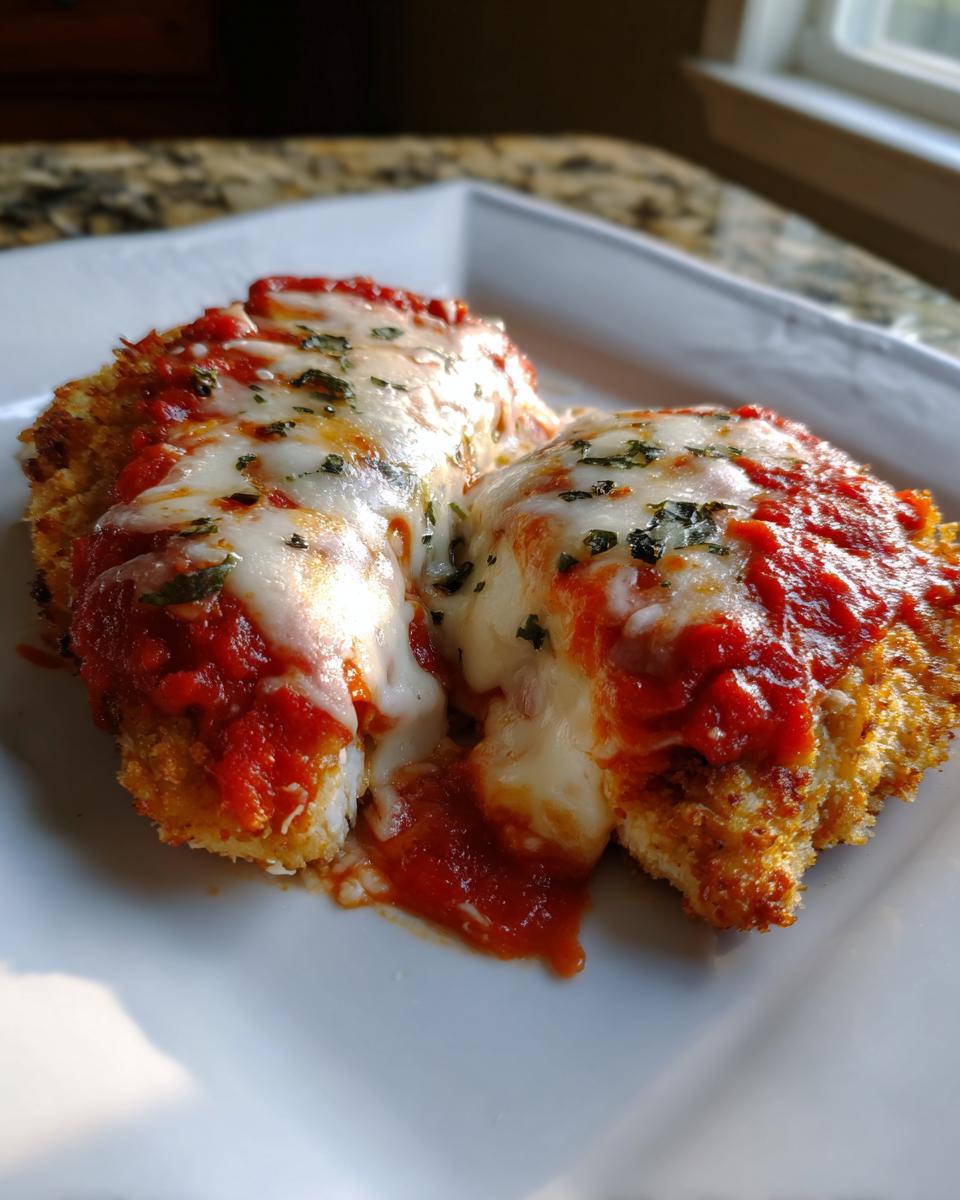
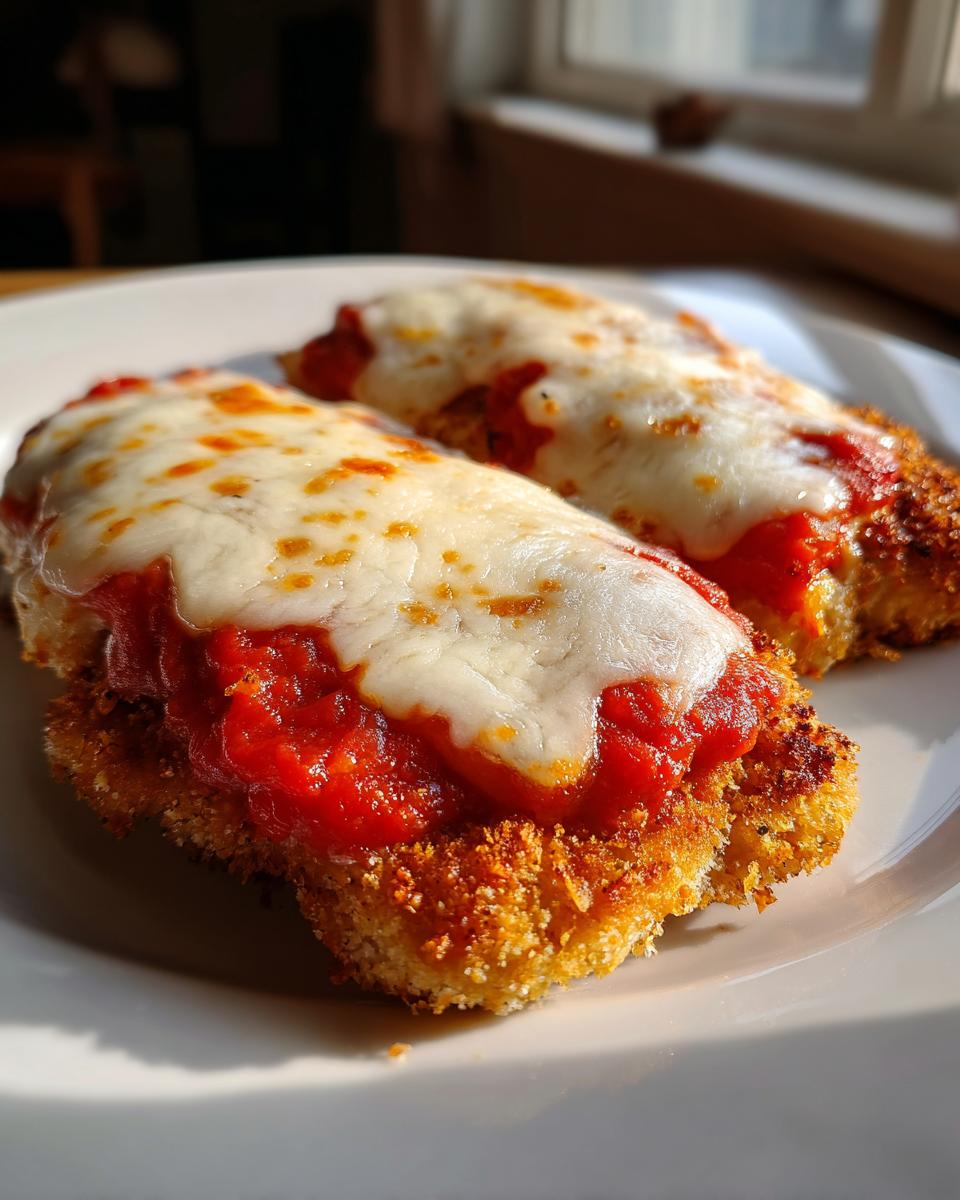
After that initial 15-minute bake, we switch gears. Pull them out carefully—they’ll be hot! Now, take about a quarter cup of your delicious marinara sauce and spoon it right over the top of each piece of chicken. Don’t go too close to the edges when saucing, or you might slide off your topping! Then you’ll lay on those slices of fresh mozzarella, making sure most of the sauce is covered. A final dust of that extra Parmesan cheese goes on top. Back into the oven they go for just 5 to 8 more minutes. We are looking for that gorgeous, bubbly melt and making sure the internal temperature hits 165 degrees Fahrenheit. That’s our safety check, ensuring your **Easy chicken Parmesan** is perfectly cooked through. Learn more about safe food handling for baking best practices here!
Setting Up Your Breading Station for Cheesy Chicken Cutlets
Your breading station is just three little piles of goodness in shallow dishes. First dish: simple flour. Second dish: your beaten eggs. The third dish is the star lineup: Panko breadcrumbs combined with that first 1/2 cup of Parmesan, oregano, salt, pepper, and garlic powder. You need to work quickly and methodically, like an assembly line! Dredge the chicken in the flour first—shake off the excess, we don’t want clumpy coating. Then dip it in the egg, letting the extra drip off, and finally, here’s the crucial part: Press that cutlet *firmly* into the Panko mix. Don’t just toss it; really push and massage those crumbs onto the surface. This high-pressure application is what keeps everything stuck on when baking, guaranteeing those gorgeous **cheesy chicken cutlets**!
The Baking and Melting Process for Easy Chicken Parmesan
We bake in two stages, which is the genius hack here. The first 15 minutes is all about setting that crust. We brush the cutlets with olive oil before they go in at 400°F. This creates a dry heat environment that crisps the coating beautifully before we introduce the wet ingredients. Once you pull them out to top with sauce and mozzarella, we’re just focused on melting and achieving that internal doneness. We bake again until the cheese is gooey and the temperature reads 165°F. This controlled, two-part bake is far superior to trying to bake it all at once, which often leads to burned cheese before the center is done. This method ensures your **Easy chicken Parmesan** is flawless from edge to center.
Tips for Success: Mastering Your Baked Chicken Parm Recipe
Even though this is an easy chicken dinner idea, sometimes even the best recipes need a little nudge. My formal training taught me that consistency is everything if you want repeatable results every time you make this **baked chicken parm recipe**. The biggest pitfall I see home cooks run into is uneven thickness. If one end of your cutlet is paper thin and the other is still bulky, you end up with dry, crumbly edges while the center is just barely cooked through—and nobody wants that!
For best results, use a meat mallet or even the bottom of a heavy saucepan and pound those breasts out until they are uniformly about half an inch thick. If your chicken breasts are huge to begin with, you can even slice them horizontally after pounding to create thinner cutlets, which is a great trick for a faster cook time. You can explore more about proper chicken prep techniques here. It may seem like an extra step, but this pounding guarantees your **cheesy chicken cutlets** are juicy throughout!
Achieving Uniform Thickness for Even Cooking
Seriously, pay attention to the pounding! I always lay the chicken between two sheets of plastic wrap before I start beating it. It keeps the juices contained and stops the meat from tearing. You want it flat and even, like a good paving stone. If you have a very thick breast, slicing it horizontally after pounding it once will give you two perfectly sized cutlets that cook evenly every single time. Trust me, achieving this uniformity is the first step toward making incredible **Italian comfort food at home** that always turns out right!
Serving Suggestions for Family Friendly Pasta Night
Now that you have these incredible, crispy, cheesy cutlets, what are you going to serve them with? Portion size matters, especially since this is such a rich dish! We want sides that complement the tomato and cheese without getting lost underneath our star plate. For a true **family friendly pasta night**, I usually stick to the classics, but you have options!
If you’re going the pasta route, don’t overthink the sauce! Since we’ve already spooned marinara over the chicken, keep the pasta sauce light. I love using spaghetti or linguine, tossed simply with a little olive oil, salt, and fresh parsley. If you want a bit more body, rigatoni or penne work great for catching any extra sauce that drips off the chicken. The goal is to let the **Easy chicken Parmesan** be the main event, not the pasta underneath it.
But honestly, my favorite way to serve this is to contrast the richness with something bright and fresh. A simple side salad tossed in a sharp vinaigrette—maybe lemon juice, Dijon, and olive oil—cuts through the cheese perfectly. Or, go for some steamed or lightly roasted green veggies. Asparagus spears tossed with salt and pepper, or maybe some garlicky green beans? They cook super fast, giving you something healthy and green on the plate besides the mozzarella. It keeps the meal feeling balanced and way less heavy!
Storage and Reheating Instructions for Leftover Easy Chicken Parmesan
Okay, let’s talk about leftovers, because I hope you made enough—this dish is almost better the next day once the flavors have really settled in! Getting the storage right is crucial if you want to keep that beautiful Panko crust from turning soggy. The biggest tip when putting away your **Easy chicken Parmesan** is to try and keep the wet elements separate from the crispy elements, at least for a day or two.
When you put away leftovers, if you can manage it, scrape off most of the melted mozzarella and sauce. Store the plain **crispy breaded chicken breast** in a single layer in an airtight container. If you can’t separate it completely, that’s okay—just make sure that container is completely sealed to keep ambient fridge moisture out. You want this stored cold, and it will keep well for about three days. If you’re seriously planning ahead, you can freeze pre-baked, un-sauced cutlets for up to two months!
The Secret to Keeping It Crispy When Reheating
Put the microwave away—I mean it! Microwaves are the enemy of crispiness because they steam the food right back into sogginess. We need dry, direct heat to bring that crunch back. Your best friends here are the air fryer or the conventional oven. It takes a little longer than 30 seconds in the microwave, but the payoff is enormous.
For the air fryer, just set it to about 375°F for 6 to 8 minutes. It works wonders for reviving that Panko crust. If you’re using the oven, set it to 375°F as well. Place the leftover chicken on a wire rack set over a baking sheet—this allows air to circulate underneath and prevents the bottom from steaming. It’ll take about 10 to 12 minutes. Once it’s hot all the way through, then you can add your fresh sauce and cheese on top and pop it under the broiler for just a minute or two to melt! You’ll get results so close to fresh-made, you won’t even believe it. For more general food handling tips, always check out resources on safe food storage guidelines.
Frequently Asked Questions About Italian Comfort Food at Home
I always get so many questions when people try this recipe for the first time because they’re worried about messing up that perfect crust! It’s totally natural when you’re trying to bring high-quality **Italian comfort food at home**. I’ve gathered the most common things I hear so we can clear them up right here. Knowing these little science bits means you’ll feel super confident making this **quick chicken Parmesan** next time!
Can I use chicken thighs instead of breasts for this recipe?
Oh, absolutely! Chicken thighs are super flavorful, and honestly, they are a little more forgiving because they have more fat and are harder to overcook. If you use thighs, you need to make sure they are boneless and skinless, obviously, and pound them down to a similar thickness, maybe just a little thicker than the breasts, say three-quarters of an inch. Because they are fattier, they might render out a little more oil in the pan during that initial bake, which is totally fine. Just watch the time—you might need two or three extra minutes in the initial baking phase until they feel pretty firm before you top them with sauce. The goal is still that 165°F internal temperature, but they stay so juicy!
What is the best way to freeze this dish?
This is an excellent question for making sure you always have an **easy chicken dinner idea** waiting for you! The success of freezing depends entirely on *when* you freeze it. If you want the absolute best result when you reheat it, you should freeze the chicken *after* the first bake, but *before* adding sauce and cheese. After that initial 15-minute bake, let the cutlets cool completely, then you can stack them with parchment paper in between in a freezer-safe bag. That way, the Panko crust is set, but it hasn’t gotten soggy from the sauce!
When you want to eat them, just pull them out, let them thaw overnight in the fridge, brush them with sauce, top with cheese, and bake according to the original instructions. If you freeze them fully assembled—with sauce and cheese—they’ll still be tasty, but the crust will definitely suffer a little bit during the reheating process. For maintaining that crunch factor, pre-saucing freezing is the way to go for your next **cheesy chicken cutlets** meal!
Nutritional Estimates for This Dish
Okay, so let’s talk numbers. Because this recipe is built around simpler techniques and baking instead of deep frying, we actually manage to keep things surprisingly reasonable compared to big restaurant portions! Remember, these figures are based on the exact ingredient amounts in the recipe—serving size is one cutlet—and they can shift a bit depending on the brand of marinara sauce you choose or the exact thickness of your mozzarella slices. Think of this as your reliable baseline information!
Here’s what you can generally expect per serving, which covers one perfect piece of that **crispy breaded chicken breast**:
- Calories: Right around 550. Pretty solid for a hearty, satisfying meal, especially for a weeknight!
- Protein: We are clocking in at about 50 grams. That chicken breast really delivers, which keeps us feeling full and satisfied long after dinner.
- Fat: Roughly 25 grams total, with about 10 grams of that being saturated fat, mainly coming from the butter in the breading process (if you use butter instead of oil) and the wonderful mozzarella cheese.
- Carbohydrates: We’re looking at about 35 grams, most of which comes from the Panko breading and the natural sugars in the marinara sauce.
We keep the fiber relatively low at about 3 grams, as this isn’t loaded with vegetable bulk, but it ensures you get a tremendous flavor payoff with every bite. Knowing these numbers helps you plan the rest of your meal—maybe a big side salad is in order to boost those fiber stats next time!
Share Your Kitchen Alchemy
Now that you’ve transformed simple ingredients into this incredible, restaurant-quality **Easy chicken Parmesan**, I truly want to know how it turned out! That’s the heart of Alchemy Chef—watching the magic happen in *your* kitchen and knowing you nailed that crispy crust, even without the deep fryer. Did you manage to keep the cutlets perfectly crisp? Were your family members asking for seconds right away?
If this recipe brought a moment of joy or connection to your table tonight, please take a moment to leave a rating right here on the site! Five stars means the world to me and tells other busy cooks that yes, this **baked chicken parm recipe** is the reliable keeper they need. Head over to the comments section and drop your feedback!
More importantly, snap a picture! Tag us when you share your results on social media. Seeing your incredible spreads of **cheesy chicken cutlets** and perfectly plated Italian comfort food validates all the rigorous testing that goes into making these recipes foolproof. Let’s keep the joy of delicious transformation spreading—I can’t wait to see your versions!
PrintEasy Baked Chicken Parmesan

Make restaurant-quality chicken parmesan at home with this simple baked recipe. You get crispy, cheesy cutlets without the mess of deep frying.
- Prep Time: 15 min
- Cook Time: 23 min
- Total Time: 38 min
- Yield: 4 servings 1x
- Category: Dinner
- Method: Baking
- Cuisine: Italian
- Diet: Vegetarian
Ingredients
- 4 boneless, skinless chicken breasts, pounded to 1/2 inch thickness
- 1 cup all-purpose flour
- 2 large eggs, beaten
- 1 1/2 cups panko breadcrumbs
- 1/2 cup grated Parmesan cheese, plus more for topping
- 1 teaspoon dried oregano
- 1/2 teaspoon garlic powder
- 1/2 teaspoon salt
- 1/4 teaspoon black pepper
- 2 tablespoons olive oil
- 2 cups marinara sauce
- 8 ounces fresh mozzarella cheese, sliced
Instructions
- Preheat your oven to 400 degrees Fahrenheit. Lightly grease a baking sheet or line it with parchment paper.
- Set up a standard breading station: Place flour in one shallow dish. Whisk eggs in a second shallow dish. In a third shallow dish, combine panko breadcrumbs, 1/2 cup Parmesan cheese, oregano, garlic powder, salt, and pepper.
- Dredge each chicken cutlet first in the flour, shaking off excess. Dip it into the egg mixture, letting excess drip off. Finally, press the cutlet firmly into the breadcrumb mixture to coat both sides completely.
- Brush both sides of the breaded cutlets lightly with olive oil. Place them on the prepared baking sheet.
- Bake for 15 minutes.
- Remove the chicken from the oven. Spoon about 1/4 cup of marinara sauce over the top of each cutlet. Top each with slices of fresh mozzarella and a sprinkle of extra Parmesan cheese.
- Return the chicken to the oven and bake for another 5 to 8 minutes, or until the cheese is melted and bubbly and the chicken is cooked through (internal temperature reaches 165 degrees Fahrenheit).
- Serve immediately over your favorite pasta.
Notes
- For extra crispy results, you can briefly pan-sear the breaded cutlets in a hot skillet with a little oil for 1 minute per side before topping and baking.
- Use high-quality marinara sauce for the best flavor in this easy chicken dinner idea.
- If you prefer a thinner cutlet, slice the chicken breasts horizontally after pounding them.
Nutrition
- Serving Size: 1 cutlet
- Calories: 550
- Sugar: 8
- Sodium: 750
- Fat: 25
- Saturated Fat: 10
- Unsaturated Fat: 15
- Trans Fat: 0
- Carbohydrates: 35
- Fiber: 3
- Protein: 50
- Cholesterol: 150