
Oh, you’re craving that perfect throwback snack, aren’t you? Nothing screams ‘party ready’ quite like those cheesy, savory little bites that disappear the moment they hit the table. If you are looking for the definitive, tested, and true hanky panky recipe, you’ve landed in the right spot! I’m Juliana Cruz, and I combine my personal love for comforting food with my background in food science and professional recipe development. That means you get that nostalgic taste you remember, but with the absolute assurance that this recipe works perfectly—every single time. Forget guesswork; let’s make the best, most reliable retro appetizer you’ve ever had.
- Why This Classic Hanky Panky Recipe is Your New Favorite Easy Appetizer Recipe
- Ingredients for the Ultimate Hanky Panky Recipe
- Step-by-Step Instructions for Your Hanky Panky Recipe
- Tips for Success with This Cheesy Meat Bites Hanky Panky Recipe
- Make-Ahead and Storage for Your Retro Party Snacks
- Serving Suggestions for This Simple Crowd Pleaser
- Frequently Asked Questions About the Hanky Panky Recipe
- Estimated Nutritional Data for One Serving of Hanky Panky
- Share Your Perfect Hanky Panky Recipe Creations
Why This Classic Hanky Panky Recipe is Your New Favorite Easy Appetizer Recipe
I’ve developed hundreds of recipes over the years, but some classics just can’t be improved, only perfected. This specific hanky panky recipe is one of those golden standards. It’s not fussy, but it guarantees a massive smile from everyone who tries it, which is why I bring them to every family gathering.
Why will you instantly love this retro snack?
- It truly lives up to its name as an Easy Appetizer Recipe—minimal mixing required!
- These are the quintessential Retro Party Snacks that bring back floods of happy memories.
- The balance of salty sausage and sharp cheddar makes it an instant Simple Crowd Pleaser.
- They bake up fast, meaning less time fussing and more time enjoying the party.
Trust me, when I tested this one for a big New Year’s Eve crowd, they were gone before I even finished setting out the napkins.
Ingredients for the Ultimate Hanky Panky Recipe
When you’re making something this simple, quality matters, and I need you to trust exactly what goes into the mixing bowl. Since you’re planning your party spread, having all your components ready is the first step in making this hanky panky recipe smooth sailing! We’re sticking to the core components that make these Cheesy Meat Bites legendary.
Here is what you’ll need:
- 1 pound bulk pork sausage (I usually go for mild or medium)
- 1 (8 ounce) package cream cheese, make sure it’s softened!
- 1 cup shredded sharp cheddar cheese
- 1 teaspoon Worcestershire sauce
- 1/2 teaspoon onion powder
- 1/4 teaspoon garlic powder
- 1/4 teaspoon salt
- 1/8 teaspoon black pepper
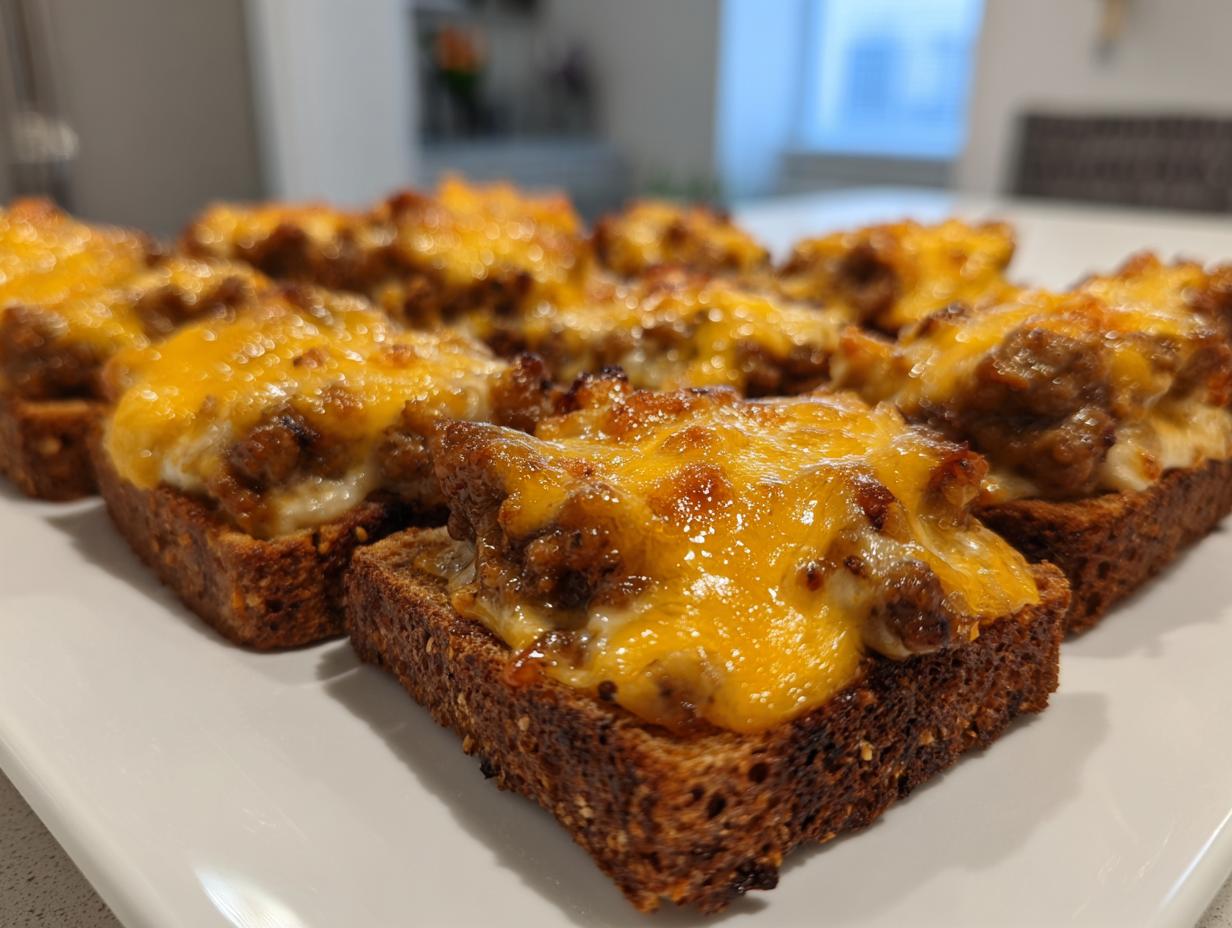
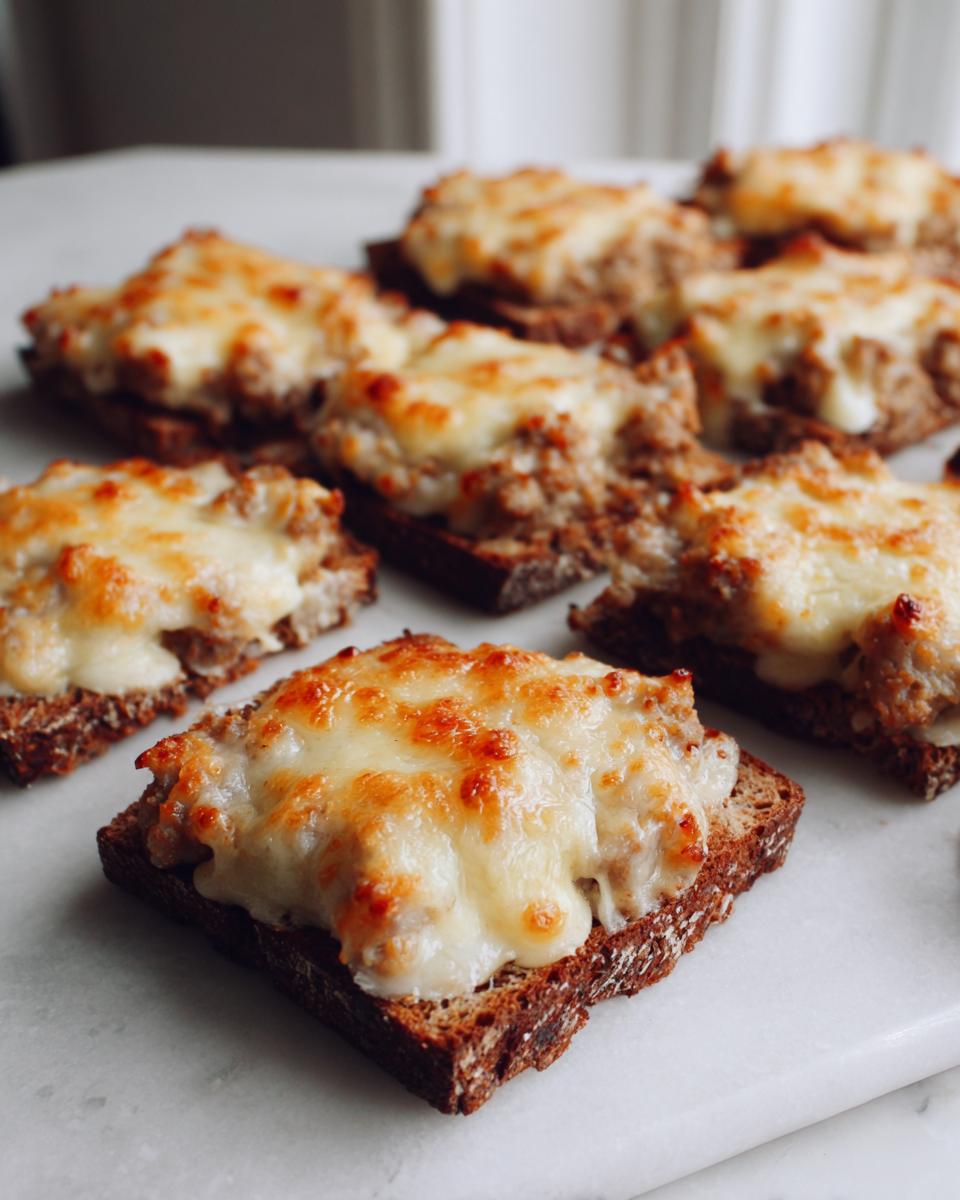
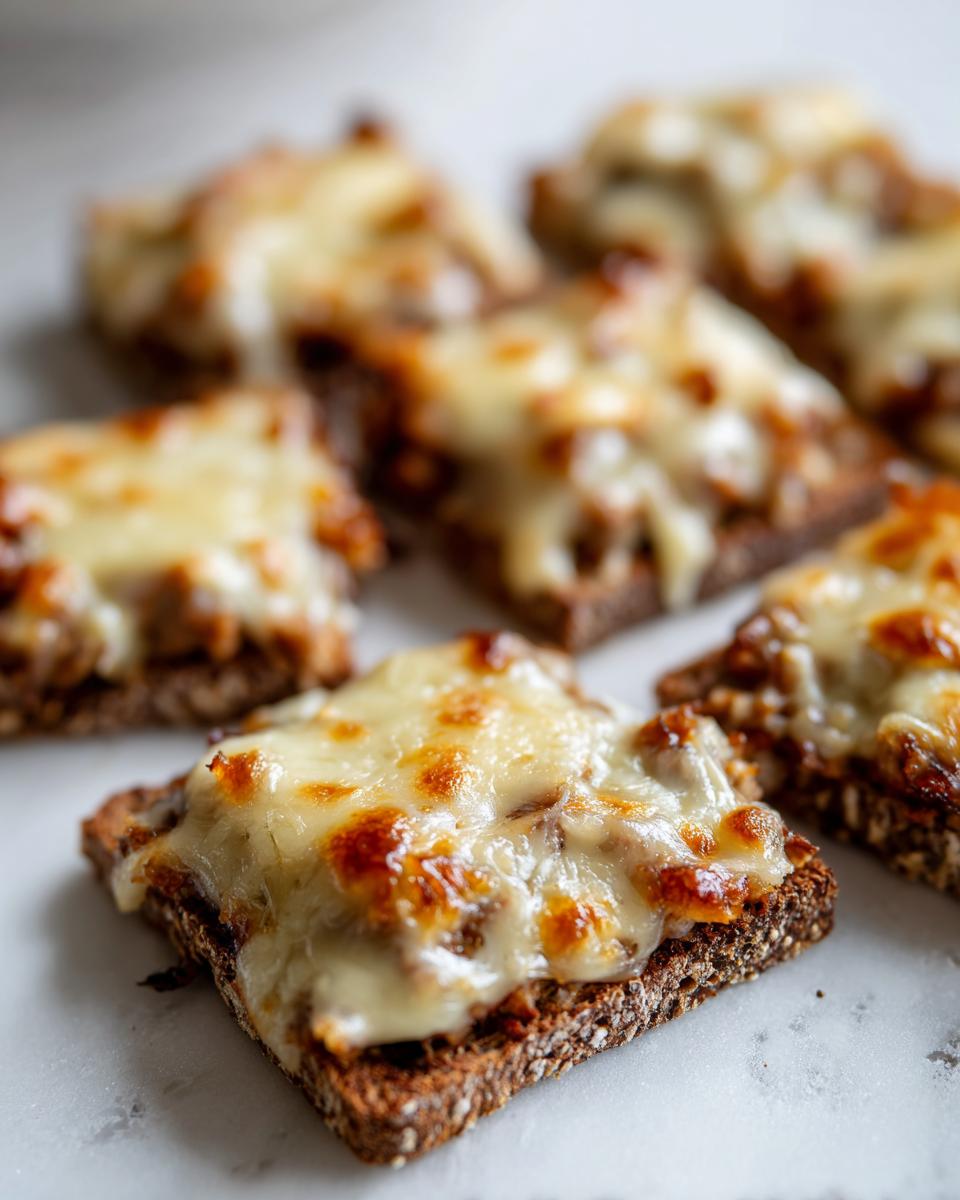
- 24 slices pumpernickel or rye bread
See? I told you it was easy! Having that cream cheese soft ahead of time is crucial for a smooth mix.
Step-by-Step Instructions for Your Hanky Panky Recipe
Now we get to the fun part! Baking these is so quick, I promise. Before you even grab your skillet, make sure your oven is preheated to 350 degrees Fahrenheit. Getting that oven ready first is vital so the little bread bases can toast up perfectly! Also, grease up a baking sheet—you don’t want any sticking when these come out hot.
Preparing the Cheesy Meat Mixture for the Hanky Panky Recipe
First things first: in your largest skillet over medium heat, cook the bulk pork sausage. Get in there and break it up really well as it browns. This next step is non-negotiable—you must drain off ALL the grease once it’s beautifully browned. Nobody wants a greasy appetizer! Pop the sausage back into the pan, but immediately reduce the heat down to low. Now, toss in that softened cream cheese, sharp cheddar, Worcestershire sauce, onion powder, garlic powder, salt, and pepper. Stir the mixture constantly until all the cheese has melted beautifully and everything is smooth. Once it’s all combined, you’ve created the hot appetizer filling for this hanky panky recipe!
Assembling and Baking Your Hot Appetizer Recipes
Lay your 24 slices of bread neatly onto that prepared baking sheet. Spoon an equal amount of that gorgeous, cheesy meat mixture right onto the center of each slice. I like to spread it carefully just to the edges so you get topping in every single bite. Bake these treasures for just 10 to 12 minutes. You’re looking for the cheese topping to be wonderfully bubbly and you want to see those edges of the bread getting just lightly toasted—that crunch is everything! Serve these Hot Appetizer Recipes immediately while they are still warm!

Tips for Success with This Cheesy Meat Bites Hanky Panky Recipe
When I’m developing professional recipes, I focus heavily on making sure the result is perfect under testing conditions, and these little Cheesy Meat Bites are no exception! The secret to that creamy, cohesive texture isn’t just the cream cheese; it’s how you handle the melt. Make sure you keep that heat low once the cheese goes in. If you rush it or cook it too high, the cheese can get oily instead of wonderfully smooth. I always personally check the mixture by lifting my wooden spoon—the mixture should coat the spoon evenly before it touches the bread.
Another tip I learned early on is that even though the recipe calls for sharp cheddar, using an extra-sharp variety gives the filling a much needed kick to balance the richness of the sausage and cream cheese. It’s all about that flavor complexity!
Ingredient Swaps for Your Hanky Panky Recipe
I know sometimes running to the store for bulk pork sausage isn’t possible, and that’s okay! This recipe is very forgiving, which is what makes it such a fantastic, Easy Appetizer Recipe. You absolutely can substitute ground beef for the pork sausage if that’s what you have on hand. Ground beef tends to be a bit leaner, so you might notice you have slightly less grease to drain, but the flavor outcome is still fantastic.
If you’re hosting vegetarians, you could potentially try substituting the sausage with a plant-based ground crumble, though I haven’t tested that blend myself! Also, I sometimes use onion salt instead of regular salt combined with the onion powder—it just deepens that savory quality a little bit. Just remember to adjust any other seasonings if you play around with the core ingredients.
Make-Ahead and Storage for Your Retro Party Snacks
Planning appetizers for a big party or potluck can be hectic, right? That’s why I love that you can totally cheat a little bit with this hanky panky recipe! We can absolutely prep these ahead of time, which saves so much stress on Game Day or when those holiday guests show up.
The best way to do this is to assemble everything *before* baking. Once you’ve spooned that perfect cheesy meat mixture onto every slice of pumpernickel, just arrange them on your baking sheet like you normally would. Cover that whole sheet tightly with plastic wrap—I like to do a double wrap just to be safe—and pop it right into the refrigerator. You can safely prep them like this up to 24 hours in advance!
When it’s time to serve these Retro Party Snacks, you need to adjust your cooking time slightly. Because they are cold going into the oven, you’ll need to bump that baking time up by about 3 to 5 extra minutes. You’re still aiming for that same bubbly center and lightly toasted edges, but just give them a little extra warmth to get there.
If you have any leftovers (which is unlikely, trust me!), they store beautifully. Keep the cooled appetizers in an airtight container in the fridge for up to three days. To reheat them and bring back that fresh-from-the-oven taste, I recommend using a regular oven or toaster oven at 350°F for about 5 minutes until they are warmed through and melty again. Microwaving tends to make the bread a little chewy, though if you are in a total rush, just zap one for about 15 seconds!
Serving Suggestions for This Simple Crowd Pleaser
So, you have these amazing, rich, cheesy, and savory bites ready to go—a true Simple Crowd Pleaser! Since the Hanky Panky filling is quite decadent, I always try to balance the rest of the platter with something light and crisp. Think about balancing the richness of the meat and cheese perfectly.
For drinks, I love serving these with something slightly acidic, like a Sauvignon Blanc or maybe even a dry, crisp hard cider. If you’re sticking to non-alcoholic options, some bubbly sparkling water with sliced cucumbers and mint looks elegant and cuts right through that melted cheese flavor.
On the food side, serve these alongside fresh vegetable crudités—carrots, celery, and bell peppers. The cool crunch of those veggies is the perfect contrast to the warm, soft bread and sausage filling. It makes the whole appetizer spread feel complete and thoughtful!
Frequently Asked Questions About the Hanky Panky Recipe
I always get so many questions when readers try out this incredible hanky panky recipe for the first time! It’s such a classic, and people want to make sure they nail that perfect retro vibe. Here are the most common things folks ask me when they are planning on making these Quick Cheese Appetizers.
What is the best bread to use for this Hanky Panky recipe?
Hands down, the most traditional and my personal favorite bread for this dish is pumpernickel. The slightly dense, earthy flavor of the Pumpernickel Appetizer really stands up to that rich meat and cheese filling beautifully, and it toasts up to a wonderful crisp edge while staying soft underneath. Rye bread is an extremely close second and works wonderfully if you prefer a bit more tang. You can use basic white bread in a pinch, but honestly, it gets a little floppy once it’s loaded up. Stick to pumpernickel or rye for the best structure!
Can I make this spicy?
You absolutely can! If you like a little heat, this is one of the easiest Easy Appetizer Recipe variations to play with. I suggest adding about a quarter teaspoon of cayenne pepper right into the cheese mixture when you add the garlic and onion powder. Or, if you want a deeper flavor boost, try swapping the garlic powder for a half teaspoon of actual minced garlic and cook it with the sausage! Another trick I love is using Pepper Jack cheese instead of, or mixed with, the sharp cheddar. Just taste it before you spoon it onto the bread!
Do I have to use pork sausage?
Nope! You do not have to use pork sausage in this hanky panky recipe. As I mentioned in my tips section, ground beef is a totally acceptable substitute, and many people prefer it for a bolder flavor. If you’re trying to keep things a bit lighter, ground turkey or even ground chicken works fine too! Just make sure you drain the fat really, really well from whatever meat you choose because, as we know, excess grease is the enemy of a good, crisp crust.

Estimated Nutritional Data for One Serving of Hanky Panky
As a food scientist, I believe in transparency, right down to the numbers! When I perfect a recipe, every detail is calculated, and that includes giving you an idea of what you’re enjoying. Now, remember, because we are using different brands of sausage, different types of cheese, and the exact amount of topping spread on each piece varies slightly when you assemble them, these figures are definitely estimates for one piece based on the recipe exactly as written.
These savory bites pack a punch of flavor, and that’s reflected in the macros here. If you are counting closely, you’ll want to look at the fat content, as that comes from the sausage and the cheese base of this hanky panky recipe.
For one serving (one appetizer bite), here is the estimated nutritional breakdown:
- Calories: 145
- Fat: 11g (with about 6g saturated fat)
- Protein: 8g
- Carbohydrates: 3g
- Sugar: Less than 1g
If you’re making these for a potluck and keeping track for guests, this gives you a solid baseline! They are full of satisfying protein and fat, making them a perfect, hearty snack for any gathering or your next Super Bowl party spread.
Share Your Perfect Hanky Panky Recipe Creations
Now, here’s the part I love the most! Seeing your kitchen transform into something magical—that’s the alchemy I live for. I put all my testing rigor into this hanky panky recipe so that you have total confidence, but I so truly want to hear how it turned out in *your* home.
Did you use pumpernickel like I suggested, or did you try a sourdough base? Did you add a sneaky bit of cayenne pepper? Please, if you loved this Classic Comfort Food take a second to click down below and give the recipe a star rating. Five stars mean the world to me and help other home cooks see that this recipe is reliable!
I spend a lot of time developing recipes that are both delicious and dependable, so please leave a comment telling me about your experience. If you snapped a picture of those golden, bubbly bites, tag me on social media! Seeing your successful spreads for Game Day or the holidays is my favorite reward. For more reliable recipes that bring that little bit of kitchen magic to your table, make sure you follow along. Happy cooking, everyone!
PrintClassic Hanky Panky Appetizer Recipe

Make this easy, retro Hanky Panky recipe featuring savory sausage, cream cheese, and cheddar baked on toasted bread slices. This simple crowd pleaser is perfect for game days or holiday appetizers.
- Prep Time: 15 min
- Cook Time: 12 min
- Total Time: 27 min
- Yield: 24 appetizers 1x
- Category: Appetizer
- Method: Baking
- Cuisine: American
- Diet: Vegetarian
Ingredients
- 1 pound bulk pork sausage
- 1 (8 ounce) package cream cheese, softened
- 1 cup shredded sharp cheddar cheese
- 1 teaspoon Worcestershire sauce
- 1/2 teaspoon onion powder
- 1/4 teaspoon garlic powder
- 1/4 teaspoon salt
- 1/8 teaspoon black pepper
- 24 slices pumpernickel or rye bread
Instructions
- Preheat your oven to 350 degrees Fahrenheit. Lightly grease a baking sheet.
- In a large skillet over medium heat, cook the bulk pork sausage, breaking it up as it cooks, until it is fully browned. Drain off all the grease.
- Return the cooked sausage to the skillet. Reduce the heat to low.
- Add the softened cream cheese, shredded cheddar cheese, Worcestershire sauce, onion powder, garlic powder, salt, and pepper to the sausage.
- Stir the mixture constantly until all the cheese is melted and the ingredients are fully combined into a smooth, cheesy meat mixture. This is your hot appetizer filling.
- Place the slices of bread on the prepared baking sheet.
- Spoon an equal amount of the cheesy meat mixture onto the center of each slice of bread. Spread the mixture evenly to cover the surface.
- Bake for 10 to 12 minutes, or until the cheese mixture is bubbly and the edges of the bread are lightly toasted.
- Serve these quick finger foods immediately while warm.
Notes
- You can substitute ground beef for the pork sausage if preferred for this cheesy meat bites recipe.
- For an extra layer of flavor, lightly toast the bread slices in the oven for 3 minutes before adding the topping.
- This recipe works well as a make-ahead option; assemble the appetizers completely, cover, and refrigerate for up to 24 hours. Add 3-5 minutes to the baking time if baking directly from the refrigerator.
Nutrition
- Serving Size: 1 bite
- Calories: 145
- Sugar: 0.5
- Sodium: 320
- Fat: 11
- Saturated Fat: 6
- Unsaturated Fat: 5
- Trans Fat: 0.1
- Carbohydrates: 3
- Fiber: 0.2
- Protein: 8
- Cholesterol: 35